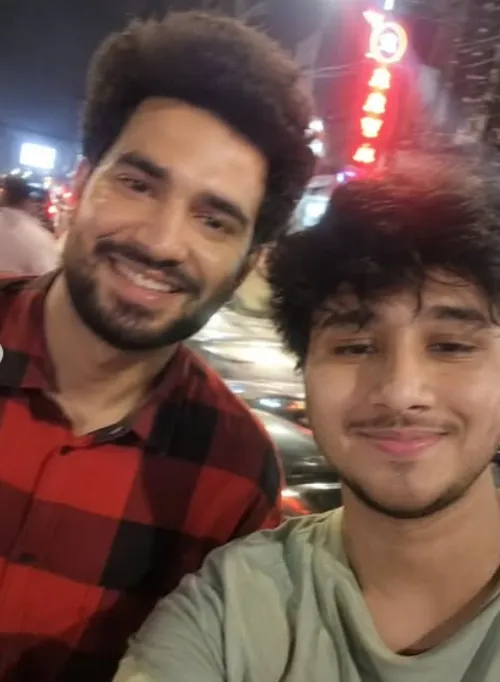
Photo with your fav celebrity
Om Editing Top Photo with Your Fav Celebrity: Yeh Style Kya Hai?
Om Editing Top type photo editing ka idea un logon ke liye perfect hai jo apni normal selfie ko celebrity-style fan moment me convert karna chahte hain. Is trend me goal hota hai ek aisi image banana jo natural bhi lage aur cinematic bhi ho, jaise aap real-life me apne favorite star ke saath ek random, candid moment me capture hue ho.
Read Also: cinematic-style realistic portrait | 2026 New Year
Ye style un users ke liye useful hai jo social media par unique DP, fan post, reel cover, ya Instagram story banana chahte hain. Isme focus polished studio shot par nahi, balki ek authentic, spontaneous, aur slightly imperfect vibe par hota hai. Isi wajah se yeh prompt style viral feel deta hai aur photo ko zyada real aur relatable bana deta hai.
Jo log mobile se AI photo editing, celebrity with me photo editing, ya realistic selfie generation try karna chahte hain, unke liye yeh concept kaafi useful hai. Aapko bas sahi reference photo aur sahi composition choose karni hoti hai, phir output ek casual street-style or night-time selfie jaisa lag sakta hai.
This Style Prompt Photo Me Kya Output Milta Hai?
Is type ki editing ka sabse bada feature hota hai realism. Photo me usually ordinary smartphone selfie jaisa feel aata hai, jisme perfect framing ke bajay natural imperfection hoti hai. Light thodi uneven ho sakti hai, background me neon ya street-lamp type glow aa sakta hai, aur overall mood candid, urban, aur spontaneous feel deta hai.
Visual tone mostly night scene, city vibe, ya busy public place jaisa hota hai. Background me blurred people, traffic lights, ya warm-cool mixed lighting photo ko depth deti hai. Face aur body pose ko bhi aise place kiya jata hai jaise aap aur celebrity ek hi frame me casual tarike se side-by-side khade hon.
Is style me composition deliberately loose rakha jata hai. Matlab shot over-posed ya overly edited nahi lagta, balki ek “quick accidental snap” wala effect deta hai. Yehi rawness photo ko interesting banati hai, especially agar aap fan edit, profile post, ya shareable social content create kar rahe ho.
- Natural-looking selfie vibe
- Candid celebrity interaction feel
- Night or street-light ambience
- Soft blur aur slight motion effect
- Messy but believable framing
- Realistic skin tones aur casual mood
This Style Photo Ko Use Kaise Karein: Step-by-Step Guide
Agar aap beginner hain, to tension lene ki zarurat nahi hai. Ye process mobile par bhi easily follow kiya ja sakta hai. Sabse pehle aapko ek clear aur face-visible photo select karni hoti hai. Uske baad AI editor ya photo generation tool me image upload karke style apply kiya jata hai.
Best result ke liye aapko prompt-based editing me sirf basic instructions follow karni chahiye. Image ko celebrity ke saath natural position me rakhna, lighting ko realistic banana, aur background ko busy but soft blur me dikhana important hota hai. Isse final image zyada believable lagti hai.
Mobile par kaam karte waqt slow aur step-by-step approach rakhna better hota hai, taaki face distortion ya over-editing na ho. Neeche simple process diya gaya hai jo almost har beginner follow kar sakta hai.
- Apni ek clear photo choose karein jisme face achchhi tarah visible ho.
- AI photo editor ya editing app open karke image upload karein.
- Celebrity-style reference ya fan edit mode select karein, agar available ho.
- Prompt/style apply karein aur output generation start karein.
- Result preview karke face, hands, aur background check karein.
- Agar image too bright ya too blurry ho, to regenerate ya slight adjustments karein.
- Final photo ko save karke Instagram, WhatsApp, ya profile use ke liye export karein.
Kaunsi Photos This Style Ke Liye Sabse Best Rehti Hain?
Best output tab aata hai jab input photo simple, clear, aur face-focused ho. Agar aapki image me subject properly visible hai to AI ko reference samajhne me aasani hoti hai. Full-body shots bhi chal sakte hain, lekin face detail aur posture clean hona chahiye.
Lighting bhi kaafi important hai. Soft daylight, indoor neutral light, ya thodi warm evening light achchhi rehti hai. Bahut dark photo, extreme backlight, ya overexposed image se face distortion ka risk badh jata hai. Background jitna clean hoga, result utna better control me aayega.
Clothing simple aur casual ho to zyada realistic look milta hai. Plain t-shirt, shirt, hoodie, ya everyday outfit celebrity fan-photo style ke saath natural lagta hai. Agar pose too stiff hoga to candid feel kam ho jayegi, isliye relaxed expression aur normal head angle useful hota hai.
- Angle: Slight front-facing ya mild side angle best hota hai
- Resolution: Clear, high-quality image use karein
- Lighting: Soft, even, aur natural light preferred hai
- Background: Simple background ho to face better stand out karta hai
- Clothing: Casual outfits zyada realistic lagte hain
- Expression: Normal, relaxed, aur natural face expression use karein
Pro Tips for the Best Results with Om Editing Top
To get the most natural and polished result from Om Editing Top, start with a clear source image of your face. Even though the final look can be casual and spontaneous, a sharper reference usually helps the edit keep your features more accurate and consistent. Good lighting in the original photo also makes a big difference, especially when you want the celebrity photo effect to look believable.
Another smart tip is to choose a reference style before editing. Decide whether you want the image to feel like a real selfie, a night street shot, a travel moment, or a soft indoor candid. When you keep that direction in mind, Om Editing Top works better for creating a balanced, realistic look instead of something that feels overly forced.
- Use a clear front-facing photo for better facial consistency.
- Pick one mood first, such as casual, cinematic, or nightlife.
- Keep the background idea simple so the main subject stays strong.
- Ask for realistic lighting, natural skin texture, and soft shadows.
- Test small changes in pose, camera angle, and setting for variety.
- Match the edit to the final platform, like Instagram, reels, or a thumbnail.
If you want even better results, try making tiny adjustments instead of changing everything at once. Small edits to expression, framing, or background energy can often create a much more convincing celebrity-style image. That is one of the biggest strengths of Om Editing Top: it can help you get a trendy result while still keeping the photo believable.
Common Mistakes to Avoid in This Style
One common mistake is using a low-quality source image. If the face is too blurry, dark, or cropped badly, the final output may lose important details. Since the goal is to create a clean and realistic celebrity photo edit, the base image should always be good enough for the model or editor to understand your features properly.
Another issue is overloading the request with too many visual ideas at once. When people ask for too many effects, poses, lighting styles, and background changes in one edit, the result can look confusing. Om Editing Top works best when the creative direction is focused, clear, and easy to follow.
- Using poor source quality: This can reduce face accuracy and make the output look less realistic.
- Adding too many style demands: Too many instructions can make the final image feel messy or inconsistent.
- Ignoring lighting balance: Uneven light can hide details and weaken the selfie effect.
- Forcing unnatural poses: Strange body angles often make the image look edited instead of real.
- Changing the subject too much: If the face loses its original identity, the photo no longer feels personal.
It is also better not to push the background too hard. A busy scene may look impressive for a moment, but if it distracts from the main subject, the image loses impact. The strongest results usually come from a good mix of simplicity, clarity, and natural composition.
Best Use Cases and Ideas for This Style
Om Editing Top is a great choice for social media images, especially when you want a fun “photo with your fav celebrity” style post. These edits work well for Instagram uploads because they look eye-catching, personal, and highly shareable. A realistic celebrity selfie can quickly grab attention in a feed filled with ordinary pictures.
It is also useful for profile pictures, story posts, and reel covers. If you want a picture that feels casual but still stands out, this kind of edit can give you a premium social look. Many people also use it for creative display pictures, fan pages, and themed content where a celebrity-inspired visual makes the profile more engaging.
Here are some of the best places to use this kind of image:
- Instagram feed posts for a trendy and eye-catching look
- Profile pictures that feel stylish and memorable
- Reels covers that need a strong visual hook
- Thumbnails for reaction videos, fan edits, or trend posts
- Portfolio samples for creative photo editing examples
- Story highlights or digital scrapbook-style memories
This style is especially effective when the image tells a story. A selfie with a celebrity feel can suggest a concert moment, an event photo, a travel memory, or a spontaneous night-out snapshot. That storytelling angle is exactly what makes Om Editing Top so useful for content creators and casual users alike.
Variations You Can Try with This Style
One of the best things about Om Editing Top is how easily you can change the mood of the final image. You do not have to stick to one version every time. Try experimenting with different lighting, color tones, and background settings so each edit feels fresh and unique. Even small changes can completely transform the personality of the photo.
For example, a warm golden look can make the image feel soft and friendly, while cooler tones can create a more cinematic or dramatic effect. You can also try different seasons, times of day, and location types to match the kind of story you want the photo to tell. This makes the edit feel more creative and more useful for different platforms.
- Mood variations: casual, dreamy, cinematic, glamorous, playful, moody
- Colour variations: warm tones, cool blue tones, vintage filters, soft pastel shades
- Setting variations: street lights, café background, party vibe, concert crowd, city night, studio-style blur
- Seasonal variations: summer brightness, rainy-night reflections, winter soft light, festive background energy
- Camera style variations: selfie angle, shoulder shot, wide candid frame, close portrait crop
You can also experiment with celebrity-style scene ideas. Some people may want a fan-event feel, while others may prefer a more private behind-the-scenes look. By mixing different variations, this style can give you multiple versions of the same concept without making the image repetitive.
Conclusion: Try This Style for a Fun Celebrity Photo Effect
This prompt is a simple and creative way to turn an ordinary photo into something exciting, trendy, and social-media ready. Whether you want a casual selfie look, a celebrity-style moment, or a polished image for your profile, this editing style gives you plenty of room to experiment.
If you want a photo that feels personal, realistic, and fun to share, now is the perfect time to try this look. Test different moods, angles, and settings, and see how quickly one image can become a standout post.
💬 Comments