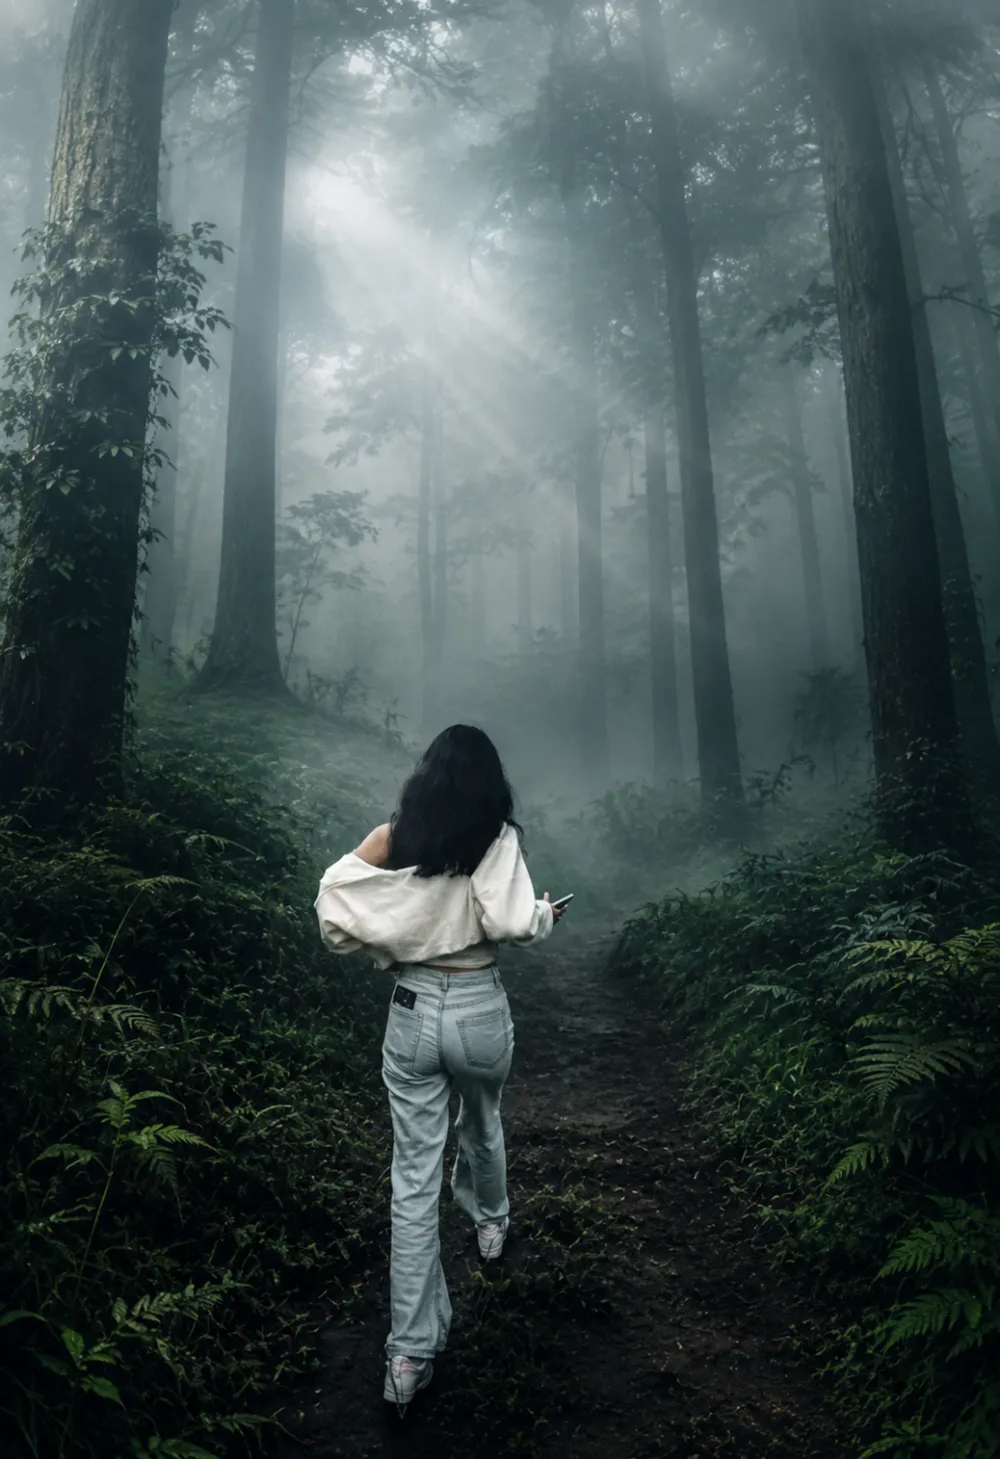
ultra-realistic foggy forest masterpiece
Om Editing Top के साथ ultra-realistic foggy forest masterpiece क्या है?
Om Editing Top style में बनाया गया ultra-realistic foggy forest masterpiece एक ऐसा visual effect है जिसमें साधारण image को dreamy, cinematic और hyper-real forest scene में बदल दिया जाता है। इस तरह का edit खासतौर पर उन लोगों के लिए useful है जो nature photography, moody wallpapers, fantasy visuals, social media posts, या premium-looking AI-generated edits बनाना चाहते हैं।
Read Also: cinematic-style realistic portrait | 2026 New Year
इस style की सबसे बड़ी खासियत है कि यह image को सिर्फ “foggy” नहीं बनाता, बल्कि पूरे scene में depth, mystery और realism जोड़ता है। पेड़ों के बीच घनी धुंध, soft light rays, forest tones और atmospheric perspective मिलकर ऐसा feel देते हैं जैसे कोई cold morning में DSLR से shot लिया गया real forest frame हो।
अगर आप photo editing, AI image enhancement, या mobile-based creative editing सीख रहे हैं, तो यह prompt-style especially useful है। इसमें lighting, color grading, detail enhancement और environmental mood—all-in-one visual transformation मिलती है, जिससे beginner भी professional-like result पा सकता है।
इस prompt/photo style से आपको क्या मिलता है?
जब आप इस तरह की editing use करते हैं, तो final image में natural fog layers, cinematic mood, और rich woodland texture साफ दिखाई देता है। दृश्य ऐसा लगता है जैसे forest के अंदर सुबह-सुबह हल्की ठंडक हो, हवा में नमी हो, और सूरज की किरणें पेड़ों के बीच से बहुत softly निकल रही हों।
Color grading भी इस style का बड़ा हिस्सा है। Deep emerald green, moss green, dark teal और earthy brown shades मिलकर image को realistic और premium look देते हैं। इससे trees ज्यादा dense लगते हैं, foliage ज्यादा alive महसूस होती है, और background naturally mist में fade होकर depth create करता है।
यह style उन images में सबसे अच्छा काम करता है जहाँ composition open ho, background में natural elements हों, और subject clear हो। Output सामान्य edit से कहीं ज्यादा immersive लगता है क्योंकि इसमें HDR-like clarity, balanced contrast, sharp textures, और soft cinematic lighting का combination मिलता है।
- Dense natural fog for mystery and depth
- Soft volumetric light rays for cinematic realism
- Forest-inspired color palette with green and earthy tones
- Ultra-high-definition detail enhancement
- Moody woodland atmosphere with dreamy mist layers
This Style में इसे step-by-step कैसे use करें?
अगर आप beginner हैं और mobile पर काम कर रहे हैं, तो भी यह style use करना आसान है। सबसे पहले ऐसी photo चुनें जिसमें forest, trees, nature background, या outdoor scenery हो। फिर अपनी editing app, AI image tool, या photo enhancer में image upload करें और Om Editing Top style के अनुसार atmospheric forest effect apply करें।
Second step में fog intensity को धीरे-धीरे increase करें। एकदम heavy fog लगाने से subject छिप सकता है, इसलिए पहले medium level से शुरू करें और preview देखकर adjust करें। उसके बाद color tone को cool और natural रखें, ताकि white fog के साथ green forest colors balanced दिखें।
Final step में detail enhancement और sharpness control करें। Leaves, branches, tree trunks, और background shadows को थोड़ा refine करें, लेकिन इतनी sharpening न करें कि image artificial लगे। Mobile users को हमेशा before/after compare करना चाहिए ताकि realism बना रहे।
- एक clear forest या outdoor photo चुनें।
- Image को editing tool में upload करें।
- Fog effect या mist layer apply करें।
- Green, teal, and earthy tones के साथ color grading करें।
- Volumetric light rays या soft light enhancement add करें।
- Contrast, shadows, और highlights को balance करें।
- Final preview देखकर export करें।
अगर आपकी app में separate sliders हैं, तो exposure को थोड़ा low रखें, shadows को soft करें, और clarity को moderate level पर रखें। इससे fog ज्यादा natural लगेगी और forest scene cinematic बनेगा।
Which photos This Style के लिए सबसे अच्छे हैं?
इस style के लिए सबसे अच्छे photos वे होते हैं जिनमें background खुला हो और natural elements ज्यादा हों। Forest trails, tree-lined paths, mountain woods, misty fields, या dense greenery वाली images बहुत अच्छा result देती हैं। अगर photo में already soft light है, तो edit और भी realistic लगेगा।
Angle भी बहुत important है। Eye-level या slightly low-angle shots इस style में ज्यादा dramatic दिखते हैं क्योंकि fog और tree height दोनों का effect बेहतर आता है। बहुत close-up face shots की बजाय wide or medium-wide composition बेहतर रहती है, ताकि environment पूरी तरह दिख सके।
Resolution high होनी चाहिए, ideally clear and sharp image, ताकि fog add करने के बाद भी details visible रहें। Clothing भी scene के mood से match करनी चाहिए—dark, neutral, earthy, or outdoor-friendly colors ज्यादा suitable होते हैं। Bright neon outfits इस style के साथ natural नहीं लगते।
- High-resolution photo with visible detail
- Wide or medium-wide forest composition
- Natural lighting, preferably morning or cloudy light
- Simple background with trees, foliage, or misty nature
- Neutral, earthy, or dark clothing tones
- Less cluttered frame for better cinematic depth
अगर background already busy है, तो edit के बाद image भारी लग सकती है। इसलिए clean composition वाली photo चुनना बेहतर है। ऐसे photos में fog layers, light rays, और forest grading ज्यादा naturally blend होते हैं, जिससे final result truly premium लगता है।
Pro Tips for the Best Results with Om Editing Top
Om Editing Top works best when you guide it with a clear visual direction instead of keeping the idea too broad. For a foggy forest look, the strongest results usually come from giving the editor a strong mood, a defined color palette, and a realistic lighting style. That helps the final image feel cinematic, premium, and natural rather than overly processed.
If you want the most convincing output, think like a photographer. Decide whether the scene should feel calm, mysterious, dramatic, or dreamy, and keep that feeling consistent across the whole edit. Small details like the density of the fog, the softness of the light, and the balance between dark trees and bright mist can completely change the final atmosphere.
- Use clear descriptive words for mood, like misty, moody, cinematic, or enchanted.
- Ask for realistic lighting so the forest looks natural and not overexposed.
- Keep the color grading grounded in nature with greens, browns, and muted shadows.
- Prefer depth-related terms such as atmospheric perspective, layered fog, and soft light rays.
- Choose high-detail phrases when you want sharper foliage, textured bark, and rich background depth.
- If the image has people or objects, make sure they blend naturally into the forest scene.
Another useful tip is to stay consistent with the visual theme. If you want a cold morning forest, don’t mix in bright summer colors or sunny tropical tones. The more aligned your instructions are, the more polished and believable the final result will look with Om Editing Top.
Common Mistakes to Avoid in This Style
One of the biggest mistakes is overloading the edit with too many conflicting ideas. If you ask for ultra-realistic fog, bright neon colors, golden sunset light, and heavy fantasy effects all at once, the result can feel messy. Om Editing Top performs better when the style direction is focused and the atmosphere is easy to understand.
Another common issue is pushing the image too far into artificial enhancement. When contrast, saturation, or sharpness becomes excessive, the forest may lose its natural look. The goal is to create a premium cinematic edit that still feels like a real photograph, not a digital poster.
- Don’t mix too many moods in one prompt, because the final image can look confused and uneven.
- Don’t exaggerate colors too much, or the forest will stop feeling realistic.
- Don’t forget lighting direction, since realistic shadows and highlights are essential.
- Don’t make the fog too heavy everywhere, or important details can disappear completely.
- Don’t use vague wording only, because the output may become generic instead of cinematic.
- Don’t ignore texture detail, especially on trees, leaves, and background layers.
A cleaner approach usually gives a better result than a heavily crowded one. With Om Editing Top, simple and precise visual guidance often produces stronger depth, better balance, and a more professional finish.
Best Use Cases and Ideas for This Style
This style can be used in many creative ways beyond just a dramatic forest wallpaper. The foggy woodland style is especially effective for social media visuals because it feels premium, emotional, and attention-grabbing. It works well when you want your image to stand out without looking too flashy.
This type of edit is also a great fit for profile pictures, cover art, and personal branding visuals when you want a mysterious or artistic mood. Since the scene is nature-based and cinematic, it can be adapted for different platforms while still keeping a strong visual identity.
- Instagram posts: Great for aesthetic feeds, nature themes, and moody visual storytelling.
- Profile pictures: Useful for creating a refined, mysterious, and artistic impression.
- Thumbnails: Helps nature, travel, or cinematic content look more clickable and polished.
- Portfolios: Ideal for showcasing editing skills, AI art style, or conceptual photography work.
- Reels covers: Makes short-form content feel more cohesive and visually premium.
You can also use this style for wallpapers, blog banners, nature-inspired posters, and creative mood boards. If your content needs a calm yet dramatic background, this prompt can turn a simple image into something that feels immersive and story-driven.
Variations You Can Try with This Style
One of the best things about this look is how easily you can experiment with different versions of the same idea. The base concept of a foggy forest can be adjusted to feel colder, warmer, darker, softer, or more magical depending on the mood you want. This makes it useful for testing multiple creative directions from one image.
You can shift the feeling of the forest by changing the color palette, time of day, season, or intensity of the mist. A winter version may feel quiet and icy, while an autumn version can look richer and more emotional. These small changes help the final image feel fresh every time.
- Moody version: Darker tones, thicker fog, and deeper shadows for a dramatic look.
- Dreamy version: Softer light, lighter mist, and gentle tones for a more peaceful feel.
- Autumn version: Add warm brown, amber, and muted orange tones for a seasonal forest vibe.
- Winter version: Use colder greys, icy whites, and muted greens for a frosty atmosphere.
- Dawn version: Introduce subtle sunrise light for a soft, hopeful morning scene.
- Deep forest version: Make the canopy denser with more shadows and layered vegetation.
You can also try variations based on camera style, such as wide-angle forest photography, portrait framing, or close-up woodland detail. Yeh style gives you a flexible creative base, so it’s easy to explore different looks without losing the cinematic quality of the scene.
Conclusion: Try This Style for a Cinematic Forest Look
This edit is a powerful choice when you want to create an ultra-realistic foggy forest masterpiece with depth, mood, and cinematic detail. The key is to keep the atmosphere consistent, use natural colors, and focus on realistic lighting so the final result feels immersive and premium.
If you want a forest edit that looks professional, mysterious, and visually rich, this style is a great style to experiment with. Try different moods, seasons, and lighting variations to discover the version that best fits your creative vision.
💬 Comments