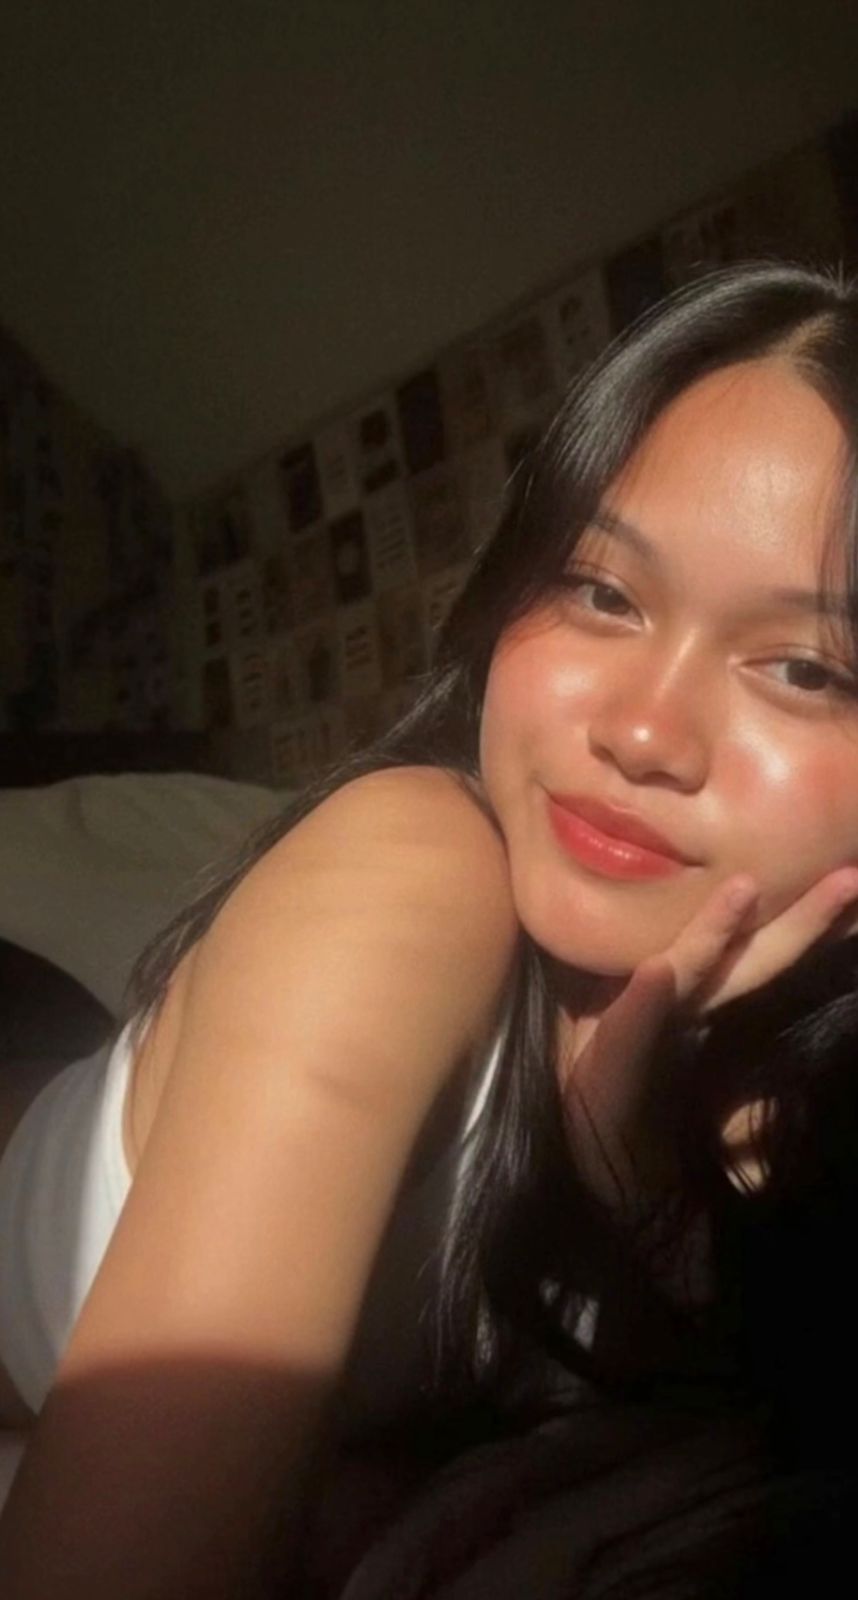
Ethereal Filter HDR
Om Editing Top ke saath Ethereal Filter HDR ka intro
Om Editing Top style mein Ethereal Filter HDR ka use un creators ke liye perfect hai jo apni photos ko soft, cinematic aur premium digital-camera look dena chahte hain. Yeh editing style zyada flashy nahi hota, lekin isme ek subtle charm hota hai jo image ko instantly classy bana deta hai.
Read Also: cinematic-style realistic portrait | 2026 New Year
Is type ka filter un logon ke liye useful hai jo portrait, selfie, fashion photo, ya mood-based aesthetic shots ko ek polished feel dena chahte hain. Agar aap mobile se editing karte ho, to bhi yeh look easily recreate kiya ja sakta hai, bas light, shadows aur color balance ka sahi use aana chahiye.
Ethereal Filter HDR ka main goal photo ko over-edit kiye bina usme depth, softness aur realism add karna hota hai. Isme subject ka natural look preserved rehta hai, jabki overall frame mein cinematic atmosphere aa jata hai. Isi wajah se yeh style beginners se lekar advanced editors tak sabke liye popular hai.
This Style Ethereal Filter HDR se aapko kya look milta hai
Is style ka output usually soft yet dramatic hota hai. Light aur shadow ka balance photo ko ek dreamy mood deta hai, aur skin tones zyada warm, luminous aur natural lagte hain. Result aisa hota hai jaise image ko early-2000s compact camera ya premium casual fashion shoot se capture kiya gaya ho.
Colour palette mein pastel softness, muted highlights aur warm whites ka feel aata hai. Contrast normal se thoda stronger hota hai, lekin black crush ya harsh oversaturation nahi hoti. Yeh look especially tab achha lagta hai jab background simple ho aur subject clearly visible ho.
Visual terms mein, aapko generally yeh elements milte hain:
- Top-left direction se soft lighting ka feel
- Gentle shadows jo face aur body contours ko define karte hain
- Natural skin texture with minimal retouching
- Subtle grain jo image ko film-like banata hai
- Dreamy, quiet aur intimate mood
- Clean composition jahan subject main focus rahta hai
This Style Ethereal Filter HDR ka use kaise karein
Agar aap beginner ho aur mobile par editing kar rahe ho, to sabse pehle ek aisi photo choose karo jisme subject ka face clear ho aur motion blur kam ho. Uske baad image ko app mein open karke brightness, contrast aur shadows ko gently adjust karo. Goal ye hona chahiye ki photo realistic lage, fake HDR jaisa heavy nahi.
Next step mein highlights ko thoda soften karo aur warmth ko slightly increase karo. Agar skin tone dull lag rahi ho, to peachy aur luminous feel dene ke liye temperature ko halka sa warm side pe le ja sakte ho. Grain add karna optional hai, lekin very subtle grain image ko authentic aur aesthetic bana deta hai.
Step-by-step easy guide:
- Apni best quality photo select karo, preferably clear portrait ya fashion shot.
- Editor app mein image open karke crop ko original composition ke aas-paas rakho.
- Exposure ya brightness ko very slightly adjust karo, taaki natural light feel aaye.
- Contrast ko moderate rakho; shadows ko soft but visible banayein.
- Warmth aur color tone ko gently tweak karo for pastel cinematic effect.
- Sharpness ko overdo mat karo, sirf clarity maintain karo.
- Finally subtle grain ya texture add karke export karo.
Agar aap AI-based prompt workflow use kar rahe ho, to same logic follow hota hai: original subject, pose aur background ko preserve rakhna, aur sirf style transformation apply karna. Yeh especially tab useful hota hai jab aap multiple portraits ko ek consistent aesthetic mein convert karna chahte ho.
This Style ke liye kaunsi photos best work karti hain
Is filter style ke liye best photos woh hoti hain jisme face clearly visible ho aur light source natural lage. Window light, outdoor shade ya soft indoor light is look ke saath bahut achha match karti hai. Agar light top-left ya side se aa rahi ho, to photo mein already cinematic depth ban jaati hai.
Background simple ho to result aur better aata hai. Cluttered background mein Ethereal HDR ka subtle effect lost ho sakta hai. Clothing ke liye plain, neutral ya soft-toned outfits—jaise white, beige, pastel blue, light pink, grey—zyada elegant feel dete hain. Heavy patterns ya neon colors is aesthetic ko distract kar sakte hain.
Practical photo tips:
- Angle: Slight front-facing ya 3/4 angle portraits best hote hain
- Resolution: High-resolution photo use karo taaki detail preserve rahe
- Lighting: Soft natural light, harsh flash se better
- Background: Clean wall, window light, room corner, ya outdoor minimal scene
- Clothing: Solid colors aur soft fabrics best rehte hain
- Expression: Calm, neutral ya thoughtful expression mood ko strong banata hai
Agar face ya hair already blur ho, to result utna clean nahi aayega. Isliye image select karte waqt clarity sabse important hai. Jitni better base photo hogi, utna hi polished aur realistic Om Editing Top Ethereal Filter HDR output milega.
Pro tips for the best results with Om Editing Top
To get the cleanest and most eye-catching Om Editing Top result, start with a photo that already has decent lighting and a clear face. Since this style works best when the subject stays natural and realistic, a sharp source image will help the final edit look more polished and less forced.
Try to choose photos where the subject is facing the camera clearly, with simple background distractions kept to a minimum. The more balanced the original frame is, the easier it becomes to create that soft cinematic look without losing detail. If you want a stronger fashion-style output, pick images with confident posture and visible facial features.
- Use a high-resolution photo so the final output stays crisp and detailed.
- Prefer natural light or soft indoor light instead of harsh flash.
- Keep the subject centered or slightly off-center for a more editorial feel.
- Choose images with simple, uncluttered backgrounds for cleaner results.
- Use one clear subject so the edit keeps focus and does not feel crowded.
- If available, upscale the image after editing for sharper skin texture and finer contrast.
Another useful tip is to match the photo with the mood you want. If you want the result to feel more dreamy, select a softer portrait. If you want it to feel more bold and magazine-like, use a frame with stronger expression and more defined shadows. This makes Om Editing Top more flexible for different content styles.
Common mistakes to avoid in This Style
One of the biggest mistakes is using a blurry or low-quality image and expecting the edit to look premium. When the starting photo is weak, the final result can lose detail in the face, hair, and background. A better source image almost always creates a better outcome.
Another common issue is over-editing. If the image becomes too saturated, too smooth, or too contrast-heavy, the natural cinematic feel disappears. The best Om Editing Top edits usually keep skin texture, realistic tones, and subtle lighting details intact.
- Do not use heavily cropped images, because important facial details may get lost.
- Avoid photos with extreme motion blur, since the final edit may still look soft or unclear.
- Do not overload the background with too many objects, as it reduces visual impact.
- Avoid unnatural color choices that clash with the soft vintage-style mood.
- Do not over-sharpen the face, because it can make the image look artificial.
It is also important not to change the original subject too much. When the face, hair, and pose stay consistent, the edit feels more authentic and usable. That balance is what makes this style effective for people who want a polished but natural result.
Best use cases and creative ideas for This Style
The Om Editing Top style works really well for Instagram posts because it creates a clean, cinematic, and scroll-stopping look. It is ideal for portraits, fashion shots, travel memories, and aesthetic profile content where you want the image to feel stylish without looking overdone.
You can also use this style for profile pictures when you want a soft yet premium presence. The warm tones and realistic finish make the image look friendly and polished at the same time. For creators, this can be especially useful when building a consistent visual identity across social platforms.
- Instagram posts: Great for aesthetic feeds, portrait dumps, and trendy photo posts.
- Profile pictures: Useful for personal branding, creator accounts, and stylish bios.
- Thumbnails: Helps make YouTube or blog thumbnails look more cinematic and clickable.
- Portfolios: Good for model shots, creative portfolios, or editorial-style showcases.
- Reels covers: Works well for consistent cover designs with a polished visual theme.
If you want to go beyond social media, this look can also be used for digital albums, mood boards, wallpapers, and personal branding assets. Because Om Editing Top keeps the subject natural while improving the atmosphere, it fits both casual and professional use cases.
Variations you can try with This Style
One of the best things about this style is that you can experiment with different moods while keeping the same overall style. Small changes in tone, color, and lighting can completely change how the final image feels. That makes it easy to create multiple versions from one photo.
You can try a softer pastel version for a dreamy look, or a richer warm version for a more cinematic fashion feel. Seasonal adjustments also work well, such as cooler tones for rainy-day aesthetics or golden highlights for summer portraits. These variations help you build a more versatile content library.
- Mood variations: dreamy, moody, romantic, confident, nostalgic, editorial.
- Colour variations: warm beige, peach tones, muted pastels, soft gold, cool blue shadows.
- Setting variations: indoor window light, outdoor daylight, city background, bedroom portraits.
- Season variations: summer glow, rainy softness, autumn warmth, winter coolness.
You can also try changing the amount of contrast or grain depending on the platform. For Instagram, a slightly stronger cinematic finish can stand out better. For profile photos, a cleaner and softer version may be more suitable. This makes this prompt useful for many different personal styles.
Conclusion: try This Style for a cinematic everyday look
this look is a simple but powerful way to turn an ordinary photo into something soft, stylish, and visually memorable. It keeps the subject natural while adding the kind of cinematic atmosphere that works beautifully for modern social media and personal branding.
If you want portraits that feel warm, polished, and a little editorial, this style is worth trying. Experiment with different lighting, moods, and color tones, and you will quickly see how flexible yeh style can be for Instagram, profile pictures, thumbnails, and more.
💬 Comments