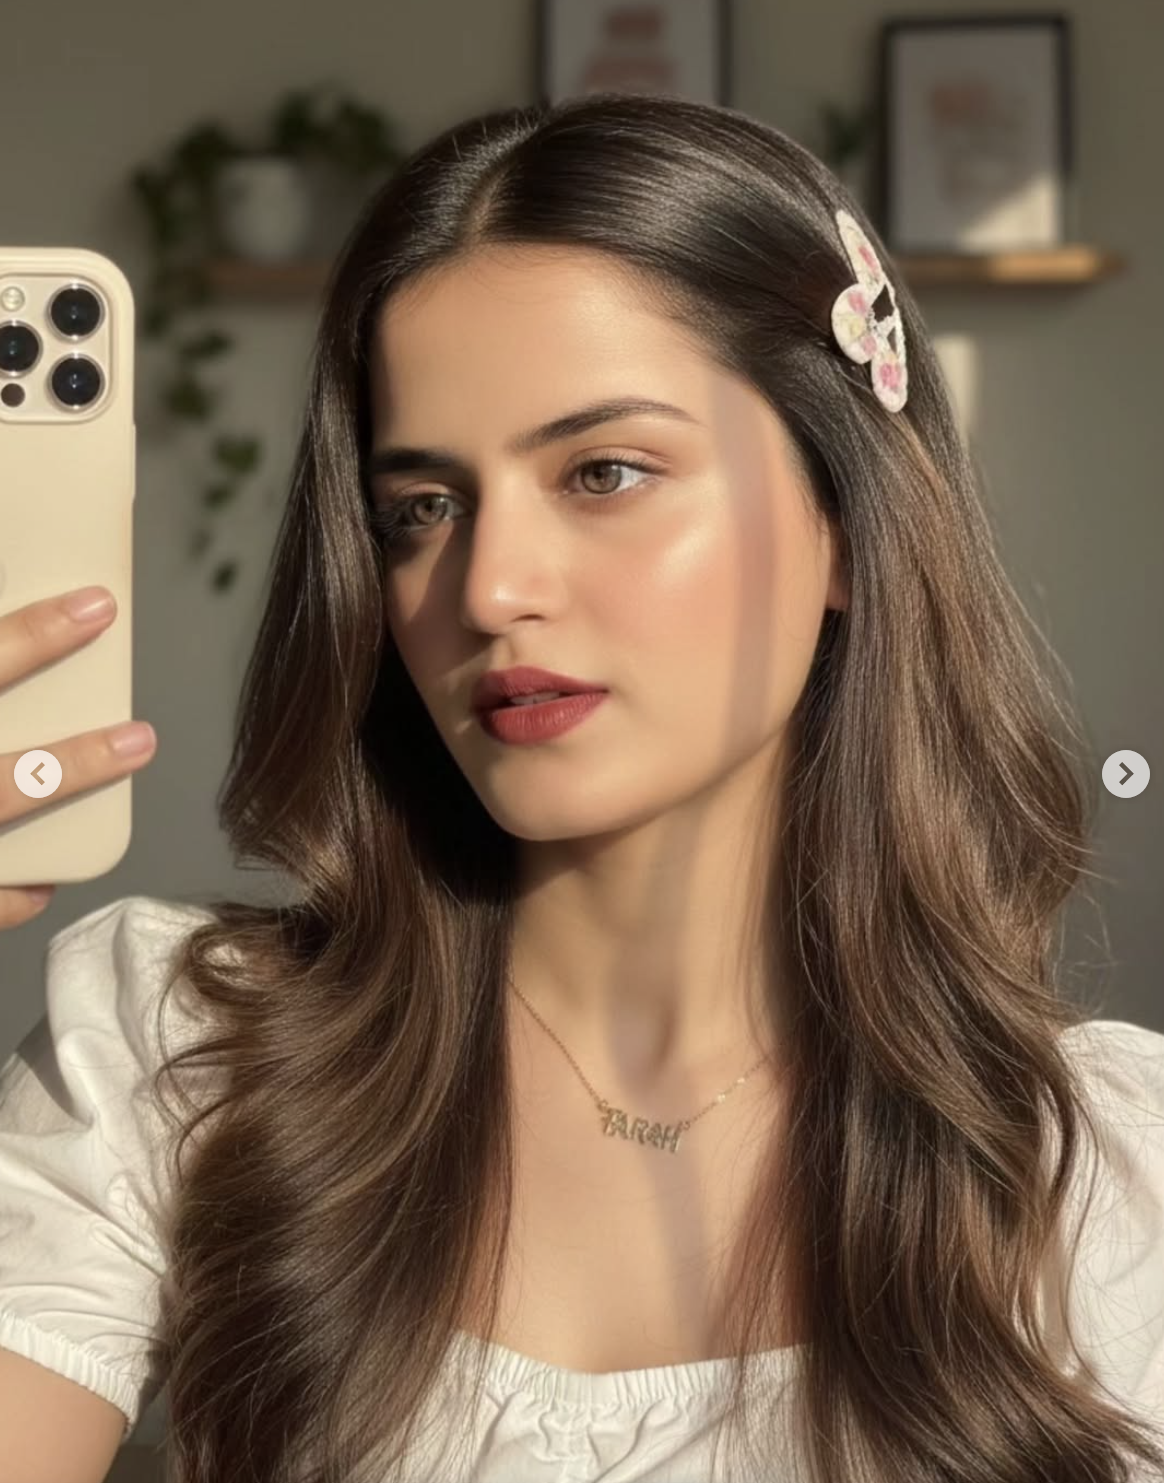
Girl with iphone
Om Editing Top kya hai aur Girl with iphone style kis liye use hota hai?
Om Editing Top style ka idea un logon ke liye bahut useful hai jo apni normal photo ko ek polished, aesthetic aur social-media-ready look dena chahte hain. “Girl with iphone” type edit usually close-up selfie feel, soft beauty enhancement, natural face preservation, aur stylish room aesthetic ko combine karta hai. Is tarah ka edit un users ke liye perfect hota hai jo apni original identity ko same rakhte hue photo ko zyada clean, bright, and premium dikhana chahte hain.
Read Also: cinematic-style realistic portrait | 2026 New Year
Is kind of prompt ya photo style ka main goal hota hai image ko natural rakhte hue usme fashion, lighting, and mood ka strong effect add karna. Yani face change nahi hota, lekin overall frame zyada attractive lagta hai. Aaj kal reels, profile pictures, Instagram posts, aur personal branding ke liye aise edits bahut popular hain, kyunki ye simple selfie ko modern portrait look de dete hain.
This Style photo style aapko actually kya deta hai?
Is style me sabse pehle jo cheez notice hoti hai woh hai lighting. Bright morning sunlight ya strong directional light image me crisp shadows create karti hai, jis se face aur hair dono me depth aati hai. Ye effect photo ko flat hone se bachata hai aur use cinematic, fresh, aur high-end feel deta hai. Brown hair, natural skin tones, aur soft room background milkar ek aesthetic indoor portrait look banate hain.
Composition bhi is style ka important part hai. Close-up selfie framing, subject ka camera ki taraf dekhna, aur clean background milkar focus sirf face aur outfit par rakhta hai. White puff-sleeve top, gold necklace, aur floral hairpin jaise details image ko feminine, elegant aur trendy banate hain. Overall result ek aisa portrait hota hai jo natural bhi lagta hai aur edited bhi, bina overdone feel ke.
Ye style in cheezon par zyada depend karta hai:
- Natural realism: face same rehta hai, features artificial nahi lagte
- Soft but strong light: highlights aur shadows balance me hote hain
- Aesthetic mood: room, outfit aur accessories photo ko classy banate hain
- Clean close-up composition: attention subject par hi rehta hai
- Stylish details: necklace, hairpin, and clothing photo ko character dete hain
This Style ko mobile par kaise use karein: step-by-step guide
Agar aap beginner hain aur mobile se edit karna chahte hain, to sabse pehle apni best selfie ya portrait photo select karein. Aisi image choose karein jisme face clear ho, blur na ho, aur lighting already thodi decent ho. Is style me original photo ki quality bahut matter karti hai, kyunki edit ka final look mostly input image par depend karta hai.
Uske baad editing app ya AI tool me image upload karein aur prompt/style apply karein. Dhyan rahe ki face ko preserve karne wala option on ho, taaki identity same rahe. Agar app me strength, beauty, sharpen, ya realism controls milte hain, to unhe moderate level par rakhein. Bahut zyada enhancement se skin unnatural lag sakti hai aur selfie ka real feel khatam ho sakta hai.
Beginner-friendly process ye raha:
- Apni best quality selfie ya close-up portrait select karein.
- Photo me face seedha aur clear ho, ye check karein.
- Editing app ya AI editor open karke image upload karein.
- Face-preservation ya identity-lock setting ko enable karein.
- Style/ prompt apply karein jo close-up portrait, morning light, aur aesthetic room look deta ho.
- Result preview karein aur agar zarurat ho to brightness ya contrast thoda adjust karein.
- Final image ko high resolution me save karein.
Mobile par kaam karte waqt ye yaad rakhein ki small edits best hote hain. Jaise hi aap over-edit karte hain, skin texture unnatural ho sakti hai. Is style ka charm hi isi me hai ki photo fresh aur realistic lage, na ki over-smoothed ya plastic.
Kaunsi photos This Style ke liye sabse best kaam karti hain?
Is type ki editing ke liye sabse achhi photo wahi hoti hai jisme face close-up ya medium close-up frame me ho. Selfie angle thoda natural hona chahiye, jaise front camera se li gayi ek candid shot. Face agar camera se directly thoda sa angled ho to shadows aur hair detail aur bhi achhe dikhte hain. Bilkul dark ya heavily cropped photo se result utna strong nahi aata.
Lighting par bhi dhyan dena zaroori hai. Bright daylight, window light, ya soft morning sunlight sabse suitable hoti hai. Background simple ho to better hai, jaise clean room, plain wall, ya aesthetic indoor corner. Agar background cluttered hoga to final edit ka premium feel kam ho sakta hai. Clothing bhi important hai—white, pastel, ya soft-tone outfits close-up portrait me zyada elegant lagte hain.
Best results ke liye ye practical points follow karein:
- Angle: front-facing ya slight side angle selfie sabse achhi hoti hai
- Resolution: high-resolution image use karein, taaki details clear rahein
- Lighting: natural sunlight ya bright directional light prefer karein
- Background: clean, aesthetic, aur distraction-free ho
- Clothing: puff-sleeve tops, soft fabrics, ya light colors zyada suit karte hain
- Accessories: necklace, hairpin, ya minimal jewelry portrait ko enhance karti hai
- Expression: calm, confident, aur natural expression best lagti hai
Agar aap photo ko seriously premium banana chahte hain, to original image ko pehle hi thoda polished rakhna useful hota hai. Clean hair, balanced exposure, aur simple background ke saath Om Editing Top style zyada effective ho jata hai. Is tarah final output me realism aur beauty dono ka balance ban jata hai, jo is edit style ki sabse badi strength hai.
Om Editing Top के लिए Pro Tips: Best Results कैसे लें
अगर आप Om Editing Top style में सबसे अच्छा result चाहते हैं, तो सबसे पहले image की base quality strong होनी चाहिए। साफ face, proper lighting, और stable selfie angle editing को और natural बनाते हैं। जब source photo already balanced होती है, तब close-up portrait का aesthetic effect ज्यादा polished दिखता है और final output भी realistic लगता है।
Editing करते समय hair detail, skin tone, shadows, और background mood पर ध्यान देना बहुत जरूरी है। क्योंकि इस type की photo में morning sunlight, soft highlights, और face texture overall look को define करते हैं। सही color balance के साथ image और भी premium लगती है, especially अगर आप social media profile या trendy portrait vibe create करना चाहते हैं।
- High-resolution image use करें ताकि face details clear रहें और close-up crop clean लगे।
- Natural lighting वाली photo चुनें, क्योंकि strong directional light shadows को more realistic बनाती है।
- Hair strands और layered texture को preserve रखें, ताकि result artificial न लगे।
- Skin tone को over-edit न करें; subtle enhancement ज्यादा premium look देता है।
- Background को aesthetic और uncluttered रखें, खासकर selfie-style portraits के लिए।
- Jewelry और outfit details को intact रखें, क्योंकि यही portrait को personality देती हैं।
एक और important tip है consistency. अगर आप एक ही style को multiple photos में use कर रहे हैं, तो same color mood, same softness level, और same light direction follow करें। इससे आपकी gallery, Instagram feed, या portfolio में uniformity आती है, और Om Editing Top look ज्यादा professional लगती है।
Common Mistakes to Avoid in This Style
बहुत लोग editing में extra filters, harsh smoothing, या unrealistic face reshaping कर देते हैं। इससे portrait की natural beauty कम हो जाती है और image fake लगने लगती है। खासकर selfie edits में, original facial features को preserve करना सबसे important होता है, क्योंकि यही photo की identity maintain करता है।
दूसरी common mistake है lighting को ignore करना। अगर source image में sunlight या shadow pattern strong है, तो editing में उसे randomly change करने से face awkward लग सकता है। इसी तरह, hair color, necklace, top, या accessory details को forcefully alter करना भी final result की authenticity खराब कर सकता है।
- Too much smoothing: त्वचा plastic जैसी दिखने लगती है और portrait natural नहीं रहता।
- Wrong shadows: light direction mismatch होने से face की depth टूट जाती है।
- Over-saturated colours: Brown hair, white top, और skin tones unnatural दिख सकते हैं।
- Face shape change करना: face features वही रखने चाहिए, वरना resemblance कम हो जाती है।
- Background clutter: busy background focus को face से हटा देता है।
- Accessory mismatch: necklace, hairpin, या outfit details बदलने से design continuity टूटती है।
अगर आप final image को professional look देना चाहते हैं, तो edits को subtle रखें। Minor improvements जैसे brightness, shadow softness, hair shine, और color harmony काफी होते हैं। Om Editing Top का best output हमेशा वही होता है जिसमें face original भी लगे और overall portrait elevated भी दिखे।
Best Use Cases: These Images कहाँ Use करें
इस तरह की close-up portrait edit कई जगहों पर बहुत useful होती है। सबसे common use Instagram profile pictures, story highlights, and feed posts में होता है, जहाँ aesthetic face-focused image तुरंत attention grab करती है। अगर photo में morning light और soft texture हो, तो वह classy और modern दोनों लगती है।
Creator profiles, fashion pages, and personal branding के लिए भी this style style बहुत effective है। ऐसी images portraits, beauty content, or lifestyle feeds में strong visual identity बनाती हैं। अगर आप consistency के साथ use करें, तो आपकी photos एक premium editorial feel देने लगती हैं।
- Instagram profile picture: clean close-up look के लिए perfect.
- Thumbnails: face-centered images audience का ध्यान जल्दी खींचती हैं।
- Reels covers: soft light और aesthetic room vibe cover को elegant बनाती है।
- Portfolios: portrait or beauty editing samples दिखाने के लिए useful.
- Story posts: styled selfie look personal updates को premium feel देती है।
- Fashion pages: outfit details, jewelry, and hairstyle clearly highlight होते हैं।
अगर आपका goal engagement बढ़ाना है, तो ऐसी edited portraits multiple formats में reuse की जा सकती हैं। Square crop, vertical post, या reel cover—हर जगह यह style clean, attractive, और modern लगता है। यही वजह है कि this prompt images आज personal branding और aesthetic content दोनों के लिए popular हैं।
Variations Try करें: Different Moods, Colours, और Settings
एक ही portrait style को आप कई तरीकों से experiment कर सकते हैं। उदाहरण के लिए, bright morning sunlight के बजाय golden hour light use करने से photo warmer और softer लगती है। इसी तरह, room setting को minimal, cozy, or luxury aesthetic में shift करके आप output का mood बदल सकते हैं।
Color variations भी बहुत effective होती हैं। Brown hair, white outfit, and gold jewelry जैसे elements already elegant feel देते हैं, लेकिन आप background tones, shadow strength, और overall contrast के साथ खेलकर different visuals बना सकते हैं। इससे एक ही face-based image कई content purposes के लिए adaptable बन जाती है।
- Mood variations: soft dreamy, clean editorial, moody cinematic, bright fresh look.
- Colour variations: warm beige, cool pastel, neutral white, golden tones.
- Setting variations: aesthetic bedroom, minimal studio, sunlit window scene, cozy indoor corner.
- Season variations: summer glow, monsoon softness, autumn warmth, winter cool light.
- Style variations: natural selfie, fashion portrait, influencer look, glam profile shot.
अगर आप experiment करना चाहते हैं, तो छोटे changes से start करें और compare करें कि कौन-सा version सबसे balanced दिखता है। कभी-कभी सिर्फ light softness, background tint, या hair highlight बदलने से whole image का impact काफी बढ़ जाता है। यही flexibility this look style को interesting बनाती है, क्योंकि आप same base portrait से multiple strong looks बना सकते हैं।
Conclusion: This Style Try करके देखें
yeh style style उन लोगों के लिए perfect है जो face details को preserve रखते हुए एक aesthetic, natural, और polished portrait चाहते हैं। सही light, clean composition, और subtle editing के साथ यह look social media, profile use, और creative branding में बहुत अच्छा perform करता है।
अगर आप modern close-up portrait edits पसंद करते हैं, तो इस style को अलग-अलग moods और settings के साथ जरूर try करें। थोड़े से smart changes के साथ आप एक simple selfie को भी premium-looking image में बदल सकते हैं, और यही this edit का सबसे बड़ा फायदा है।
💬 Comments