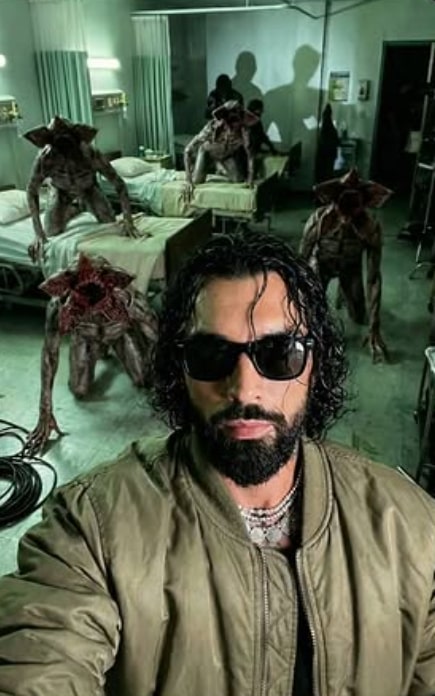
Stranger Things BTS Hospital Portrait
Om Editing Top के साथ Stranger Things BTS Hospital Portrait का असली feel
Om Editing Top जैसा creative editing style उन लोगों के लिए है जो ordinary portrait को cinematic, eye-catching और highly realistic behind-the-scenes look में बदलना चाहते हैं। इस तरह का look खास तौर पर उन users के लिए useful है जो social media पर standout करना चाहते हैं, fan edits बनाते हैं, या अपने photo ko movie-still vibe देना चाहते हैं.
Read Also: cinematic-style realistic portrait | 2026 New Year
Stranger Things BTS Hospital Portrait का concept simple नहीं है। इसमें portrait, film set atmosphere, horror-inspired background और realistic flash photography—all together मिलकर एक very specific visual story बनाते हैं। यही वजह है कि यह style सिर्फ photo edit नहीं, बल्कि एक mini scene जैसा feel देता है.
अगर आप ऐसे edits पसंद करते हैं जो dramatic, moody और ultra-detailed दिखें, तो यह prompt/photo style आपके लिए perfect है। खासकर creators, editors, meme-makers, fan-page owners और mobile photo editors के लिए यह format बहुत useful है क्योंकि इसमें character focus भी रहता है और background storytelling भी strong होती है.
यह photo style क्या देता है और क्यों इतना powerful लगता है
इस तरह के edit में सबसे पहले attention जाता है lighting और texture पर। Harsh iPhone flash, greenish hospital tint, and fluorescent ambience image को तुरंत real BTS shot जैसा feel देते हैं। Soft beauty lighting की जगह यहाँ raw, unfiltered, almost documentary-style look मिलता है, जो photo को more authentic बनाता है.
Visual mood काफी intense होता है। Dark sunglasses, chin-length curly hair, khaki bomber jacket जैसी styling subject को bold और mysterious बनाती है, जबकि hospital setting में crawling creatures, props और crew shadows scene को suspenseful और cinematic बना देते हैं। Result एक ऐसा portrait होता है जो polished भी लगता है और gritty भी.
Composition भी बहुत important है। Foreground में main character, पीछे set elements, और floor या beds पर practical creature details—ये सब मिलकर depth create करते हैं। Color-wise, muted greens, pale whites, dark shadows, and skin highlights इस edit को horror-thriller identity देते हैं.
- Lighting: harsh flash, fluorescent overhead lights, low-key shadows
- Mood: eerie, cinematic, BTS, suspenseful, realistic
- Colours: greenish hospital tint, muted tones, dark contrast, organic skin shades
- Composition: close-up foreground subject, detailed background action, strong depth of field
- Realism: practical suit textures, visible props, crew-like atmosphere, candid shot feel
This Style kaise use karein: beginner-friendly step-by-step guide
Agar aap mobile par edit kar rahe hain, to is style ko follow karna surprisingly easy hai—bas framing aur detail par dhyan dena hota hai. Sabse pehle apni base photo choose karein. Photo clear honi chahiye, face visible होना chahiye, aur subject ka pose neutral ya slightly dramatic होना चाहिए ताकि later cinematic vibe build ho सके.
Uske baad style match karne ke liye background aur mood decide karein. BTS hospital look ke liye image ko over-polish न करें. Is edit ka charm uski rawness में है: slight grain, flash reflections, and realistic shadows. Mobile editors me exposure, contrast, and color temperature carefully set karne se final output instantly better lagta hai.
Yeh workflow beginners ke liye simple hai aur kisi bhi photo editor app par follow kiya ja sakta hai:
- Ek clear portrait photo choose karein jisme face sharp ho aur subject centered ya slightly off-center ho.
- Photo ko crop karke composition ko close-up feel dein, taaki cinematic framing bane.
- Background me hospital or backstage atmosphere add karein—green tint, fluorescent light, and shadow detail ke saath.
- Subject ke outfit ko bold रखें: jacket, dark accessories, aur moody styling look ko strong banati hai.
- Flash effect add karein, lekin overexpose na karein; skin texture visible rehni chahiye.
- Contrast, clarity, and sharpness ko lightly increase karein taaki costume aur face details pop karein.
- Final image me grain ya subtle noise add karein, जिससे BTS documentary feel aur natural लगे.
Mobile par edit karte waqt ek important tip यह है कि aap layers ko overly dramatic na banाएं. Realistic BTS look tabhi believable लगता है jab subject aur background same lighting space me लगें. Isliye shadows, highlights, and color cast ko same direction me keep karna better hota hai.
Kaun si photos is style ke liye sabse achchhi hoti hain
Best result tab aata hai jab base photo already strong ho. Aise photos choose karein jisme face front ya three-quarter angle par ho, kyunki is style me facial detail important hai. Ultra-blurry selfies ya very busy backgrounds usually final edit ko weak bana dete hain.
Resolution bhi matter karti hai. High-resolution photo se skin texture, hair strands, clothing folds aur accessories clearly preserve hote hain. Agar source photo low quality hogi, to flash and cinematic effects ke baad image muddy lag sakti hai. Is style me clarity aur realism dono equally important hain.
Background ideally simple ya lightly blurred होना चाहिए. Agar background already cluttered ho, to hospital set effect dilute ho sakta hai. Clothing ke liye solid-color jacket, dark shades, or structured outerwear zyada effective रहते हैं, kyunki ye Stranger Things-inspired moody aesthetic ko support karte हैं.
- Angle: close-up, front-facing, or slight side-angle portraits
- Resolution: high-quality, sharp image with visible facial detail
- Lighting: natural light or soft indoor light that can be converted into flash-style drama
- Background: plain, blurred, or easy-to-replace with cinematic hospital ambience
- Clothing: bomber jackets, dark sunglasses, textured outerwear, and structured layers
- Best subjects: photos with clean face visibility and realistic skin texture
अगर आप चाहते हैं कि edit instantly believable लगे, तो photo में expression भी calm या serious रखें। Smiling or highly playful poses कभी-कभी horror-BTS mood से match नहीं करते। A neutral, intense, or slightly mysterious expression इस style को ज्यादा strong बनाता है.
Om Editing Top ke liye Pro Tips for Best Results
अगर आप Om Editing Top style को naturally strong और realistic बनाना चाहते हैं, तो सबसे पहले subject consistency पर ध्यान दें। Face details, hairstyle, outfit texture और lighting direction एक-दूसरे से match होने चाहिए, वरना output artificial लग सकता है। खासकर hospital-type cinematic look में skin texture, shadow balance और background props का sync बहुत important होता है।
Best results के लिए prompt में structure साफ रखें: subject, clothing, mood, lighting, location, और camera feel. इससे model को समझने में आसानी होती है कि image में कौन-सी चीज़ primary है और कौन-सी secondary. अगर आप Om Editing Top prompt variations बनाते हैं, तो हर version में सिर्फ 1-2 elements बदलें, जैसे color tone या season, ताकि final image controlled और polished लगे।
- Subject details को stable रखें, जैसे hair, outfit, face angle और expression.
- Lighting को clearly define करें: flash, fluorescent, cinematic, moody, या soft.
- Background elements limited रखें ताकि main character cleanly pop करे.
- Action शब्दों का use करें, जैसे standing, looking away, turning, or posing.
- Texture words जोड़ें, जैसे skin detail, fabric folds, wet hair, or practical costume look.
- अगर editing tool allow करता है, तो multiple variations test करें और strongest composition चुनें.
Common Mistakes to Avoid in This Style Prompts
Om Editing Top prompts में सबसे common mistake होती है too much description एक साथ डाल देना. जब prompt बहुत crowded हो जाता है, तो model important details confuse कर सकता है. Result में face, background, costume, और lighting all over the place दिख सकते हैं. इसलिए clear priority set करना जरूरी है।
दूसरी बड़ी गलती है inconsistent style mixing. For example, अगर आप एक ही prompt में ultra-clean studio portrait और messy behind-the-scenes documentary vibe दोनों बहुत strongly डाल देंगे, तो output incoherent लग सकता है. इसी तरह, vague words जैसे “good photo” या “nice pose” output को specific direction नहीं देते. Om Editing Top style में precision ही quality को improve करती है।
- बहुत सारे unrelated details जोड़ना, जिससे image cluttered हो जाती है.
- Lighting direction clear न होना, जिससे face flat या overexposed दिख सकता है.
- Clothing और hair description में inconsistency, जिससे subject पहचान कमजोर पड़ती है.
- Background को over-describe करना, जिससे main portrait focus lose हो जाता है.
- Generic words use करना, जो model को strong visual cue नहीं देते.
अगर आप clean, cinematic, and realistic result चाहते हैं, तो हर prompt version में one main idea पर focus करें. This style workflow का सबसे बड़ा फायदा यही है कि आप experimentation कर सकते हैं, लेकिन output में control बनाए रख सकते हैं।
Best Use Cases and Ideas for This Style
this prompt style images कई तरह के creative uses के लिए perfect हैं. Instagram posts, fan edits, profile pictures, reels covers, और cinematic thumbnails में ये look तुरंत attention grab करता है. खासकर जब portrait में strong expression, dramatic lighting, और detailed costume हो, तो image ज्यादा professional और engaging लगती है।
अगर आप creator, editor, या social media designer हैं, तो इस तरह की images portfolio content के लिए भी बहुत useful हैं. Behind-the-scenes aesthetic, character-inspired portrait, or cinematic hospital scene जैसी visuals story-driven content बनाती हैं. You can also use them for mood boards, concept art references, and experimental poster-style edits.
- Instagram posts: dramatic portrait feed में strong visual impact देता है.
- Profile pictures: close-up focus के कारण face details clear रहती हैं.
- YouTube thumbnails: bold expression और cinematic tone clicks बढ़ा सकते हैं.
- Reels covers: dark, moody, or high-energy frames attention quickly पकड़ते हैं.
- Portfolios: editing skill, lighting control, और concept understanding showcase होती है.
- Fan edits: fictional or BTS-inspired mood के साथ storytelling stronger बनती है.
अच्छी बात यह है कि this look images को आप अलग-अलग platforms के हिसाब से crop और refine भी कर सकते हैं. Square format social posts के लिए अच्छा रहता है, जबकि vertical framing reels और stories में ज्यादा impactful दिखता है।
This Style Variations You Can Try
अगर आप same concept को बार-बार use नहीं करना चाहते, तो छोटे-छोटे changes के साथ कई fresh variations बना सकते हैं. Yeh style prompts में mood, color palette, weather, or season बदलकर output completely नया महसूस हो सकता है. यही technique repeated content को भी exciting बनाए रखती है।
For example, आप same portrait को colder hospital tone, warmer cinematic glow, or rainy-night atmosphere में बदल सकते हैं. इसी तरह black, khaki, muted green, or deep blue palettes अलग emotional effect देती हैं. Seasonal changes भी subtle but effective होते हैं—winter mood image को crisp बनाता है, जबकि monsoon palette उसे more dramatic दिखाता है।
- Mood variations: intense, suspenseful, calm, eerie, heroic, or documentary-style.
- Colour variations: greenish hospital tint, warm amber light, cool blue shadows, desaturated tones.
- Setting variations: corridor, ward room, emergency section, dim backstage area, or studio-like space.
- Season variations: winter frost look, rainy atmosphere, autumn tones, or night-shoot vibe.
- Style variations: raw BTS feel, cinematic portrait, ultra-detailed close-up, or editorial cover look.
आप expression और camera angle के साथ भी experiment कर सकते हैं. Slightly different face direction, stronger flash, softer shadow, or closer crop image को नई identity देता है. This edit का सबसे अच्छा use यही है कि आप one core concept को कई creative directions में transform कर सकें।
Conclusion: This Style ko Try Karke Better Visuals Banayein
अगर आप impactful, detailed, and cinematic results चाहते हैं, तो this style style एक बहुत strong option है. सही subject control, lighting balance, और background discipline के साथ आप ऐसी images बना सकते हैं जो realistic भी लगें और visually striking भी हों.
अब आप pro tips, common mistakes, use cases, और variations सब जान चुके हैं, तो अगला step है test करना और अपने favorite version को polish करना. This prompt को अलग moods और color tones के साथ try करें, और देखें कि कौन-सा combination आपके content के लिए सबसे अच्छा काम करता है।
💬 Comments