Artistic Handwritten Annotations
Om Editing Top for Artistic Handwritten Annotations: What This Style Really Means
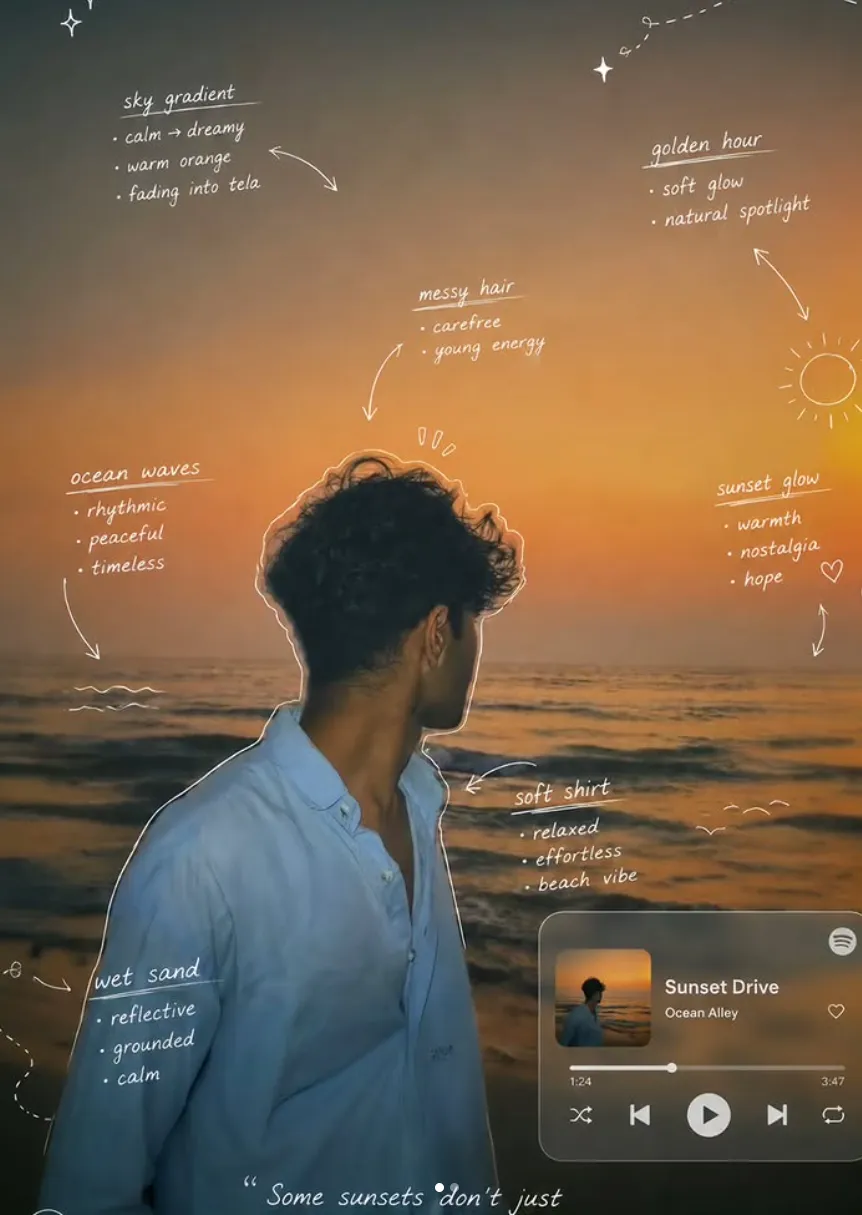
Om Editing Top is the kind of visual edit that turns a normal photo into something that feels like a creative notebook page, a mood board, and a cinematic sketch all at once. If you have seen images with handwritten notes, clean white tracing lines, tiny doodles, arrows, and a minimal annotated look, this is the style you’re looking at.
Read Also: cinematic-style realistic portrait | 2026 New Year
It works especially well for people who want their photo to feel thoughtful, stylish, and a little artistic without becoming overly busy. Whether you are editing drinks, food, street photos, portraits, café shots, or interior spaces, this style adds a hand-crafted storytelling layer that makes the image feel more personal and visually guided.
In simple words, Om Editing Top in this format is about mixing realism with design. The photo stays recognizable, but the added annotations lead the eye, highlight details, and give the image a polished editorial vibe. That makes it useful for social media posts, aesthetic branding, lifestyle content, and creative personal feeds.
What This Artistic Handwritten Annotation Style Gives You
This prompt style creates a look that is minimal, elegant, and visually smart. Instead of covering the whole photo with heavy graphics, it uses thin white sketch lines, subtle markers, and small handwritten-style notes to frame the subject naturally. The result is a clean composition that still feels rich in detail.
The mood depends on the original image, but the effect is usually soft, cinematic, and slightly premium. The annotations help the viewer notice the most important parts of the photo: the steam from a drink, the texture of food, the light in a room, or the mood of a scene. Because the notes are short and focused, the photo feels curated rather than crowded.
One of the strongest parts of this style is the way it balances negative space and tiny decorative elements. Small doodles like sparkles, hearts, or smiley marks add personality, while the clean layout keeps the image readable. If the edit also includes a glassmorphism-style music UI inspired by the colors of the photo, the whole design can feel even more modern and Instagram-ready.
- Thin white lines that trace important edges without overpowering the image
- Handwritten notes that describe mood, texture, flavour, or atmosphere
- Minimal doodles for a playful but polished finish
- Strong visual guidance so the viewer knows where to look first
- Cinematic feeling that makes the image look more thoughtful and editorial
How to Use Om Editing Top on Mobile: Step-by-Step Guide
If you are editing from a phone, the process is simple as long as your base photo is strong. First, choose a photo that already has a clear subject and enough empty space around it. This gives the handwritten annotations room to breathe and keeps the composition from feeling cluttered.
Next, open your editing app or generator and upload the image. Since this style depends on precise placement, it works best when the subject is easy to identify. After upload, focus on the main object or scene and plan where the notes should point. The goal is to guide attention, not hide the photo.
Then add the annotation layer: thin sketch lines, arrows, dotted paths, and a few tiny doodles. Keep the wording short and relevant to the subject. For example, a drink photo may get notes about flavour or temperature, while a room photo may get notes about lighting or vibe. If the tool allows it, add a short cinematic sentence that captures the overall mood in one line.
- Select a clear photo with a visible subject and some open space.
- Upload it into your editing app or AI tool on mobile.
- Identify the main elements you want to highlight: object, texture, light, background, or emotion.
- Place annotations sparingly around the subject using thin lines and simple labels.
- Use short notes that match the scene instead of long sentences.
- Add small doodles only if they support the style and do not crowd the image.
- Check spacing before saving so the photo still feels minimal and clean.
For best results on a phone, zoom out and check the full composition before exporting. If the text feels too close to the edges or the lines are covering the subject too much, reduce the number of notes. In this style, less usually looks better.
Which Photos Work Best for Artistic Handwritten Annotations
The strongest results come from photos that already have a clear focal point and good visual structure. Drinks, plated food, cozy rooms, street scenes, and close-up lifestyle shots all work well because they give the annotations something meaningful to describe. A photo with a strong subject and natural negative space is much easier to style than a crowded, busy frame.
Lighting matters a lot too. Soft daylight, warm indoor lighting, and gentle shadows usually produce the best results because they create a calm, cinematic base for the handwritten overlay. Harsh flash or extremely dark images can make the annotations feel disconnected unless the photo is intentionally styled that way.
Composition is equally important. If your subject is centered with space around it, the notes can sit beside or around it naturally. If the image is too tight, the annotations may feel squeezed. Clothing and background should also match the mood you want: clean neutrals, textured fabrics, café settings, simple tables, and uncluttered walls often work best for this Om Editing Top style.
- Angle: 45-degree product shots, top-down food shots, or straight-on lifestyle portraits
- Resolution: Use a sharp, high-resolution image so details stay clean after editing
- Lighting: Soft natural light, window light, warm ambient light, or golden hour
- Background: Simple, tidy, and not too visually noisy
- Clothing: Neutral tones, solid colors, or outfits with texture instead of heavy patterns
- Space: Leave room around the subject for arrows, notes, and doodles
- Subject clarity: Choose images where the main element is instantly recognizable
For drinks and food, close-up shots with visible texture work especially well. A coffee cup with steam, a dessert with layers, or a plated meal with interesting garnish gives the notes more meaning. For spaces, look for scenes with lamps, windows, reflections, or cozy corners because these details make the annotation style feel more atmospheric and intentional.
Pro Tips for the Best Results with Om Editing Top
If you want the cleanest and most eye-catching outcome with Om Editing Top, start with a photo that already has a strong subject and good lighting. Images with clear edges, balanced contrast, and enough empty space make handwritten annotations look more elegant and easier to read.
Try to keep the notes short, intentional, and placed where they support the composition instead of covering it. The best edits feel like part of the photo, not something pasted on top. A minimal approach usually works better than crowding the frame with too many arrows, labels, or doodles.
Here are a few practical do’s that can improve your result:
- Use high-resolution photos so the handwritten details stay sharp and clean.
- Choose images with a clear main object, like a drink, plate, room, or portrait.
- Leave some negative space for notes, lines, and small decorative marks.
- Keep the annotation style consistent so the image looks polished and cohesive.
- Match the tone of the writing to the mood of the photo, whether soft, cinematic, or playful.
- Use subtle contrast for the sketch lines so they remain visible without overpowering the subject.
Common Mistakes to Avoid in Om Editing Top
One of the biggest mistakes is adding too many annotations in every corner. When the frame becomes overcrowded, the viewer loses focus and the image feels messy instead of artistic. The goal of Om Editing Top is to guide the eye, not distract it.
Another common issue is using photos with very dark, blurry, or cluttered backgrounds. In those cases, handwritten lines and small details can disappear or look uneven. It also helps to avoid long sentences, because the effect works best when the text stays light, visual, and easy to scan.
- Overloading the image: Too many notes reduce the clean, editorial feel and make the composition feel busy.
- Ignoring the subject: If the handwriting covers the main element, the photo loses its impact.
- Poor photo quality: Low-resolution images can make the sketch lines appear fuzzy or broken.
- Random placement: Unplanned labels can make the edit feel disconnected from the scene.
- Too much text: Long sentences can clutter the design and weaken the handwritten aesthetic.
Best Use Cases and Creative Ideas for Om Editing Top
Om Editing Top works especially well for social media posts where you want a stylish, editorial, or mood-driven look. It can make everyday photos feel more thoughtful and artistic, especially when the annotations point out details that would otherwise go unnoticed.
This style is also useful for content creators, cafe pages, travel posts, and anyone building a visual brand. The handwritten touch adds personality, while the minimal layout keeps the photo feeling premium and modern. It is a great choice when you want the image to look curated instead of heavily edited.
- Instagram posts: Great for aesthetic feeds, quote-style visuals, and lifestyle content.
- Profile pictures: Works when you want a creative but still clean personal branding look.
- Thumbnails: Useful for YouTube or reels covers that need a stylish handwritten overlay.
- Portfolios: Helpful for photographers, designers, and artists showing mood-based work.
- Reels covers: Adds instant visual identity and makes content easier to recognize.
You can also use it for food shots, coffee moments, street scenes, cozy interiors, and portraits. Any image with a strong atmosphere can benefit from tiny labels, arrows, and sketch accents that tell a story without taking away the natural look of the photo.
Variations You Can Try with Om Editing Top
The best part about Om Editing Top is that you can experiment with different moods and still keep the same overall artistic feel. A soft romantic edit will look very different from a bold urban one, even if both use the same handwritten annotation style. That flexibility makes it easy to match your content theme.
Try changing the colour mood, background atmosphere, and decoration style depending on the photo. A warm golden setting can feel more nostalgic, while cool tones can create a calm, cinematic effect. Seasonal variations also work well when you want the image to reflect a time of year or a specific mood.
- Mood variations: dreamy, cozy, cinematic, playful, minimal, romantic, or moody.
- Colour variations: soft white, warm beige, pastel tones, cool blue, or muted earthy shades.
- Setting variations: cafe table, bedroom corner, travel street, studio background, or outdoor sunset scene.
- Seasonal variations: summer brightness, monsoon softness, winter warmth, or festive glow.
- Detail variations: tiny hearts, steam marks, sparkles, arrows, dotted paths, or simple frame accents.
If you like testing different looks, keep the subject the same and only change the annotation style or mood. That way you can compare which version feels more engaging, more elegant, or more suitable for your audience.
Conclusion: Why Om Editing Top Is Worth Trying
Om Editing Top is a simple but powerful way to turn an ordinary photo into something more expressive, polished, and memorable. With the right balance of handwritten notes, clean spacing, and mood-matching details, your image can feel both artistic and personal.
If you want content that stands out without looking overdone, this style is a great option to try. Experiment with different photos, keep the layout minimal, and let Om Editing Top bring out the feeling hidden inside the moment.
💬 Comments