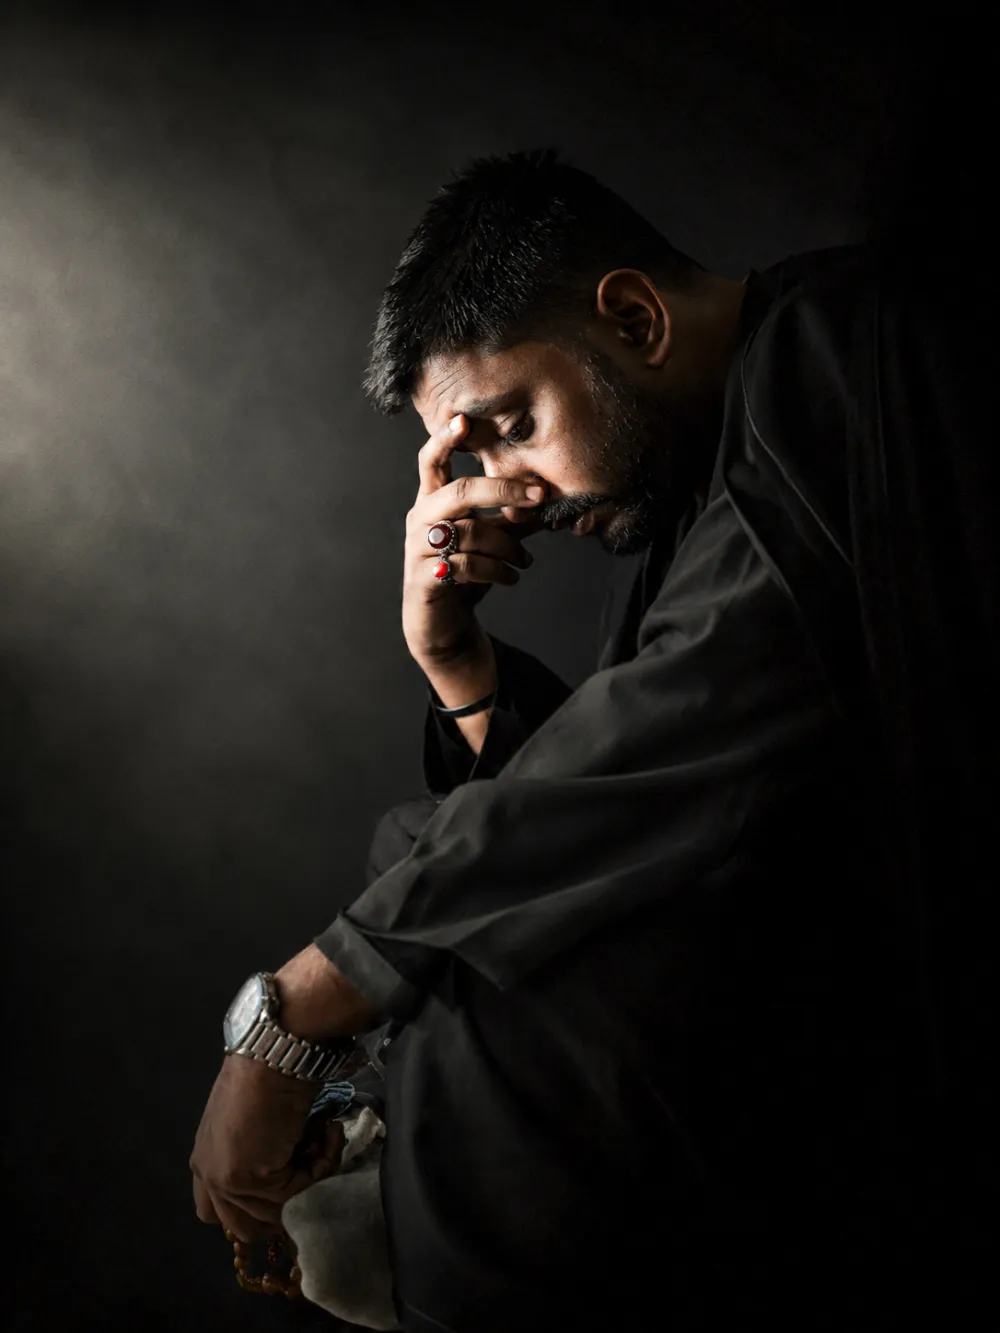
Cinematic
Om Editing Top Cinematic Look Kya Hai?
Om Editing Top style ka cinematic look un logon ke liye perfect hai jo apni photo ko movie-frame jaisa dramatic, polished aur emotionally strong banana chahte hain. Is style ka main idea simple hai: subject ko aise present karna ki image me depth, mood aur story feel ho. Yeh usually creators, editors, photographers, reels makers aur social media users ke kaam aata hai jo apni normal portrait photo ko premium cinematic vibe dena chahte hain.
Read Also: cinematic-style realistic portrait | 2026 New Year
Is type ke edit me face expression, body angle, light aur shadow sab bahut important hote hain. Result sirf ek attractive portrait nahi hota, balki aisa frame banta hai jo suspense, confidence ya thoughtfulness show kare. Agar aap cinematic portrait editing, moody side light portrait, ya dramatic half-shadow photo style seekh rahe ho, to yeh approach kaafi useful hai.
Simple words me, Om Editing Top cinematic style ek aisa visual treatment hai jahan photo ko zyada realistic, stylish aur film-inspired banaya jata hai. Isme flat lighting ke bajay contrast, depth aur selective illumination use hoti hai, jisse face ka ek part highlight hota hai aur dusra part shadow me jaakar aur zyada powerful lagta hai.
This Style Cinematic Prompt Photo Style Kya Deta Hai?
Is style ka sabse strong effect hota hai light and shadow balance. Jab ek side se soft studio light ya directional light aati hai, to face ke features zyada sculpted dikhte hain. Cheekbones, jawline aur eyes sharper lagte hain, aur overall portrait ko ek serious, thoughtful mood milta hai. Yeh cinematic portrait ko ordinary selfie se kaafi alag bana deta hai.
Color tone bhi is look ka important part hota hai. Aksar cinematic edits me muted colours, slightly cool tones, deep blacks aur controlled highlights use kiye jaate hain. Isse photo me film-like feel aati hai. Background simple ya dark ho sakta hai taaki attention directly subject par rahe. Composition usually tight aur clean hoti hai, jahan face, shoulder line aur side glance ek strong visual story create karte hain.
Realism bhi is style ka core part hai. Yeh koi over-processed beauty filter nahi hota; yeh zyada natural yet dramatic portrait look hota hai. Agar photo sahi captured ho, to final image me aisa lagta hai jaise kisi movie poster ya editorial magazine ka still ho.
- Lighting: side light, studio light, ya soft directional light
- Mood: calm, intense, contemplative, confident
- Colours: deep, balanced, low-saturation, cinematic tones
- Composition: close portrait, clean background, strong face focus
- Realism: natural skin texture aur believable shadows
This Style Ko Mobile Par Kaise Use Karein?
Agar aap beginner ho, to is style ko use karna complicated nahi hai. Sabse pehle apni best portrait photo choose karo jisme face clearly visible ho aur expression calm ho. Mobile par edit karte waqt image ko crop karna, brightness adjust karna aur contrast ko control karna sabse pehle steps hote hain. Goal yeh hai ki face ka shape aur direction clearly highlight ho.
Uske baad lighting effect ko improve karo. Agar photo already side light me hai, to aur better. Nahi hai to aap shadows ko deepen karke aur highlights ko thoda lift karke cinematic contrast create kar sakte ho. Mobile editors me exposure, contrast, shadow, highlight aur temperature tools ka use karke kaafi acha result mil jata hai. Dhyan rahe ki edit overdo na ho; natural skin aur realistic shadows maintain rehne chahiye.
Last me composition aur finishing par kaam karo. Background ko clean rakho, unnecessary bright areas hatao, aur subject ke around visual focus banaye rakho. Agar aap app-based editing kar rahe ho to same image par multiple small adjustments karo, ek hi strong filter lagane ke bajay.
- Ek clear portrait photo select karo jisme face sharp ho.
- Image ko crop karke face aur upper body ko focus me lao.
- Brightness, contrast aur shadows ko balance karo.
- Side light ya dramatic light feel create karo.
- Colours ko thoda muted aur cinematic rakho.
- Final image me skin texture aur facial details check karo.
Kaun Si Photos This Style Cinematic Look Ke Liye Best Hain?
Sabse achchi photos woh hoti hain jisme subject ka face side ya 3/4 angle par ho aur eyes me strong expression ho. Agar face completely front-facing ho to cinematic depth kam lag sakti hai. Thoda tilted body aur turned face is style ko aur strong bana deta hai, kyunki isse image me movement aur emotion dono aate hain.
Resolution bhi important hai. High-resolution portrait photo choose karo, taaki editing ke baad details blur na ho. Soft natural light ya controlled indoor light best hoti hai. Bahut harsh sunlight ya overexposed background cinematic mood ko tod sakta hai. Background simple ho to aur bhi achha hai, jaise plain wall, dark room, blurred outdoor area ya studio-like setting.
Clothing bhi overall look ko support karni chahiye. Solid colours, minimal patterns aur clean fits cinematic portrait me zyada professional lagte hain. Loud prints ya too many accessories kabhi-kabhi focus ko distract kar dete hain. Agar aap serious, moody ya elegant look chahte ho, to simple outfit aur neutral tones best choice hote hain.
- Angle: side profile, 3/4 face angle, slightly tilted head
- Resolution: high-quality, sharp facial details wali photo
- Lighting: soft indoor light, window light, ya side light
- Background: plain, dark, blurred, or distraction-free
- Clothing: solid colours, simple styling, minimal prints
- Expression: calm, thoughtful, confident, intense
Om Editing Top Cinematic Style Me Better Result Kaise Milega?
Best result tab aata hai jab capture aur edit dono thoughtfully kiye jaate hain. Agar photo lene se pehle hi angle, light aur expression sahi rakha gaya ho, to editing much easier ho jati hai. Is style me smallest details bhi matter karti hain, jaise eyes ka direction, chin ka angle, aur shoulder ka position. Yeh sab milkar cinematic story create karte hain.
Agar aap apni photo ko zyada film-like banana chahte ho, to mood consistency maintain karo. Ek hi image me bright cheerful vibe aur dark dramatic effect dono ek saath use karne se look confusing ho sakta hai. Better yeh hai ki aap ek clear intention rakho: ya to calm contemplation, ya intense determination, ya mysterious side glance.
Mobile editing me patience bhi zaroori hai. Har adjustment ke baad photo ko zoom karke dekho, especially eyes, nose edge, jawline aur shadow areas ko. Isse aap over-editing se bach jaoge aur final portrait zyada premium lagega.
This Style के लिए Pro Tips: Best Results कैसे पाएं
अगर आप Om Editing Top style में cinematic look चाहते हैं, तो सबसे पहले pose और lighting को simple रखना बहुत जरूरी है। Face angle थोड़ा सा side में हो, body relaxed रहे, और expression में overacting न हो—यही चीज़ image को clean और premium बनाती है। Soft studio light या one-side light use करने पर shadows naturally बनते हैं, जिससे frame में depth और drama आता है।
Background जितना uncluttered होगा, subject उतना ज्यादा highlight होगा। खासकर जब आप cinematic portrait, profile-style shot, या reel cover के लिए image बना रहे हों, तो composition को balanced रखना चाहिए। Face की outline, jawline, और shoulder line को ऐसे position करें कि light और shadow दोनों clearly visible रहें।
कुछ practical do’s follow करने से output और बेहतर होता है:
- Face को left या right side में subtle angle पर रखें, ताकि cinematic side lighting अच्छे से दिखे।
- Expression calm, confident, और thoughtful रखें—यह mood को strong बनाता है।
- Soft light source use करें ताकि highlights harsh न लगें और skin natural दिखे।
- Dark background या muted tones चुनें, जिससे contrast ज्यादा premium लगे।
- Frame में half-shadow effect को maintain करें ताकि cinematic chiaroscuro feel आए।
- Editing में unnecessary saturation कम रखें और tones को controlled रखें।
अगर आप Instagram portrait, thumbnail design, या creative profile image बना रहे हैं, तो छोटे adjustments भी बड़ा फर्क डालते हैं। Slightly tilted body, steady gaze, और moody light combination से Om Editing Top वाला output ज्यादा polished और attention-grabbing बनता है।
Common Mistakes to Avoid in This Style
सबसे common mistake होता है pose को बहुत rigid या unnatural बनाना। जब body stiff दिखती है या face angle बहुत ज्यादा exaggerated हो जाता है, तो cinematic feel की जगह posed look आ जाता है। Side glance को subtle रखना चाहिए, क्योंकि ज्यादा dramatic expression image को less realistic बना सकता है।
दूसरी बड़ी गलती है harsh lighting या overexposed highlights का use करना। अगर one-side light बहुत strong होगी, तो face की details loss हो सकती हैं और shadow side flat लग सकता है। Om Editing Top type edit में balance सबसे important है—light और shadow दोनों को एक-दूसरे के साथ flow करना चाहिए, न कि लड़ना चाहिए।
- बहुत bright background use करना — इससे subject का cinematic contrast कम हो जाता है।
- Over-editing skin tones — natural texture गायब हो जाती है और image artificial लगती है।
- Too many effects डालना — mood खराब हो सकता है और frame cluttered लगेगा।
- Wrong body angle रखना — side lighting का impact कम हो जाता है।
- Expression को overdo करना — calm, intense cinematic vibe कमजोर पड़ जाती है।
अगर आप consistency चाहते हैं, तो हर time same lighting direction, same mood, और same tone palette रखने की कोशिश करें। इससे आपका Om Editing Top look recognizable बनता है और आपकी edits एक professional series जैसी लगती हैं।
Best Use Cases for This Style Cinematic Images
This style style images कई जगह use की जा सकती हैं, especially वहाँ जहाँ visual impact important हो। Instagram posts में यह look instantly attention खींचता है, क्योंकि side lighting और dark shadows image को dramatic बनाते हैं। अगर आप creator, model, or personal brand build कर रहे हैं, तो यह style आपके feed को premium touch दे ���कता है।
Profile pictures के लिए भी यह aesthetic काफी useful है, खासकर तब जब आप एक serious, stylish, or thoughtful impression देना चाहते हों। Thumbnails में cinematic portrait का use करके आप viewer का focus subject पर ला सकते हैं। इसी तरह portfolios में यह style आपकी editing range, mood control, और visual storytelling को highlight करता है।
कुछ popular use cases:
- Instagram posts — moody portrait content और aesthetic feed layouts के लिए।
- Profile pictures — clean but powerful first impression बनाने के लिए।
- Thumbnails — attention-grabbing cinematic cover images के लिए।
- Portfolios — creative editing skills दिखाने और style consistency रखने के लिए।
- Reels covers — dark, bold, and polished visual identity के लिए।
अगर आप personal branding, fashion edits, या creative photography pages चला रहे हैं, तो this prompt look आपके content को more professional बना सकता है। यह style खासकर उन images में अच्छा लगता है जहाँ emotion, mystery, और focus तीनों एक साथ दिखाने हों।
Variations You Can Try with This Style
इस style की सबसे अच्छी बात यह है कि आप mood और color palette बदलकर कई अलग-अलग variations create कर सकते हैं। अगर basic cinematic portrait काम कर रहा है, तो आप उसी look को warm, cool, vintage, या rainy season mood में convert कर सकते हैं। इससे आपका content repetitive नहीं लगता और हर edit fresh feel देती है।
For example, warm golden tones image को emotional और luxurious बना सकते हैं, जबकि cool blue tones more intense and modern vibe देते हैं। इसी तरह, deep black shadows के साथ desaturated colors use करने से dramatic cinema feel मिलती है।
- Warm mood — golden, amber, or soft orange tones के साथ.
- Cool mood — blue, gray, and steel-like shades के साथ.
- Low-light mood — deeper shadows और stronger contrast के साथ.
- Rainy season vibe — moody backdrop और soft reflections के साथ.
- Night cinematic look — darker palette और bold side lighting के साथ.
- Vintage variation — muted tones, grain, और classic film feel के साथ.
आप different settings भी try कर सकते हैं, जैसे studio background, urban wall, dark interior, or minimal abstract backdrop. अगर subject का expression calm रखते हुए background बदल दिया जाए, तो this look का core mood वही रहता है लेकिन presentation हर बार नया लगता है।
Seasonal variations भी अच्छे results देती हैं। Summer version में brighter highlights, autumn version में earthy tones, और winter version में cooler shadows काफी attractive लगते हैं। यह experimentation आपकी edits को more versatile बनाती है और different platforms के लिए better fit देती है।
Conclusion: This Style को Try करें और Cinematic Look पाएं
अगर आप अपने portraits को एक powerful, stylish, और cinematic identity देना चाहते हैं, तो yeh style एक शानदार choice हो सकता है। सही side lighting, calm expression, balanced shadows, और controlled color tone के साथ यह style simple image को भी striking बना देती है।
अब आप अलग-अलग poses, moods, और color variations try करके देख सकते हैं कि आपके content पर कौन सा version सबसे अच्छा लगता है। थोड़ी practice के बाद आप ऐसे edits बना पाएंगे जो Instagram, thumbnails, profile pictures, और reels covers सभी में standout करें।
इस style को experiment करें, अपनी visual taste के हिसाब से adjust करें, और this edit look को अपनी editing identity का हिस्सा बनाएं।
💬 Comments