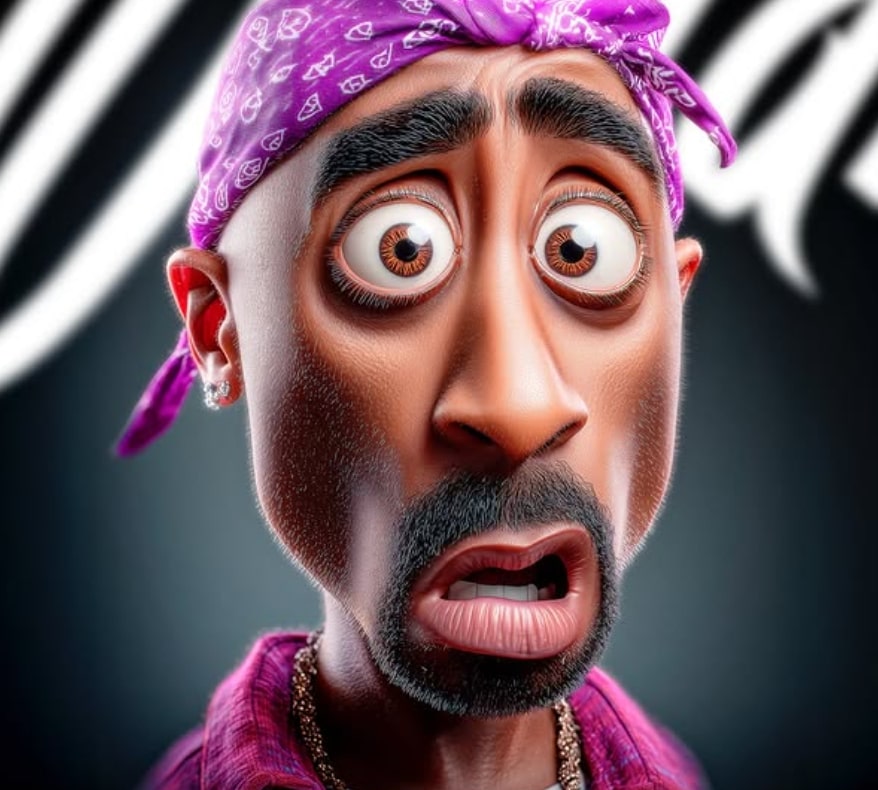
Hyper-Expressive 3D Cartoon Portrait
Om Editing Top Kya Hai aur Ye Hyper-Expressive 3D Cartoon Portrait Style Kis Ke Liye Hai?
Om Editing Top style ka matlab hai aisa face transformation jisme real photo ko ek hyper-expressive 3D cartoon portrait mein convert kiya jata hai. Ye look normal cartoon se zyada polished, cinematic aur emotionally expressive hota hai, isliye profile pictures, social media posts, fan edits, creative thumbnails, aur character-style portraits ke liye kaafi popular hai.
Read Also: cinematic-style realistic portrait | 2026 New Year
Is style ka main attraction hota hai facial expression ka dramatic upgrade. Aapka original face structure intact rehta hai, lekin eyes, mouth, skin texture, aur accessories ko stylized way mein present kiya jata hai. Is wajah se image fun bhi lagti hai aur premium 3D render jaisi feel bhi deti hai. Jo log apni photo ko unique, eye-catching aur share-worthy banana chahte hain, unke liye ye prompt style bahut useful hota hai.
Ye especially un users ke liye best hai jo AI portrait editing, cartoon avatar creation, ya social media ke liye high-impact visuals banana chahte hain. Agar aap mobile par simple photo upload karke bold, expressive aur detailed result chahte hain, to Om Editing Top style ek strong choice ho sakta hai.
This Style Aapko Kya Result Deti Hai?
Is style ka output usually ek hyper-real yet cartoonish portrait hota hai jisme face ka overall structure original photo se inspired hota hai, lekin expressions zyada dramatic ho jate hain. Eyes bade, wide open aur highly expressive dikhte hain, jo character ko energetic aur comedic feel dete hain. Mouth often open hota hai, jis se surprise, excitement ya shock ka strong visual impact aata hai.
Lighting is style ka ek aur important part hota hai. Aksar dramatic key light, soft fill light aur rim lighting ka combination use hota hai, jis se face depth ke saath pop karta hai. Background simple aur cool-toned rakha jata hai, jaise dark blue se gray gradient, taaki focus pure character par rahe. Ye background distraction kam karta hai aur portrait ko cinematic look deta hai.
Texture aur finish bhi kaafi important hote hain. Skin ko smooth plastic jaisa nahi, balki realistic pores aur facial detail ke saath render kiya jata hai. Beard, lips, eyebrows aur accessories jaise earrings ya chains bhi clearly visible rehte hain. Is tarah ki detail se image ek 3D animated movie frame jaisi lagti hai.
- Large expressive eyes for stronger emotion
- Glossy, open mouth for surprise or comic effect
- Realistic skin texture with visible facial details
- Cool gradient background for clean focus
- Sharp contrast lighting for a premium render feel
This Style Use Karne Ka Step-by-Step Guide
Agar aap beginner hain aur mobile par is style ka use karna chahte hain, to process ko simple rakhiye. Sabse pehle ek clear portrait photo choose karein. Face seedha ho, expression readable ho, aur image blur na ho. Isse AI ko real facial features samajhne mein aasani hoti hai aur output zyada accurate aata hai.
Uske baad apni photo ko selected editing tool ya AI generator mein upload karein. Agar platform prompt-based hai, to exactly us style ka instruction use hota hai jo Hyper-Expressive 3D Cartoon Portrait effect banata hai. Settings mein agar resolution, aspect ratio, ya face strength ka option ho, to unhe carefully adjust karein. High resolution result ke liye quality mode on rakhna useful hota hai.
Mobile users ke liye sabse easy flow ye hota hai: photo select karo, style apply karo, preview check karo, aur phir export karo. Agar first result perfect na ho, to dusri photo try karein ya better lighting wali image use karein. Chhote changes se output ka expression aur realism dono improve ho sakte hain.
- Ek clear, high-quality face photo choose karein.
- Photo mein face fully visible hona chahiye.
- Editing app ya AI tool open karke image upload karein.
- Agar style settings milti hain, to cartoon realism aur detail ko balanced rakhein.
- Preview mein eyes, mouth, aur skin texture ko check karein.
- Result pasand aaye to high resolution mein save karein.
This Style Ke Liye Kaunsi Photos Sabse Achhi Kaam Karti Hain?
Best output ke liye aisi photo use karein jisme face front ya slightly angled ho. Extreme side profile ya too much tilt wali image mein facial features distort ho sakte hain. Aapki eyes, nose, lips aur beard clearly visible honi chahiye, kyunki ye style unhi features ko stylized form mein convert karta hai.
Lighting bhi bahut important hai. Natural light ya soft indoor light wali photo usually better result deti hai, kyunki face detail saaf capture hoti hai. Overexposed, shadow-heavy ya low-light images mein AI ko accurate shape samajhne mein problem ho sakti hai. Agar aap chahte hain ki final portrait crisp aur expressive aaye, to original image jitni clean hogi, output utna hi strong hoga.
Background aur clothing bhi final look ko impact karte hain. Plain background zyada useful hota hai kyunki subject isolate ho jata hai. Clothes mein visible details, accessories, earrings, bandana, chain, ya beard style jaisi cheezein image ko richer banati hain. Ye details 3D cartoon output mein extra personality add karti hain.
- Front-facing ya slight-angle portrait use karein
- High resolution photo select karein, blur avoid karein
- Natural light ya soft bright lighting best hoti hai
- Plain ya uncluttered background better rehta hai
- Accessories visible hon to output aur interesting lagta hai
- Sharp facial features wali clear photo choose karein
Pro Tips for the Best Results with Om Editing Top
Om Editing Top se sabse achha output tab aata hai jab aap input photo ko carefully choose karte ho. Clear face, front-angle pose, aur good lighting wali image use karne se 3D cartoon portrait zyada natural, sharp, aur expressive dikhta hai. Agar face partially hidden ho ya image blur ho, to stylized details lose ho sakti hain.
Ek aur important tip hai accessories aur facial details ko notice karna. Earrings, beard shape, hairstyle, bandana, ya chain jaise elements image ko more realistic aur personalized banate hain. Om Editing Top ka best use tab hota hai jab aap subject ki identity ko preserve rakhte hue usse dramatic cartoon look mein convert karte ho.
Better results ke liye in points ko follow karo:
- High-resolution photo upload karo taaki facial texture aur expressions clearly come through.
- Seedha face aur visible eyes wali image choose karo.
- Simple background use karo, taaki focus subject par rahe.
- Har important detail jaise beard, lips, eyebrows, aur accessories ko clean rakho.
- Agar multiple versions banani hain, to same photo par different moods try karo.
- Lighting-rich images use karo, because shadows aur highlights 3D effect ko boost karte hain.
Om Editing Top ke saath consistency bhi matter karti hai. Agar aap ek hi style mein multiple portraits bana rahe ho, to facial proportions aur color tone ko balanced rakhna important hai. Isse aapka final set professional lagega, especially social media ya portfolio use ke liye.
Common Mistakes to Avoid in This Style
Sabse common mistake hoti hai low-quality ya heavily cropped photo use karna. Jab face details properly visible nahi hoti, to hyper-expressive 3D cartoon portrait mein symmetry aur expression loose ho sakte hain. Result mein output generic ya distorted lag sakta hai.
Dusri mistake hai overcomplicated background. Agar background bahut noisy ho, to character ki dramatic face expression aur stylized lighting ka impact kam ho jata hai. Om Editing Top ka purpose hi hota hai focus ko subject par rakhna, isliye clean composition zyada effective hoti hai.
- Blurred image use karna output ki sharpness ko reduce karta hai.
- Face par heavy shadow hona eye details ko weak bana deta hai.
- Over-editing ke chakkar mein identity features lose ho sakte hain.
- Too many accessories add karne se portrait cluttered lag sakta hai.
- Inconsistent lighting source use karne se 3D depth unnatural dikhti hai.
Ek aur issue hota hai expectations ko unrealistic rakhna. Om Editing Top style mein exaggeration important hai, but iska matlab face ko completely change karna nahi hota. Best results tab milte hain jab original features intact rahen aur unhe expressive, cartoon-like proportions mein enhance kiya jaye.
Best Use Cases and Ideas for This Style
Om Editing Top style portraits ka sabse popular use social media par hota hai. Instagram posts, profile pictures, story highlights, aur reels covers ke liye ye look instantly attention grab karta hai. Bold expression aur 3D finish feed mein standout karti hai.
Ye style personal branding aur creative portfolios ke liye bhi strong choice hai. Artists, content creators, gamers, aur editors apne profile visuals mein is type ka portrait use karke ek fun yet premium impression create kar sakte hain. Thumbnails mein bhi ye style click-worthy effect deta hai, especially jab face expression dramatic ho.
Aap in images ko in places par use kar sakte ho:
- Instagram profile photo aur post carousel covers
- YouTube thumbnails aur channel branding
- Reels covers aur short-video title frames
- Portfolio banners aur creative showcase pages
- Digital gifts, wallpapers, aur avatar-style displays
Agar aap ek fun personal project bana rahe ho, to this style portraits family, friends, ya self-portrait series ke liye bhi achhe lagte hain. Har subject ke alag expression aur accessories ke saath unique visual identity ban sakti hai, jo collection ko aur engaging bana deti hai.
Variations You Can Try with This Style
This prompt ka ek badiya benefit hai flexibility. Aap same portrait concept ko alag moods mein transform kar sakte ho, jaise funny surprise, confident hero look, cool attitude, ya intense cinematic expression. Har variation se output ka vibe change hota hai, lekin base identity same rehti hai.
Colours aur settings ke saath experiment karna bhi useful hai. Cool blue-gray background zyada dramatic feel deta hai, jabki warm sunset tones portrait ko friendly aur lively bana sakte hain. Similarly, studio lighting, neon glow, or soft gradient backgrounds different platform needs ke hisaab se suit karte hain.
Try karne layak variations:
- Mood: shocked, happy, playful, serious, fearless
- Colours: cool blue, warm orange, purple neon, grey studio, cinematic teal
- Settings: plain backdrop, abstract gradient, city vibe, fantasy-style scene
- Seasons: winter tones, rainy mood, summer glow, autumn shade
- Details: glasses, chains, hats, bandanas, earrings, hairstyle changes
Aap this look ko professional portraits ke saath bhi adapt kar sakte ho, ya phir more casual and meme-style output bana sakte ho. Jo log creative testing karna pasand karte hain, unke liye ye style endless variation opportunities deta hai.
Final Thoughts on This Style
Yeh style ek powerful style hai jo ordinary photo ko hyper-expressive 3D cartoon portrait mein convert karke instantly eye-catching bana deta hai. Iska real charm facial identity ko preserve karke usme fun, drama, aur cinematic depth add karne mein hai. Isi wajah se ye style social media aur creative editing dono ke liye useful hai.
Agar aap best result chahte ho, to clear photo, strong expression, aur clean background par focus karo. Sahi input ke saath this edit images premium lagti hain aur profile, thumbnail, ya reel cover mein easily standout karti hain.
Ab aap different moods, colours, aur lighting combinations ke saath experiment karke apna perfect version try kar sakte ho. This style ka best part ye hai ki har edit mein naya attitude aur nayi personality dikh sakti hai.
💬 Comments