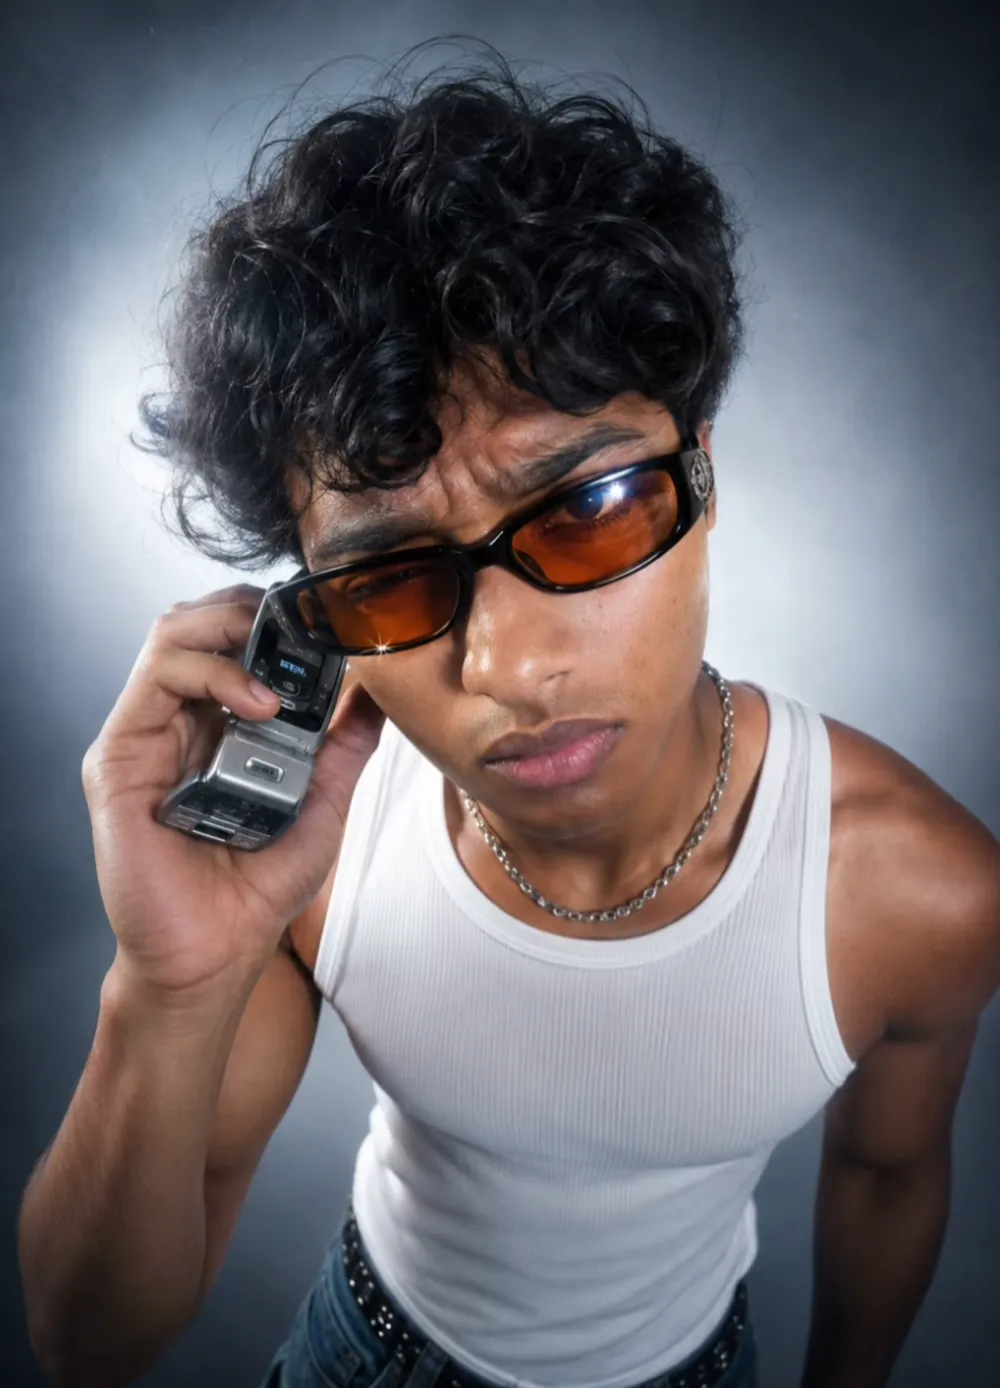
young man shot with an extreme wide-angle
Om Editing Top ke saath extreme wide-angle portrait style kya hai?
Om Editing Top jaisa ultra-realistic portrait style un logon ke liye perfect hai jo apne photos ko cinematic, bold aur modern fashion look dena chahte hain. Is type ki editing mein subject ko close-up, dramatic perspective aur strong visual impact ke saath present kiya jata hai, jisse photo instantly eye-catching lagti hai.
Read Also: cinematic-style realistic portrait | 2026 New Year
Ye look especially un creators ke liye useful hai jo Instagram, reels thumbnails, profile edits ya fashion-inspired portraits banana chahte hain. Extreme wide-angle feel ki wajah se face aur foreground zyada prominent dikhte hain, jabki background clean aur stylized lagta hai. Iska result ek aisa image hota hai jo simple selfie se kaafi zyada premium aur editorial feel deta hai.
Agar aap young male portrait, Y2K-inspired fashion edit, ya high-contrast studio shot create karna chahte hain, to yeh style kaafi effective hai. Isme focus hota hai sharp detail, bold composition, cool-toned background aur aise visual elements par jo subject ko modern, confident aur slightly exaggerated look dete hain.
Is prompt aur photo style se aapko kya milta hai?
Om Editing Top style ka sabse bada advantage hai uska strong visual punch. Extreme wide-angle aur fisheye type perspective subject ko dramatic bana deta hai, especially jab camera face ke kaafi close ho. Isse foreground face larger, torso smaller aur overall frame zyada expressive lagta hai.
Lighting is style ka ek aur important part hai. Hard flash ya beauty-dish type lighting se skin texture, glasses ke highlights, aur outfit details sharply visible hote hain. Cool grey-blue gradient background aur subtle vignette image ko clean, studio-like, aur fashionable feel deta hai. Overall mood thoda confident, thoda edgy aur thoda editorial hota hai.
Color palette usually cool aur polished hoti hai, jisme grey, blue, white aur subtle reflections ka use hota hai. Agar aapko modern fashion portrait, retro flip-phone vibe, ya Y2K aesthetic pasand hai, to yeh style us direction mein kaafi strong output deta hai.
- Lighting: hard flash, beauty dish, crisp highlights
- Mood: confident, stylish, editorial, slightly playful
- Colors: cool grey-blue tones, white outfit accents, subtle contrast
- Composition: centered framing, close camera angle, strong face focus
- Texture: sharp skin detail, visible fabric texture, clean studio finish
- Lens feel: extreme wide-angle / fisheye distortion for dramatic effect
This Style kaise use karein: beginner-friendly step-by-step guide
Agar aap mobile par bhi ye style create karna chahte hain, to process ko simple rakhna best hai. Sabse pehle ek aisi photo choose karein jisme subject ka face clear ho aur pose natural lag raha ho. Is style mein close camera distance important hoti hai, isliye front-facing ya slightly angled portrait zyada effective hota hai.
Uske baad aapko image editor ya AI image tool mein style direction deni hoti hai. Yahan main idea hota hai: studio fashion portrait, extreme wide-angle lens, high contrast lighting, cool background aur sharp detail. Prompt input karte waqt subject details ko clear rakhein, lekin photo ka natural feel maintain karne ke liye over-describing se bachein.
Mobile users ke liye ek practical workflow ye ho sakta hai: photo select karo, crop set karo, then lighting and contrast adjust karo, aur final output ko check karo for face distortion and background consistency. Agar output me face bahut zyada stretched lag raha ho, to intensity kam kar do. Agar image dull lage, to highlights aur clarity thoda badhao.
- Photo choose karo: clear face aur front/near-front pose wali image lo.
- Background check karo: plain ya simple background best rehta hai.
- Style direction add karo: studio, wide-angle, fashion edit, sharp detail.
- Lighting preference set karo: hard flash ya high-contrast look select karo.
- Colour mood define karo: cool grey-blue, clean, editorial tone rakho.
- Output review karo: distortion, face placement aur texture verify karo.
- Final touch up karo: brightness, contrast aur vignette ko balance karo.
Kaunsi photos sabse achchhi kaam karti hain?
Om Editing Top style tab sabse achchha result deti hai jab input photo clean aur well-framed ho. Portrait aisa hona chahiye jisme subject ka face clear ho, expression visible ho aur camera ke saath direct interaction feel aaye. Since extreme wide-angle effect close-up shots mein zyada powerful hota hai, isliye mid-shot ya tight portrait images preferred hain.
Resolution bhi important hai. High-resolution image use karne se final edit zyada crisp aur professional lagti hai. Low-quality photo mein face details, glasses reflections aur fabric texture loss ho sakta hai, jo is style ka core part hai. Lighting ideally soft nahi, balki controlled aur direct honi chahiye, taaki hard flash look naturally create ho sake.
Clothing aur background bhi final mood ko affect karte hain. White tank top, clean solid outfits, minimal accessories aur simple studio background is look ko strong banate hain. Agar background already busy hai, to output cluttered feel kar sakta hai. Isliye plain wall, studio backdrop ya neutral setting sabse practical choice hoti hai.
- Angle: slightly high angle ya close front angle best hai
- Resolution: high-resolution, sharp source photo use karein
- Lighting: even ya direct light, face par clear highlights honi chahiye
- Background: plain, clean, studio-style ya minimally textured
- Clothing: simple, fitted, fashion-forward outfits better lagte hain
- Expression: confident, cool, slightly playful expression kaafi suit karta hai
- Accessories: glasses ya retro props visual interest add kar sakte hain
Pro tips for the best results with Om Editing Top
To get the strongest output from Om Editing Top, start by keeping the subject clear and the visual idea very specific. The more deliberate your editing request is, the easier it becomes to create a polished, professional-looking image that feels intentional instead of random. If you want a bold fashion-style portrait, focus on the mood, angle, lighting, and expression together.
Another smart tip is to keep the composition balanced. With extreme wide-angle or fisheye-style images, small changes in camera angle can completely change the final look. For the best results, think about how the face, outfit, background, and accessories work together. A clean setup usually makes the distortion feel stylish rather than messy.
- Use a clear subject description so the face and outfit stay consistent.
- Choose one strong mood, such as confident, cool, playful, or editorial.
- Keep the background simple if you want the subject to stand out more.
- Ask for lighting details like flash, studio light, or soft glow for a cleaner finish.
- Use sharp texture and crisp detail when you want a high-end photo look.
- Experiment with slight pose changes to make the expression feel more natural.
- For social media edits, think about square framing and center composition first.
If you are using Om Editing Top for portrait-style images, it also helps to match the styling with the mood. For example, a retro phone, trendy sunglasses, and a modern Y2K outfit can create a strong visual story. That kind of consistency makes the edit feel more premium and more shareable.
Common mistakes to avoid in This edits
One common mistake is overloading the edit with too many unrelated details. When the subject, background, lighting, and props all compete for attention, the image can lose its main focus. The best Om Editing Top results usually come from a clean idea with a strong center point.
Another issue is pushing the distortion too far without controlling the composition. Extreme wide-angle and fisheye looks can be stylish, but if the face or body becomes too uneven, the image may look awkward instead of editorial. Keeping the distortion tasteful is what gives the photo its fashion edge.
- Too many props: This can distract from the face and weaken the subject’s presence.
- Weak lighting direction: Flat lighting can make the edit look less dramatic and less premium.
- Cluttered background: A busy background can reduce the clean studio feel.
- Unclear facial expression: If the expression is too vague, the portrait may lose personality.
- Overdone effects: Excess bloom, glare, or fog can hide important details.
- Inconsistent styling: Mixing random fashion elements can break the Y2K or editorial vibe.
For Om Editing Top, the goal is usually to make the image look stylish, bold, and usable across platforms. So instead of adding every possible effect, focus on the ones that support the overall mood. A cleaner edit almost always looks better than a crowded one.
Best use cases and ideas for These images
These kinds of edits work really well for Instagram posts, especially when you want a high-impact portrait that stands out in the feed. The strong camera angle, fashion styling, and polished finish make the image feel modern and eye-catching. It is the kind of visual that can instantly signal personality and style.
They are also a great fit for profile pictures when you want something more expressive than a basic headshot. A close, editorial-style image with a confident pose can help your profile feel more memorable. If the framing is clean, it can also work well as a display image on different platforms.
- Instagram posts: Perfect for bold fashion content and stylish personal branding.
- Profile pictures: Works well when you want a confident, standout avatar.
- Thumbnails: Great for reels, edits, and creative content that needs attention fast.
- Portfolios: Useful for showing off portrait editing, lighting, and styling skills.
- Reels covers: Helps create a consistent, attractive visual identity.
You can also use Om Editing Top images for themed content series, mood boards, digital art collections, and fashion-inspired showcases. Because the look is already dramatic and modern, it blends nicely into creative pages that rely on strong aesthetics. If your goal is to build a recognizable style, this kind of image can become part of your signature look.
Variations you can try with This Style
One of the best things about this style is how easily you can change the mood while keeping the same core concept. If you want a different vibe, try shifting the color palette first. Cool grey, blue, silver, and white can make the edit feel sleek, while warmer tones can give it a more nostalgic or energetic feel.
You can also experiment with different settings and seasonal ideas. A clean studio setup gives a polished editorial result, but you could also test softer daylight, nightlife tones, or seasonal color themes to make the image feel fresh. Even a small change in atmosphere can make the edit feel completely new.
- Mood variations: Confident, playful, mysterious, cinematic, or luxury editorial.
- Colour variations: Cool blue, neon accents, monochrome, warm beige, or high-contrast black and white.
- Setting variations: Studio backdrop, city vibe, retro room, minimal background, or glossy fashion set.
- Seasonal ideas: Winter tones, summer brightness, rainy-night mood, or festive neon styling.
- Pose variations: Lean-in angle, direct gaze, side profile, or casual candid expression.
If you want to keep your this prompt edits interesting, try making one change at a time. For example, keep the same outfit but switch the lighting, or keep the same composition but change the color palette. That way, you can compare results and find the style that works best for your page or project.
Conclusion: try This Style for a bold modern look
this look is a strong choice when you want a portrait that feels modern, expressive, and visually powerful. The mix of wide-angle distortion, stylish styling, and clean studio energy can create an image that stands out in social media feeds, portfolios, and creative showcases.
If you like edgy fashion edits, editorial portraits, or Y2K-inspired visuals, this style is worth trying with different moods and color themes. Experiment, refine the details, and make yeh style your own signature look.
💬 Comments