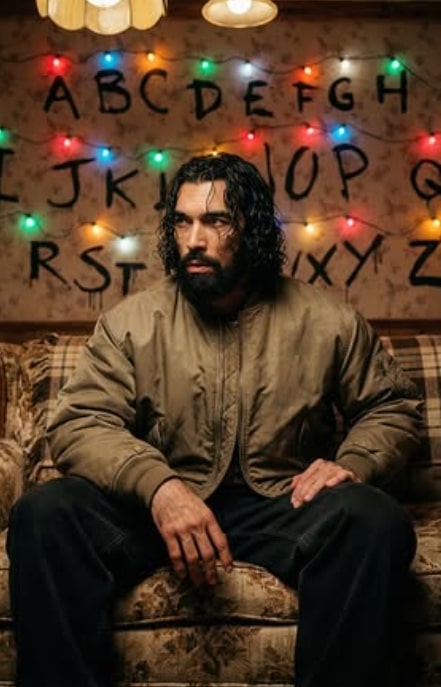
Ultra-Photorealistic Stranger Things-Style 1980s Portrait
Om Editing Top: Ultra-Photorealistic Stranger Things-Style 1980s Portrait Kya Hai?
Om Editing Top jaisa Stranger Things-style 1980s portrait prompt un logon ke liye hai jo apni photo ko cinematic, moody aur ultra-realistic retro look mein convert karna chahte hain. Is style ka main goal hota hai ek aisi image banana jo 1980s ke nostalgic feel ke saath ek mysterious, slightly creepy atmosphere bhi create kare.
Read Also: cinematic-style realistic portrait | 2026 New Year
Ye look un creators ke liye perfect hai jo social media, thumbnail, profile photo, fan-art style visuals, ya AI portrait editing me unique output chahte hain. Isme modern sharpness ke saath vintage room, warm string lights, dramatic shadows, aur intense close-up framing ka combination hota hai.
Agar aap beginner hain, to bhi ye style samajhna easy hai, kyunki isme main focus subject ke face, hair detail, lighting balance, aur background storytelling par hota hai. Simple language mein, ye prompt ek normal portrait ko movie-scene type image mein badal deta hai.
Ye Prompt Style Aapko Kaisa Visual Result Deta Hai?
Is prompt style ka sabse strong part hai uska ultra-photorealistic finish. Photo mein skin detail, hair texture, sharp facial features, aur depth of field ka effect bahut natural lagta hai. Overall image aisi feel deti hai jaise kisi professional studio camera se shot li gayi ho, lekin background mein 1980s ka cinematic drama add ho gaya ho.
Lighting is style ka heart hai. Warm Christmas string lights room ko cozy banati hain, jabki wall par uneven black ink letters ek uneasy aur supernatural mood create karte hain. Ye contrast hi image ko interesting banata hai—ek taraf festive warmth, aur dusri taraf suspense aur mystery.
Composition bhi is look ko powerful banati hai. Close-up portrait, slightly gloomy living room, old sofa, hanging lamps, aur textured interior together ek rich visual story build karte hain. Is wajah se image sirf portrait nahi lagti, balki ek scene ya movie still jaisi feel deti hai.
- Lighting: warm, soft, festive, aur dramatic contrast wali
- Mood: mysterious, nostalgic, slightly unsettling
- Colours: warm yellows, muted browns, dark shadows, small multicolour light accents
- Realism: high detail, natural skin tone, realistic hair strands, cinematic depth
- Composition: close-up focus, indoor retro setting, story-driven background
Om Editing Top Prompt Ko Kaise Use Karein: Step-by-Step Guide
Agar aap mobile par editing kar rahe hain, to ye process bahut simple hai. Sabse pehle apni best photo choose karein jisme face clearly visible ho. Uske baad editing app ya AI image generator mein prompt ka proper use karein, aur reference image ko sahi tarike se attach karein.
Is style mein result tab best aata hai jab aap subject ko clear instructions dete hain—jaise hair, face angle, lighting preference, aur background mood. Beginner users ko har step ko carefully follow karna chahiye, taaki final output original photo se zyada polished aur cinematic lage.
Mobile users ke liye sabse important baat hai: photo selection, prompt order, aur reference accuracy. Agar base image hi blurry hogi, to ultra-photorealistic result weak aa sakta hai. Isliye quality photo se start karna hamesha better hota hai.
- Apni best portrait photo select karein. Face front ya thoda side angle par ho, aur expression clear ho.
- Photo ko app mein upload karein. AI editing tool ya photo editor ka image-to-image option use karein.
- Style prompt apply karein. 1980s cinematic, realistic, moody, and ultra-detailed look choose karein.
- Reference accuracy set karein. Face structure aur hairstyle ko preserve karne ka option ho to use on rakhein.
- Lighting aur background mood define karein. Warm lights, indoor vintage room, and dramatic shadows mention karein.
- Generate multiple variations. Ek hi image ke 2-4 versions try karein aur best one pick karein.
- Final touch-up karein. Agar needed ho to brightness, contrast, aur sharpness thoda adjust karein.
Kaunsi Photos Is Style Ke Liye Sabse Best Kaam Karti Hain?
Is prompt style mein best results tab milte hain jab input photo clear aur high-resolution ho. Close-up portrait sabse useful hota hai, kyunki is look ka focus face aur hair detail par hota hai. Agar image me face already sharp hai, to final output aur zyada realistic lagega.
Angle bhi important hai. Straight-facing ya slightly turned face best rehta hai, kyunki aise shot mein facial symmetry aur expression achchhe se preserve hote hain. Hair detail especially important hai, isliye curls, volume, aur wet texture jaisi elements tab hi sahi dikhenge jab original photo mein visible ho.
Background simple rakhna better hai, kyunki AI ko subject aur scene dono ko balance karna hota hai. Plain wall, soft indoor light, ya uncluttered room photo ko strong base dete hain. Clothing bhi solid aur simple ho to better hota hai, because busy prints aur extra distractions cinematic mood ko weak kar sakte hain.
- Angle: front-facing ya slight 3/4 angle
- Resolution: high-resolution, sharp, no heavy blur
- Lighting: soft indoor light, natural face visibility, no harsh overexposure
- Background: simple, clean, and low distraction
- Clothing: plain, solid colours, retro or neutral style works best
- Hair visibility: clear curls, texture, and shape visible in the frame
Om Editing Top ke liye Pro Tips for Best Results
Om Editing Top par aise ultra-photorealistic 1980s portrait results tab aur strong aate hain jab aap prompt ko clean, specific aur balanced rakhte ho. Is style mein sabse important cheez hoti hai subject consistency, lighting mood, aur background detail ka harmony. Agar aap wajah se bhi too many conflicting instructions de dete ho, output generic ya overprocessed lag sakta hai.
Best practice ye hai ki aap face, hair, expression aur scene setting ko clearly define karo, lekin unnecessary duplication avoid karo. “Cinematic”, “mysterious”, “gloomy”, aur “cozy” jaise terms ek saath achhe lagte hain, bas inhe natural flow mein use karo. Saath hi, skin texture, depth of field, aur vintage interior ka balance maintain karna output ko aur believable banata hai.
- Subject ki facial identity aur hair details ko consistent rakho, taaki portrait realistic lage.
- Lighting ko ek clear direction do, jaise warm practical lights aur moody shadows ka combination.
- Background mein sirf important elements rakho, taaki face se attention na hate.
- 1980s feel ke liye vintage interior, old sofa, ceiling lamps, aur string lights jaise cues use karo.
- Close-up portrait ke liye ultra-sharp details aur soft depth of field ka balance maintain karo.
- Agar text wall element include kar rahe ho, to uska placement neat aur readable feel hona chahiye.
Ek aur useful tip ye hai ki Om Editing Top par same concept ke multiple variations test karo. Kabhi background thoda darker rakhkar dekho, kabhi lights ko zyada festive bana do, aur kabhi mood ko aur eerie direction mein le jao. Is tarah aapko pata chalega ki kis combination mein sabse zyada powerful Stranger Things-style portrait vibe aati hai.
Common Mistakes to Avoid in Om Editing Top Prompts
Sabse common mistake hoti hai prompt ko overstuff kar dena. Jab subject, pose, lighting, camera, room decor, wall text, aur atmosphere sab kuch ek hi line mein heavy detail ke saath bhar diya jata hai, to result messy ya confused ho sakta hai. Better hota hai cheezein priority ke hisaab se frame ki jayein.
Dusri problem hoti hai inconsistent styling. Agar aap modern studio, neon cyberpunk, aur 1980s living room ko ek saath mix kar dete ho, to output ka vintage feel weak ho jata hai. Om Editing Top ke liye clean era-specific language use karna zyada effective hota hai, especially jab goal cinematic retro portrait ho.
- Too many style directions dena — output visually confused ho sakta hai.
- Face ya hair details ko baar-baar change karna — subject identity distort ho sakti hai.
- Background ko main subject se zyada important banana — portrait focus kam ho jata hai.
- Lighting instructions clear na hona — mood flat ya unrealistic lag sakta hai.
- Unnecessary repetition — prompt longer hota hai, but better nahi hota.
- Too much sharpness aur too much blur ek saath maangna — image unnatural dikh sakti hai.
Ek aur mistake ye hoti hai ki log aesthetic words to use karte hain, par practical scene details nahi dete. Example ke taur par “cinematic” likhna enough nahi hota; aapko warm string lights, old furniture, ceiling beams, aur subtle shadows jaisi details bhi deni chahiye. Ye chhoti cheezein Om Editing Top output ko believable aur polished banati hain.
Best Use Cases for Om Editing Top Style Images
Om Editing Top style images ka use sirf ek portrait banane tak limited nahi hai. Ye visuals social media branding, aesthetic posts, nostalgia-based content, aur fan-inspired edits ke liye kaafi useful hote hain. Agar aap Instagram par strong visual identity build karna chahte ho, to aisa cinematic retro portrait instantly attention grab kar sakta hai.
Profile pictures ke liye bhi ye style kaafi effective hota hai, especially jab aapko dramatic yet polished look chahiye. YouTube thumbnails mein bhi is tarah ke portraits ka use karke aap mystery, suspense, ya retro vibe communicate kar sakte ho. Portfolio pages aur moodboards mein bhi ye images aapki creative direction ko strong banati hain.
- Instagram posts: cinematic retro aesthetic aur moody portrait feeds ke liye.
- Profile pictures: sharp, memorable, and visually striking identity ke liye.
- YouTube thumbnails: suspenseful or nostalgic content ko highlight karne ke liye.
- Reels covers: scroll-stopping cover frames banane ke liye.
- Creative portfolios: portrait lighting aur character styling showcase karne ke liye.
- Fan edits aur concept art: 1980s-inspired storytelling visuals ke liye.
Agar aap content creator ho, to aise images ko storytelling assets ki tarah use karo. Ek hi image series se aap intro post, thumbnail, story cover, aur highlight cover sab create kar sakte ho. Om Editing Top par jab same concept ko multiple formats mein adapt kiya jata hai, to brand look aur bhi professional lagta hai.
Variations You Can Try with Om Editing Top
Is style ka sabse interesting part ye hai ki aap mood aur environment ko change karke same concept ke different results nikal sakte ho. Ek version ko zyada warm aur nostalgic rakha ja sakta hai, jabki doosra version zyada eerie aur suspenseful ho sakta hai. Isi flexibility ki wajah se Om Editing Top variations test karna kaafi useful hota hai.
Aap colour palette ke saath bhi experiment kar sakte ho. Warm amber lights se cozy retro feel aati hai, jabki cooler shadows aur muted tones scene ko more dramatic bana dete hain. Seasonal changes bhi kaam aate hain — winter vibe mein lights zyada cozy lagti hain, while rainy or dim evening setting image ko aur cinematic bana deti hai.
- Different moods: cozy, mysterious, dramatic, nostalgic, eerie.
- Colour shifts: warm golden, cool blue, soft neutral, muted vintage.
- Settings: living room, bedroom corner, hallway, basement-style interior.
- Seasonal ideas: winter holidays, rainy nights, autumn evenings, late-night indoor scenes.
- Lighting changes: fairy lights, lamp glow, window shadows, low-key cinematic light.
- Composition tweaks: tighter close-up, slightly wider frame, centered portrait, off-center framing.
Agar aapko experiment karna pasand hai, to same portrait ko different emotional tones mein generate karke compare karo. Ek version cheerful retro look de sakta hai, aur doosra version suspense-driven feel de sakta hai. Ye approach Om Editing Top users ke liye especially helpful hai, kyunki isse aapko apne brand ya content ke liye best visual language mil jati hai.
Conclusion: Om Editing Top ke Saath Try Karo
Om Editing Top ka use karke aap ultra-photorealistic Stranger Things-style 1980s portrait ko aur zyada cinematic, detailed, aur memorable bana sakte ho. Sahi lighting, consistent subject details, aur retro interior cues ke saath result kaafi powerful aur story-driven lagta hai.
Agar aap best output chahte ho, to prompt ko clean rakho, variations test karo, aur mood ke hisaab se background aur colour palette adjust karo. Om Editing Top ke saath ye style try karke aap social media, thumbnails, ya portfolio ke liye standout visuals easily create kar sakte ho.
💬 Comments