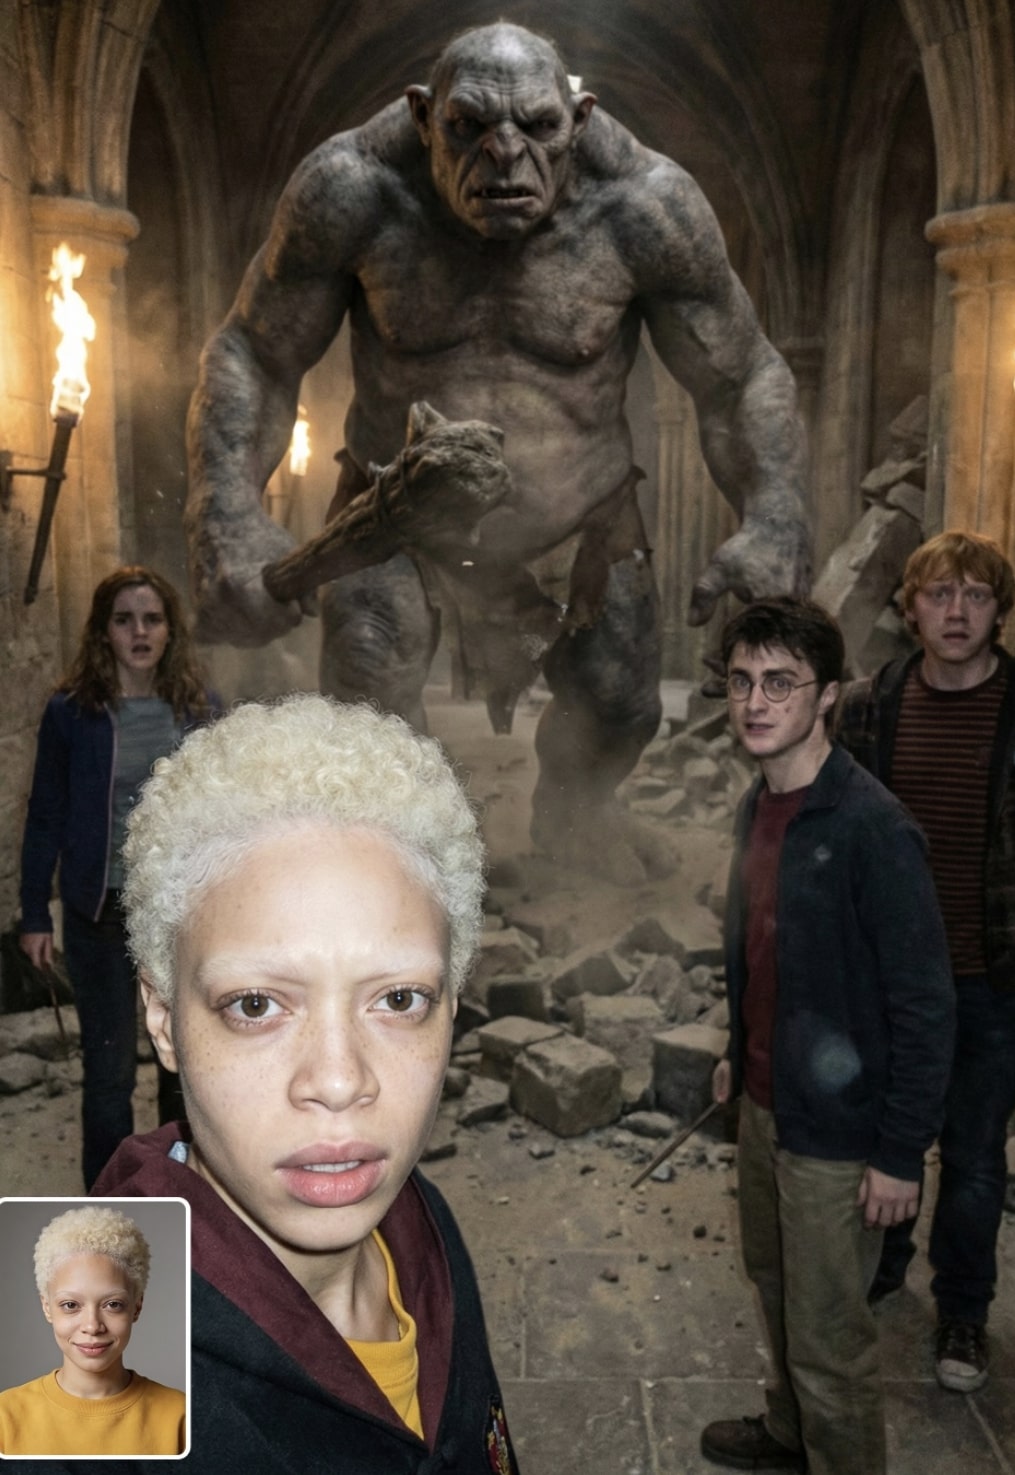
Hogwarts corridor
Om Editing Top: Hogwarts Corridor Style Kya Hai?
Om Editing Top ka Hogwarts corridor style un logon ke liye hai jo apni normal photo ko ek dramatic, cinematic fantasy scene mein badalna chahte hain. Ye look sirf “edit” nahi hota, balki aisa lagta hai jaise aap kisi tense movie moment ka part ho—dark stone corridor, dust, broken surroundings, aur strong storytelling ke saath.
Read Also: cinematic-style realistic portrait | 2026 New Year
Is style mein focus sirf background par nahi hota. Main subject ki facial identity, posture, aur expression ko natural rakha jata hai, taaki image realistic lage. Ye especially un creators ke liye useful hai jo AI photo editing, fantasy poster look, cinematic portrait, ya viral Instagram-style transformation banana chahte hain.
Hogwarts corridor type edit un users ke liye bhi best hai jo mobile se simple photo ko high-impact visual mein convert karna chahte hain. Agar aap dramatic lighting, wizard-world atmosphere, aur realistic action frame pasand karte hain, to ye prompt-style editing kaafi powerful result de sakti hai.
This Style Se Is Prompt Style Mein Kya Milta Hai?
Is style ka sabse strong point hai iska cinematic realism. Image mein usually dark stone corridor, scattered debris, dust particles, aur uneven torchlight jaisi details hoti hain jo scene ko alive bana deti hain. Overall mood tense, urgent, aur slightly dangerous feel hota hai.
Lighting yahan bahut important hoti hai. Harsh flash aur natural shadow combination scene ko gritty documentary look deta hai. Isse photo polished studio shot nahi lagti, balki aisi lagti hai jaise kisi real moment ko instantly capture kiya gaya ho. Ye effect fantasy aur realism ka balance create karta hai.
Composition mein foreground subject ko clearly highlight kiya jata hai, jabki background mein large threatening presence ya action elements scene ko depth dete hain. Is tarah ka framing especially tab achha lagta hai jab aap storytelling-based edit banana chahte ho—jahan viewer ko ek hi frame mein tension, motion, aur atmosphere sab mil jaye.
- Lighting: uneven torchlight, natural shadows, harsh flash
- Mood: tense, gritty, cinematic, survival-based
- Colours: dark stone grey, dusty brown, warm orange highlights
- Composition: foreground focus, strong depth, action-oriented framing
- Realism: handheld feel, documentary-style capture, natural expressions
This Style Kaise Use Karein: Beginner Friendly Step-by-Step Guide
Agar aap bilkul beginner hain, to pehla step hai ek clear portrait select karna. Aisi photo choose karein jisme aapka face sharp ho aur expression neutral ya slightly intense ho. Blurry ya low-quality selfie se result weak aa sakta hai, kyunki fantasy scene mein face identity ko clean dikhana zaroori hota hai.
Dusra step hai photo ko mobile par properly upload karna. Editing tool mein original image add karke style/prompt-based transformation apply karein. Agar platform allow karta hai, to aspect ratio aur framing pe dhyan dein, taaki body aur face dono natural lage. Crop bahut tight na ho, warna cinematic background ka effect kam ho jayega.
Teesra step hai final output ko review karna. Dekhein ki face unchanged hai ya nahi, lighting natural lag rahi hai ya nahi, aur background mein action elements balance mein hain ya nahi. Agar output overexposed, too dark, ya unnatural lage, to second attempt mein zyada clear portrait ya better lighting wali source photo use karein.
- Ek sharp, front-facing ya slightly side-angled portrait choose karein.
- Photo ka face area clear ho aur expression readable ho.
- Editing app ya AI tool mein image upload karein.
- Hogwarts corridor jaisa cinematic fantasy style select karein.
- Result preview karke shadows, contrast, aur realism check karein.
- Need ho to better quality photo ke saath re-generate karein.
Kaunsi Photos Is Style Ke Liye Sabse Best Hain?
Is type ke edit ke liye sabse best photos woh hoti hain jisme subject ka face clearly visible ho. Front angle ya slight three-quarter angle usually sabse safe rehta hai, kyunki isse AI ko facial structure samajhne mein help milti hai. Extreme side profile ya very low-angle shots kabhi-kabhi identity ko distort kar dete hain.
Resolution high honi chahiye, ideally aisi jisme skin details, eyes, aur hair edges clear dikh rahe hon. Poor quality, too much noise, ya heavy blur wali image se cinematic realism kam ho sakta hai. Agar photo indoor hai, to soft natural light ya even lighting better hoti hai, because shadows face details ko hide nahi karti.
Background bhi important hai. Simple, uncluttered background se subject easily isolate hota hai. Busy background, multiple people, ya strong color distractions style ko confuse kar sakte hain. Clothing ke liye plain ya simple outfit best hota hai, kyunki edit ke baad fantasy environment ka focus zyada strong lagta hai.
- Angle: front-facing ya slight 3/4 angle
- Resolution: high-quality, sharp, non-blurry image
- Lighting: soft natural light or balanced indoor light
- Background: simple, clean, low distraction
- Clothing: plain, non-busy, neutral colors preferred
Best results tab aate hain jab source photo mein face clearly visible ho aur pose natural ho. Agar aap chahte ho ki edit zyada cinematic dikhe, to aisi photo choose karein jisme shoulders relaxed hon, chin normal position mein ho, aur expression over-smile na kare. Isse final output more dramatic aur believable lagta hai.
Ek aur practical tip: aapki photo mein harsh filters, heavy beauty mode, ya over-editing already nahi hona chahiye. जितना original image clean hogi, उतना hi AI-style transformation strong aur realistic lagega. Isi liye Om Editing Top ke Hogwarts corridor look ke liye simple, sharp, aur well-lit photo sabse effective hoti hai.
Om Editing Top के लिए Pro Tips: Best Results कैसे लें
अगर आप Om Editing Top style में cinematic fantasy edit बनाना चाहते हैं, तो सबसे पहले framing पर ध्यान दें। इस तरह के scene में subject, background action, और light तीनों का balance बहुत important होता है। सही composition से image ज्यादा realistic और impactful लगती है, खासकर जब corridor जैसा narrow space हो।
एक और बड़ा point है facial consistency. Portrait-based edits में face details को stable रखना सबसे जरूरी होता है, क्योंकि उसी से output believable बनता है। साथ ही, environment cues जैसे dust, broken stones, torchlight, और motion feel को naturally blend करना चाहिए ताकि scene forced न लगे।
- Foreground subject को clear और centered रखें, लेकिन थोड़ा tension वाला off-balance pose दें।
- Background में action element add करें, जैसे large creature, debris, या rushing atmosphere, ताकि depth बने।
- Lighting को mixed रखें: warm torch glow के साथ harsh flash effect भी use करें।
- Clothing और facial expression को scene के emotion के हिसाब से match करें।
- Handheld, documentary-style framing से image ज्यादा raw और realistic लगेगी।
- Stone dust, broken floor, और shadow contrast जैसे details add करें ताकि cinematic texture आए।
अगर आप Om Editing Top image को social media-ready बनाना चाहते हैं, तो detail overload से बचना बेहतर है। Scene में enough chaos हो, लेकिन main subject फिर भी readable रहे। यही balance edit को polished और professional बनाता है, खासकर fantasy action shots में।
Common Mistakes to Avoid in This Style
सबसे common mistake है scene को बहुत ज्यादा clean या studio-like बना देना। Hogwarts corridor जैसा damaged, dramatic setting natural chaos मांगता है; अगर floor, walls, और lighting too perfect दिखेंगे, तो overall realism कम हो जाएगा। ऐसे edits में gritty texture और imperfect shadows ही story को believable बनाते हैं।
दूसरी गलती होती है action को overdo करना. जब हर element बहुत dramatic हो जाता है, तब focus main character से हट जाता है। Om Editing Top style का best output तब आता है जब energy high हो, लेकिन composition controlled रहे।
- Too many effects add करना output को noisy और fake बना देता है।
- Main subject के face proportions बदल देना पहचान को कमजोर कर सकता है।
- Lighting mismatch image को flat या confusing बना सकता है।
- Background clutter बढ़ाने से corridor की natural depth खो सकती है।
- Characters की placement random रखने से storytelling effect कम हो जाता है।
एक और issue है color tone inconsistency. अगर foreground warm है और background completely different mood में चला गया, तो edit disconnected लगेगा। इसलिए same visual language रखना जरूरी है—same shadow behavior, same cinematic grain, और same atmospheric density। इससे this style result ज्यादा cohesive दिखता है।
Best Use Cases for These Images
ऐसी fantasy documentary-style images कई तरह से use की जा सकती हैं। सबसे obvious use है Instagram post या story, जहां dramatic scene instantly attention पकड़ता है। अगर आपका content fantasy, edit art, or cinematic transformation से related है, तो यह style बहुत strong first impression देता है।
इन images को profile picture के creative version, YouTube thumbnail, या reels cover के लिए भी use किया जा सकता है। खासकर thumbnails में high tension, visible subject, और strong lighting clickability बढ़ाते हैं। this prompt जैसा look cosplay pages, fan edits, and AI art showcases के लिए भी ideal है।
- Instagram posts: cinematic feed consistency और visual storytelling के लिए।
- Profile pictures: fantasy-inspired identity या themed branding के लिए।
- Thumbnails: action-heavy videos और edit tutorials के लिए attention grabber।
- Reels covers: short-form content को dramatic start देने के लिए।
- Portfolios: creative editing skills और fantasy composition दिखाने के लिए।
अगर आप creator हैं, तो ऐसी visuals को series format में भी use कर सकते हैं—same character, different scene, different emotional moment. इससे आपकी feed में a consistent cinematic universe बनता है, और this look theme बार-बार different angles से present किया जा सकता है।
This Style Variations You Can Try
इस concept की सबसे अच्छी बात यह है कि आप mood और setting के साथ बहुत experiment कर सकते हैं। एक ही base idea को dark, heroic, mysterious, or urgent tone में बदला जा सकता है। इससे हर output fresh लगता है, लेकिन overall style connected रहती है।
Seasonal variations भी काफी effective होते हैं। अगर corridor scene को winter haze, autumn dust, or rain-damp atmosphere में shift किया जाए, तो image का mood पूरी तरह बदल जाता है। yeh style edits में color palette experiment करना भी बहुत useful है, क्योंकि tonal changes से story का emotion instantly shift हो जाता है।
- Mood changes: tense, heroic, fearful, adventurous, or suspenseful look try करें।
- Colour variations: warm amber, cold blue, desaturated grey, or moody sepia palette use करें।
- Setting variations: broken hall, torchlit passage, smoke-filled corridor, or storm-lit interior try करें।
- Seasonal effects: icy air, autumn dust, rainy haze, or summer heat glow add करें।
- Lighting styles: soft cinematic light, harsh flash, dramatic backlight, or flickering torch shadows explore करें।
आप character expression और body language बदलकर भी variation ला सकते हैं। कभी brave stance, कभी defensive pose, कभी shocked reaction—हर version अलग कहानी बताता है। यही flexibility this edit style को repeatable भी बनाती है और creative भी।
This Style: Final Conclusion
this style उन लोगों के लिए perfect style है जो cinematic fantasy, realistic action, और documentary-style intensity को एक साथ blend करना चाहते हैं। सही lighting, believable facial detail, और strong atmosphere मिलकर image को memorable बनाते हैं।
अगर आप एक dramatic, story-rich edit चाहते हैं, तो इस style के साथ experiment करना जरूर worth it है। अलग-अलग moods, colors, और settings try करें, और देखें कि कौन-सा version सबसे ज्यादा powerful लगता है। this prompt को अपने next creative project में use करके आप बहुत आसानी से standout visual बना सकते हैं।
💬 Comments