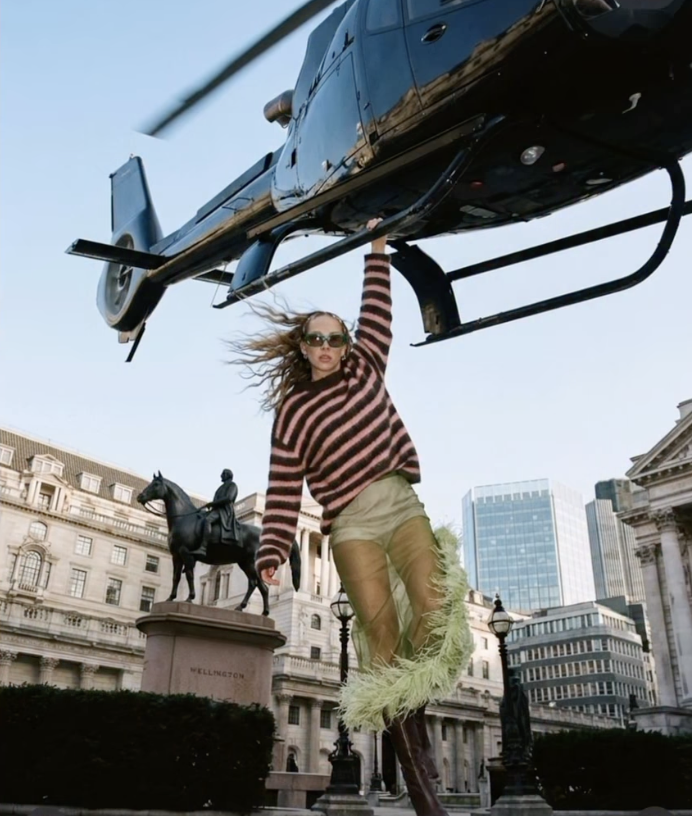
Helicopter
Om Editing Top के साथ Helicopter फोटो एडिटिंग क्या है?
Om Editing Top जैसी फोटो-एडिटिंग स्टाइल उन लोगों के लिए बहुत useful होती है जो अपनी साधारण selfie को cinematic, high-fashion और realistic transformation में बदलना चाहते हैं। इस तरह की editing खासकर उन users के लिए है जो social media पर standout दिखना चाहते हैं, travel-themed portraits बनाना चाहते हैं, या फिर एक bold and dramatic AI photo edit style try करना चाहते हैं।
Read Also: cinematic-style realistic portrait | 2026 New Year
Helicopter photo editing में आम तौर पर subject को एक ऐसे action scene में place किया जाता है जहाँ image में height, motion, luxury, और adventure का strong feel आता है। इस style की खासियत यह है कि photo real लगती है, लेकिन उसका composition इतना dramatic होता है कि वह instantly eye-catching बन जाती है।
अगर आप photo editing ke beginner हैं, तो भी यह style समझना आसान है क्योंकि इसमें face detail, outfit, lighting, aur background सब कुछ बहुत clear और polished रखा जाता है। यही वजह है कि यह look Instagram reels, profile pictures, travel edits और fashion-inspired portraits के लिए काफी popular है।
इस Prompt Style में आपको क्या मिलता है?
Helicopter-style edit का main appeal उसका cinematic atmosphere होता है। Photo में usually bright daylight, sharp focus, और clean realistic shadows का combination मिलता है, जिससे subject naturally scene का हिस्सा लगता है। Aerial background और wide city view edit को depth देते हैं, जबकि helicopter जैसी dramatic object placement image को unique बनाती है।
इस तरह की photo style में mood adventurous, premium और bold feel कराती है। Colors अक्सर crisp और vibrant रहते हैं, ताकि sky, city view, black helicopter, और subject का outfit अच्छे से separate दिखे। जब lighting balanced हो, तो face details साफ रहती हैं और edit artificial नहीं लगती।
Composition भी इस style का बहुत important हिस्सा है। Subject usually frame के center या slightly off-center रखा जाता है ताकि attention सीधे चेहरे और action pose पर जाए। Background में open sky, aerial landscape, और recognizable landmark जैसी चीजें image को stronger बनाती हैं।
- Realistic light and shadow balance
- Cinematic aerial perspective
- Sharp face clarity and outfit detail
- Premium travel-editorial feel
- High-contrast but natural-looking colors
Helicopter Edit को Step-by-Step कैसे Use करें?
अगर आप beginner हैं और मोबाइल पर यह style use करना चाहते हैं, तो सबसे पहले अपनी best selfie चुनें। कोशिश करें कि फोटो साफ हो, face directly visible हो, और image में too much blur या harsh shadow न हो। जितनी clear source photo होगी, उतनी ही realistic final edit बनेगी।
इसके बाद editing tool या AI image generator में prompt/photo style apply करें और ensure करें कि reference image properly selected हो। Mobile पर काम करते समय internet stable होना चाहिए, क्योंकि high-detail generation में time लग सकता है। एक बार result आने के बाद आप brightness, contrast, और crop को small adjustments के साथ improve कर सकते हैं।
Beginner-friendly flow इस तरह follow करें:
- अपनी सबसे clear selfie select करें।
- Photo को crop या resize करके face को prominent रखें।
- Editing tool में reference image upload करें।
- Helicopter-style prompt/photo style apply करें।
- Generate होने का wait करें और result check करें।
- अगर जरूरत हो तो light, sharpness, और framing adjust करें।
- Final image को high quality में save करें।
Best result के लिए एक बार में बहुत सारे edits बदलने के बजाय simple approach रखें। पहले subject placement और realism देखें, फिर minor tweaks करें। इससे mobile editing smoother रहती है और image quality भी better बनी रहती है।
कौन-सी Photos Helicopter Style के लिए सबसे अच्छी रहती हैं?
इस तरह की editing के लिए सबसे अच्छा वही photo होती है जिसमें face साफ दिखे और body posture natural लगे। Front-facing या slightly angled selfie अक्सर अच्छा काम करती है, क्योंकि editor को facial features easily preserve करने में मदद मिलती है। बहुत dark, crowded, या low-quality photos से realistic output कम मिलती है।
Lighting भी बहुत important है। Soft daylight या evenly lit indoor photo best रहती है, क्योंकि इससे skin tones natural दिखते हैं। Background जितना simple होगा, उतना subject cleaner दिखेगा। Busy backgrounds कभी-कभी helicopter scene में merge नहीं हो पाते, जिससे edit less realistic लग सकती है।
Clothing की बात करें तो plain, stylish, और well-fitted outfit बेहतर रहता है। Strong colors या patterned clothes भी काम कर सकते हैं, लेकिन overexposed या too shiny fabric avoid करना चाहिए। Face से लेकर shoulders तक clear visibility होना helpful है, खासकर जब edit में body proportions preserve करने हों।
- Angle: front or slight side angle सबसे अच्छा
- Resolution: high-resolution selfie चुनें
- Lighting: natural, soft, and even light preferred
- Background: clean, simple, और uncluttered
- Clothing: neat outfit with visible details
- Expression: calm, confident, and clear face look
अगर आपकी base photo strong होगी, तो Om Editing Top वाली Helicopter edit और भी ज्यादा polished, cinematic, और believable लगेगी। इसलिए हमेशा source image पर ध्यान दें, क्योंकि realistic final result का foundation वहीं से बनता है।
Pro Tips for the Best Om Editing Top Results
अगर आप Om Editing Top से सबसे अच्छा आउटपुट चाहते हैं, तो सिर्फ idea अच्छा होना काफी नहीं है। सही composition, lighting, pose balance और background placement भी उतना ही important होता है। खासकर जब edit में helicopter, height, city view या cinematic travel feel शामिल हो, तब small details पूरे image का impact बदल देती हैं।
Best results के लिए कोशिश करें कि subject और background दोनों एक-दूसरे को support करें। अगर face, outfit और body proportions को natural रखना है, तो reference image साफ, well-lit और front-facing होना चाहिए। इससे editor को fine details preserve करने में आसानी होती है और final image ज्यादा realistic दिखती है।
- High-quality selfie या portrait use करें ताकि facial details साफ रहें।
- Neutral expression या confident pose choose करें, क्योंकि extreme expression कई बार cinematic scene से mismatch कर देता है।
- Outfit simple और clean रखें, ताकि helicopter scene में focus subject पर बना रहे।
- Background में sky, aerial view, or landmark जैसे elements को balanced रखें, ताकि image overcrowded न लगे।
- Lighting direction consistent रखें, especially जब daylight या dramatic shadow effect चाहिए हो।
- Generate करने के बाद edges, hands, and clothing folds को zoom करके check करें।
एक और useful tip यह है कि आप result को सिर्फ “cool” नहीं, बल्कि “believable” बनाने पर ध्यान दें। this style style edits तभी strong लगते हैं जब motion, scale, and depth सही लगे। अगर subject बहुत बड़ा या बहुत छोटा feel हो रहा है, तो prompt variation या composition adjustment ज़रूर try करें।
Common Mistakes to Avoid in This Edits
कई बार edit अच्छा concept लेकर भी कमजोर इसलिए लग जाता है क्योंकि कुछ common mistakes हो जाती हैं। सबसे पहली गलती होती है low-resolution reference use करना। जब source image blurry होती है, तो face details, hair edges और outfit textures distorted आ सकते हैं, जिससे final output artificial लगता है।
दूसरी बड़ी गलती है too many visual elements एक साथ जोड़ देना। Helicopter, city, Eiffel Tower, dramatic sky और fashion look — ये सभी elements powerful हैं, लेकिन अगर composition overdone हो जाए तो image cluttered दिखती है। this prompt effect के लिए clarity जरूरी है, chaos नहीं।
- Blurry selfie use करना: इससे facial identity weak हो जाती है और realism कम हो जाता है।
- Unnatural pose force करना: Body position अगर scene से match नहीं करेगी, तो edit fake लगेगा।
- Lighting mismatch: Subject पर एक light direction और background पर दूसरी direction होने से cut-and-paste effect आता है।
- Too much zoom or crop: Subject details कट जाएँ तो cinematic feel टूट जाती है।
- Background overload: बहुत सारे landmarks या effects add करने से main subject दब जाता है।
- Ignore final touch-up: Small issues जैसे hand shape, shadow softness, and edge blending अगर देखे नहीं गए, तो output polished नहीं लगेगा।
इन mistakes को avoid करने से आपका final image cleaner, more realistic, और share-worthy बनता है। यह खास तौर पर तब important होता है जब आप social media पर attention-grabbing visuals बनाना चाहते हैं।
Best Use Cases and Creative Ideas for This Style
this look style images कई जगह use किए जा सकते हैं, खासकर उन लोगों के लिए जो bold, cinematic, and attention-catching visuals पसंद करते हैं। Instagram posts पर यह edit immediately scroll-stop effect दे सकता है, क्योंकि aerial background और high-altitude concept viewers का ध्यान खींच लेते हैं।
Profile picture के लिए भी इसका use किया जा सकता है, लेकिन वहां image को थोड़ा cleaner और less crowded रखना बेहतर होता है। अगर आपको branding, personal style showcase, या travel-inspired content बनाना है, तो यह edit आपके page को premium aesthetic दे सकता है।
- Instagram posts: dramatic travel look और cinematic mood के लिए।
- Profile pictures: अगर आप unique but clean visual identity चाहते हैं।
- Thumbnails: YouTube या short-video thumbnails में instant curiosity create करने के लिए।
- Portfolios: creative editing samples या fashion editorial showcases में।
- Reels covers: consistency और strong visual theme बनाने के लिए।
इस तरह के images reel covers में भी बहुत अच्छे लगते हैं, especially अगर आपकी video travel, adventure, AI edits, or transformation content से related है। अगर आप creator हैं, तो एक consistent yeh style visual theme आपके content को recognizable बना सकती है।
Variations You Can Try with This Style
इस edit की सबसे अच्छी बात यह है कि आप इसी concept को कई moods और settings में बदल सकते हैं। अगर आपको bright daytime वाला dramatic aerial look पसंद है, तो वही base रखकर आप sunset, golden hour, rainy atmosphere, या night-city version भी try कर सकते हैं। इससे आपका content repetitive नहीं लगेगा।
आप background color palette बदलकर भी output का tone पूरी तरह बदल सकते हैं। Cool blue sky image को fresh और adventurous feel देता है, जबकि warm sunlight इसे more cinematic और luxurious बनाती है। इसी तरह subject की pose और camera angle change करके a more energetic या a more elegant look create किया जा सकता है।
- Mood variations: cinematic, luxury, adventure, bold, dreamy, epic.
- Colour variations: bright daylight, golden tones, blue-hour, moody shadows.
- Setting variations: city skyline, mountain air, sea view, desert sky, night lights.
- Seasonal ideas: summer clarity, winter haze, monsoon clouds, spring brightness.
- Style variations: editorial fashion, action-shot realism, travel poster look, social media hero image.
अगर आप experiment करना चाहते हैं, तो एक ही concept को different outputs में test करें और compare करें कि कौन सा version आपकी personality या content niche के साथ सबसे ज्यादा match करता है। यही approach this edit results को more versatile और professional बनाती है।
Conclusion: Try This Style for a Cinematic Look
अगर आप एक ऐसा edit चाहते हैं जो bold भी हो, cinematic भी लगे, और social media पर instantly notice भी किया जाए, तो this style एक strong choice है। सही reference, balanced composition, और smart variations के साथ आप बहुत polished result पा सकते हैं।
अब आप different moods, colours, and use cases के साथ experiment करके अपना best version बना सकते हैं। चाहे Instagram post हो, profile picture हो, thumbnail हो, या reels cover — this prompt style images आपके content को more attractive और memorable बना सकती हैं।
💬 Comments