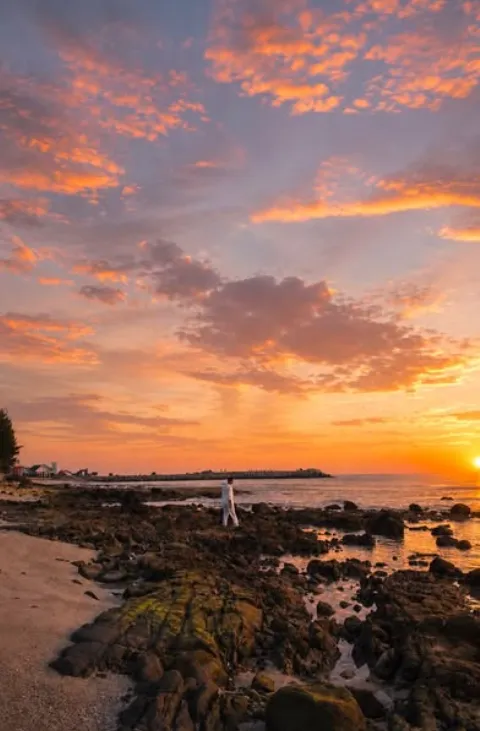
HD quality and Ultra-realistic outdoor photo enhancement
Om Editing Top के साथ HD Quality और Ultra-Realistic Outdoor Photo Enhancement क्या है?
Om Editing Top का यह फोटो एडिटिंग स्टाइल उन लोगों के लिए है जो अपनी normal outdoor photo को ज्यादा clear, cinematic और high-end look देना चाहते हैं। इसमें फोटो की original identity, face structure और overall composition को बनाए रखते हुए image को ऐसा बनाया जाता है कि वह natural भी लगे और visually premium भी दिखे।
Read Also: cinematic-style realistic portrait | 2026 New Year
यह style खास तौर पर उन users के लिए useful है जो Instagram, profile photos, travel shots, couple portraits, reels covers, या cinematic outdoor portraits को improve करना चाहते हैं। अगर आपकी photo daylight में ली गई है, लेकिन उसमें depth, warm tone, soft glow, और professional clarity की कमी है, तो यह enhancement उसी gap को fill करता है।
इस तरह की photo enhancement में focus केवल sharpness बढ़ाने पर नहीं होता, बल्कि mood build करने पर भी होता है। Sunset-inspired colors, soft haze, realistic light falloff, और film-like texture मिलकर image को ऐसा feel देते हैं जैसे photo किसी expensive camera से naturally capture की गई हो।
यह Photo Style आपको क्या देता है?
इस enhancement का सबसे बड़ा फायदा यह है कि photo over-edited नहीं लगती। चेहरे की details, background depth, skin tones, और outdoor light balance को इस तरह adjust किया जाता है कि result polished हो लेकिन fake न लगे। यही वजह है कि यह style modern portrait editing में बहुत popular है।
Visual output में आपको आमतौर पर HD clarity, dreamy atmosphere, cinematic diffusion, और warm sunset palette देखने को मिलता है। Soft yellow, orange, और pink tones image में एक gentle glow जोड़ते हैं, जिससे subject अलग से pop करता है और background में एक dreamy natural ambience बनता है।
कई बार outdoor photos flat दिखती हैं, especially जब sunlight harsh हो या background dull हो। इस style में contrast, highlights, shadows, और color grading को carefully balance किया जाता है ताकि photo realistic भी रहे और artistic भी लगे। Kodak analog camera effect इसकी nostalgic film-like feel को और strong बनाता है।
- HD clarity: face और outfit details ज्यादा साफ दिखती हैं
- Cinematic haze: photo में soft dreamy atmosphere आता है
- Sunset tones: warm yellow, orange, और pink shading मिलती है
- Realistic look: original face और composition preserve रहती है
- Film effect: analog camera जैसा nostalgic premium finish मिलता है
This Style Prompt को Mobile पर Step-by-Step कैसे Use करें?
अगर आप beginner हैं, तो भी इस type की editing को use करना काफी simple है। सबसे पहले एक साफ outdoor photo चुनें जिसमें subject clearly visible हो। फिर उसी image को editing tool या AI photo editor में upload करें, और page पर दिया गया prompt exactly apply करें। यहाँ सबसे जरूरी बात यह है कि original face और pose को maintain रखने वाला option enabled रहे।
Mobile users के लिए सबसे आसान तरीका यह है कि आप पहले image को gallery से select करें, फिर prompt box में style instructions paste करें, और output settings में realistic enhancement, high detail, और cinematic tone जैसी options choose करें। अगर tool manual sliders देता है, तो brightness, warmth, contrast, और sharpness को balanced रखें ताकि photo natural लगे।
Editing के बाद result को ध्यान से check करें। Face shape, skin tone, background colors, और light direction को compare करें कि कहीं extra smoothing या artificial glow तो नहीं आ गया। जरूरत हो तो minor refinement करें, लेकिन image की identity को alter न होने दें।
- अपनी सबसे अच्छी outdoor photo gallery से चुनें।
- Photo editor या AI enhancement tool खोलें।
- Image upload करें और original composition preserve रखने वाला mode select करें।
- Prompt/style apply करें और HD, ultra-realistic, cinematic enhancement choose करें।
- अगर sliders हों, तो warmth, contrast, clarity, और haze को balanced रखें।
- Preview देखकर check करें कि face, background, और outfit natural दिख रहे हैं या नहीं।
- Final image export करें और high resolution में save करें।
कौन-सी Photos इस Style के लिए सबसे अच्छी रहती हैं?
इस तरह की enhancement के लिए वही photos best रहती हैं जिनमें subject clear हो और lighting already usable हो। Outdoor portraits, travel photos, standing pose shots, half-body photos, और natural sunlight वाली images पर इसका result खासतौर पर अच्छा आता है। अगर background open sky, trees, road, park, या sunset area जैसा है, तो cinematic effect और भी better दिखता है।
Photo angle भी बहुत important है। Slightly front-facing या 3/4 angle वाली images face structure को naturally preserve करती हैं और enhancement के बाद ज्यादा balanced लगती हैं। बहुत low-quality, blurry, या heavily cropped photos से बचना चाहिए, क्योंकि ultra-realistic result के लिए base image मजबूत होना जरूरी है।
Clothing और background की simplicity भी मदद करती है। Plain shirt, solid color outfit, light texture वाली clothes, या outdoor casual wear इस style में अच्छी लगती हैं क्योंकि focus subject पर रहता है। Strong backlight, overexposed sky, या बहुत crowded background वाली photos में भी editing possible है, लेकिन result उतना clean नहीं होगा जितना एक well-shot image पर होता है।
- Best angle: front-facing या 3/4 portrait angle
- Best resolution: high-resolution image, ideally clear and uncropped
- Best lighting: natural daylight, golden hour, या soft sunset light
- Best background: open outdoor background, trees, sky, road, park, or sunset scene
- Best clothing: simple, clean, solid-color, or casual outdoor outfits
- Avoid: blurred faces, heavy shadows, low light noise, and extremely busy backgrounds
Pro tips for the best results with Om Editing Top
अगर आप Om Editing Top से सबसे natural और premium look चाहते हैं, तो शुरुआत हमेशा clean source photo से करें। जितनी clear face details, proper lighting, और balanced background होगी, उतना ही better ultra-realistic outdoor photo enhancement मिलेगा। खासकर तब, जब goal HD quality के साथ cinematic feel देना हो, तो image ko over-edit करने के बजाय subtle improvements पर focus करना चाहिए।
Best output पाने के लिए photo का composition भी matter करता है। Subject अगर center या rule-of-thirds placement में है, natural pose में है, और background clutter कम है, तो final result ज्यादा polished लगता है। Sunset tones, soft haze, aur film-style color grading तभी अच्छा काम करते हैं जब base photo already stable ho.
- High-resolution image upload करें ताकि facial details sharp रहें और output crisp दिखे।
- Face ke original features को preserve रखें, ताकि edited photo artificial न लगे।
- Outdoor lighting वाली photos पर काम करें, क्योंकि natural environment enhancement ज्यादा realistic दिखता है।
- Soft sunset glow, warm tones, aur subtle atmospheric diffusion use करें, ताकि dreamlike effect natural लगे।
- Background ko clean aur uncluttered रखें, जिससे subject photo ka main focus बना रहे।
- Kodak analog-style finish को lightly apply करें, ताकि vintage touch मिले लेकिन clarity कम न हो।
- Final image को export करने से पहले zoom करके skin tone, shadows, aur highlight balance जरूर check करें।
Common mistakes to avoid in This edits
कई लोग ultra-realistic photo enhancement करते समय extra filters, heavy smoothing, या too much color saturation use कर लेते हैं। इससे image sharp तो लग सकती है, लेकिन natural realism कम हो जाता है। अगर आपकी edit में face अलग, background over-blown, या light too fake लगे, तो output premium की बजाय overprocessed महसूस होगा।
एक और common issue है composition को ignore करना। अगर original photo में subject already odd angle, harsh shadow, या low-detail background है, तो सिर्फ effect जोड़ने से result strong नहीं बनेगा। इसी तरह sunrise/sunset tone को बहुत strong करने पर skin shade unnatural दिख सकती है और dream haze पूरे frame को muddy बना सकता है।
- Too much smoothing: इससे skin plastic जैसी दिखती है और realistic texture गायब हो जाता है।
- Over-saturation: Orange, pink, aur yellow tones जरूरत से ज्यादा intense हो जाएँ तो sunset effect fake लगता है।
- Harsh sharpening: Extra sharpness चेहरे के edges को unnatural बना सकती है और image noisy दिख सकती है।
- Background overload: बहुत सारे effects लगाने से subject lose हो जाता है और photo का focus टूटता है।
- Identity mismatch: Face features बदलने से final image authentic नहीं रहती, जो realistic enhancement के लिए नुकसानदायक है।
- Weak lighting balance: Shadows और highlights control न हों तो HD quality की बजाय flat या blown-out image मिलती है।
Best use cases and creative ideas for This Style
Om Editing Top का सबसे अच्छा use तब होता है जब आपको social media के लिए eye-catching, realistic, और cinematic outdoor portrait चाहिए। Instagram posts, profile pictures, reels covers, aur portfolio images में यह style बहुत अच्छा लगता है, क्योंकि इसमें subject polished भी दिखता है और natural भी रहता है।
यह enhancement उन users के लिए भी useful है जो storytelling-based visuals बनाना चाहते हैं। Sunset background, soft atmospheric glow, और analog camera feel जोड़कर आप ऐसी photo बना सकते हैं जो सिर्फ edited नहीं, बल्कि emotionally rich लगे। Creator profiles, personal branding, travel portraits, aur professional thumbnails में यह look काफी strong visual impact देता है।
- Instagram posts: Warm cinematic tones के साथ scroll-stopping portrait बनाएं।
- Profile pictures: HD clarity के साथ clean and confident personal image तैयार करें।
- YouTube thumbnails: Outdoor hero-shot style visuals use करके attention बढ़ाएं।
- Portfolios: Fashion, lifestyle, aur portrait collections में premium realism जोड़ें।
- Reels covers: Soft sunset haze के साथ aesthetic and consistent branding बनाएं।
- Travel memories: Outdoor photos को cinematic keepsake में convert करें।
Variations you can try with This Style
अगर आप experiment करना चाहते हैं, तो this style style को अलग-अलग moods, seasons, aur color palettes के साथ try करें। एक ही base photo से multiple versions बनाकर आप देख सकते हैं कि कौन-सा look आपके content style के लिए best है। कभी warm golden hour vibe बेहतर लगेगी, तो कभी soft pink sky या moody blue-hour tone ज्यादा refined महसूस होगा।
आप setting बदलकर भी output में बड़ा फर्क ला सकते हैं। Beach, garden, rooftop, field, forest path, ya open road जैसी outdoor locations cinematic enhancement को अलग character देती हैं। उसी तरह, season-based variations जैसे summer glow, autumn warmth, winter coolness, aur monsoon softness आपके edit को unique बना सकती हैं।
- Golden hour version: Soft yellow light और gentle orange glow के साथ classic cinematic look।
- Pink sunset version: Dreamy and romantic palette के लिए हल्के pink tones जोड़ें।
- Moody outdoor version: Slightly cooler shadows और controlled contrast के साथ dramatic feel बनाएं।
- Vintage film version: Kodak analog-style texture के साथ nostalgic portrait तैयार करें।
- Summer bright version: Clean, airy, and vibrant outdoor enhancement try करें।
- Autumn warm version: Earthy tones, soft haze, aur rich warm highlights use करें।
Conclusion: try This Style for a realistic outdoor look
अगर आपका goal clean, stylish, aur ultra-realistic outdoor portrait बनाना है, तो this prompt एक strong creative direction देता है। सही photo, balanced lighting, aur subtle cinematic touches के साथ आप ऐसा result पा सकते हैं जो HD भी लगे और natural भी रहे।
अब आप अलग-अलग moods, colors, aur settings के साथ experiment करके अपने लिए best version बना सकते हैं। this look को test करें, variations try करें, और देखें कि simple portrait कैसे premium outdoor artwork में बदल सकता है।
💬 Comments