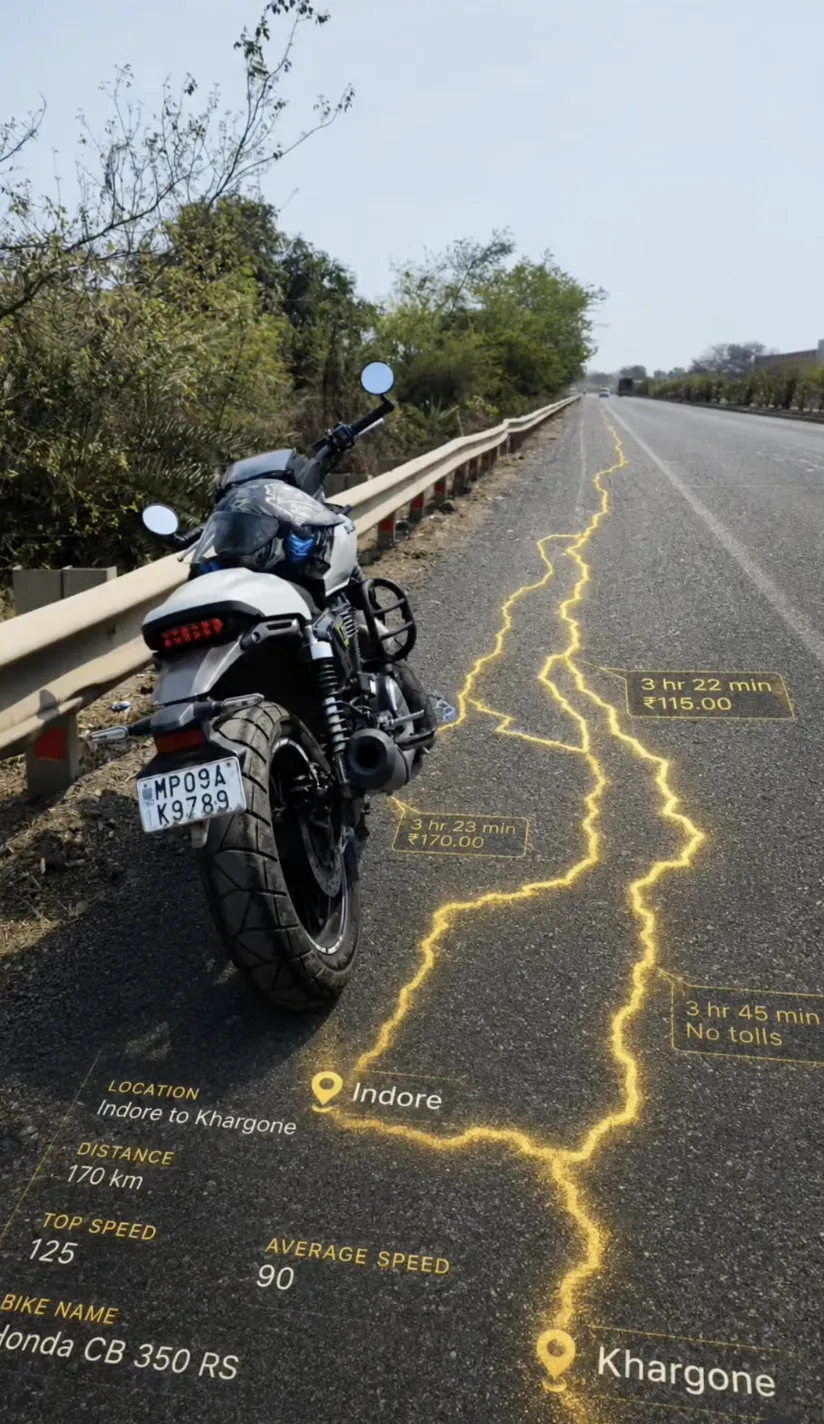
biker photo
Om Editing Top biker photo ke liye cinematic image prompt style kya hai?
Om Editing Top biker photo style un logon ke liye hai jo apni normal motorcycle picture ko ek premium, hyper-realistic cinematic edit me transform karna chahte hain. Is type ke prompt ka goal simple enhancement nahi hota, balki biker ko exactly same rakhte hue background, road, stats overlay, aur overall mood ko movie-like banana hota hai.
Read Also: cinematic-style realistic portrait | 2026 New Year
Ye style creators, photo editors, bike lovers, Instagram reels designers, aur AI image users ke liye useful hai jo apni riding photo ko standout karna chahte hain. Agar aapko realistic motorbike edit, road texture par UI-style stats, ya dynamic ride-themed composition chahiye, to yeh prompt style kaafi powerful hai.
Isme focus usually subject ko change karne par nahi, balki scene ko enhance karne par hota hai. Matlab biker ki identity, gear, pose, aur bike details same rehti hain, aur editing ka main magic composition, cinematic lighting, aur road integration me aata hai.
Ye biker photo style aapko exactly kya output deta hai?
Is type ke prompt ka sabse strong point hai realism. Output me biker artificial ya cartoonish nahi lagta, balki original photo jaisa hi preserved rehta hai. Saath hi scene me cinematic lighting add hoti hai, jo image ko zyada dramatic aur premium look deti hai.
Visual mood usually high-contrast, moody, aur road-trip inspired hota hai. Colours me deep blacks, metallic tones, asphalt greys, aur natural outdoor shades zyada effective lagte hain. Agar screenshot-based ride stats ya route information add ki ja rahi ho, to woh bhi road surface ke saath physically blended feel honi chahiye.
Composition ka main charm yeh hai ki biker foreground me strong focus banata hai, aur embedded UI elements image ko tech-meets-adventure feel dete hain. Yani ye sirf bike photo edit nahi, balki ek story-driven riding visual ban jata hai.
- Lighting: natural, cinematic, aur realistic shadows ke saath
- Mood: adventurous, rugged, premium, and high-energy
- Colours: dark asphalt tones, subtle highlights, realistic skin and gear tones
- Composition: biker central subject, road par integrated stats, strong perspective depth
- Realism: face, body, bike, aur riding gear ko natural preserve kiya jata hai
This Style biker photo prompt ka use kaise karein? Beginner-friendly guide
Agar aap mobile par kaam kar rahe hain, to sabse pehle apni clear biker photo select karein. Photo aisi honi chahiye jisme biker aur motorcycle dono achhe se visible hon, kyunki prompt ka main objective subject ko preserve karna hota hai. Blurry ya heavily cropped image se result weak aa sakta hai.
Uske baad edit tool ya AI image generator me photo upload karein aur prompt ko carefully apply karein. Yahan sabse important point yeh hai ki original biker details ko preserve karna hota hai, isliye editing instructions me identity, pose, gear, aur bike ko unchanged rakhna critical hai. Agar reference screenshot bhi diya gaya hai, to uske visible data ko accurate manner me scene ke saath integrate karna hota hai.
Processing ke baad image ko zoom karke check karein. Ensure karein ki road stats naturally painted ya projected lagein, floating ya sticker jaise na dikhein. Agar composition off lage, to prompt me lighting, depth, aur perspective ko aur specific banaya ja sakta hai.
- Apni best biker photo choose karein.
- Photo ko mobile editor ya AI tool me upload karein.
- Reference image aur stats screenshot agar available ho to add karein.
- Prompt me biker ko exactly same rakhne ka instruction confirm karein.
- Cinematic road integration aur realistic lighting apply karein.
- Output ko zoom karke check karein ki bike, pose, aur stats accurate hain ya nahi.
- Final image ko save karke social post, thumbnail, ya reel cover ke liye use karein.
Kaunsi photos biker photo edit ke liye sabse achhi hoti hain?
Best results tab milte hain jab original photo sharp ho aur biker ka face, body posture, helmet, gloves, boots, aur bike clearly dikh rahe hon. Side angle, three-quarter angle, ya slightly low angle shots aksar zyada cinematic lagte hain, kyunki ye motorcycle ki presence ko strong banate hain.
Resolution bhi important hai. High-resolution images me details preserve hoti hain, aur AI ya editing process me distortion kam aata hai. Agar photo dark hai to thoda usable ho sakta hai, lekin extreme low-light, motion blur, ya overexposed images me final result inconsistent ho sakta hai.
Background clean ho to editing aur better ho jati hai. Busy traffic, extra people, ya cluttered surroundings scene ko weak kar sakte hain. Clothing aur riding gear bhi neat aur visible hona chahiye, kyunki style prompt me un details ko exactly preserve karna important hota hai.
- Angle: side, front-three-quarter, ya low-angle riding pose
- Resolution: clear, high-detail, minimum blur
- Lighting: soft daylight, golden hour, ya balanced outdoor light
- Background: simple road, open area, ya uncluttered outdoor scene
- Clothing: helmet, jacket, gloves, boots, aur gear clearly visible hon
- Bike visibility: motorcycle ke body parts aur design details sharp hon
Om Editing Top biker photo me realism aur road integration kyu important hai?
Is style ka real power realism me chhupa hota hai. Agar biker same rahe aur sirf background add ho, to image flat lag sakti hai. Lekin jab stats, road texture, lighting, aur shadows sahi tarah se blend hote hain, tab photo ek believable cinematic frame ban jati hai.
Road integration ka matlab hai UI ya data elements ko aise dikhana ki woh surface ka part lagein. Isse image me depth aati hai aur viewer ko lagta hai ki biker sach me ek stylized ride scene me khada hai. Yeh effect especially social media thumbnails aur creative posts me attention grab karta hai.
Aise edits me small details bahut matter karti hain: reflection, shadow direction, perspective distortion, aur surface texture. Ye sab milkar ek normal biker photo ko premium Om Editing Top visual me convert kar dete hain.
This Style ke liye pro tips for best results
अगर आप Om Editing Top style images से maximum impact चाहते हैं, तो सबसे पहले reference clarity पर ध्यान दें. जिस biker photo को base रखा गया है, उसमें subject, pose, gear, और motorcycle details जितने clear होंगे, final output उतना ही sharp और realistic लगेगा. इसी तरह ride stats screenshot को clean and readable रखना जरूरी है, ताकि composition में text, numbers, और route elements naturally blend हो सकें.
Best results के लिए prompt instructions को simple और specific रखना हमेशा मदद करता है. Cinematic lighting, realistic road texture, depth, reflections, और perspective distortion जैसे details output को premium feel देते हैं. अगर image को social media या thumbnail use के लिए बना रहे हैं, तो framing ऐसा रखें कि biker center of attention रहे और stats layer supporting visual की तरह काम करे, not distraction की तरह.
- High-resolution reference image use करें, ताकि face, helmet, bike, और gear details intact रहें.
- Stats screenshot को readable रखें, ताकि values और labels accurately render हों.
- Subject के around realistic shadows और road reflections मांगें, इससे depth बढ़ती है.
- Cinematic but natural lighting specify करें, ताकि output over-edited न लगे.
- Composition में biker को primary focus और stats को integrated background element की तरह position करें.
- अगर motion feel चाहिए, तो subtle road perspective, glow, और surface texture mention करें.
Common mistakes to avoid in This edits
बहुत लोग edit बनाते समय subject को over-style कर देते हैं, और result artificial दिखने लगता है. Om Editing Top type composition में सबसे बड़ी गलती biker की identity, riding pose, या gear details को बदल देना होती है. जब reference subject match नहीं करता, तो edit का realism तुरंत कम हो जाता है. इसी तरह screenshot data को approximate करना भी output की authenticity खराब कर देता है.
दूसरी common mistake है UI को floating hologram जैसा दिखाना. अगर stats road surface के साथ physically integrate नहीं होते, तो scene fake लगता है. Also, too many visual effects जैसे excessive glow, heavy blur, or random color filters composition को cluttered बना देते हैं. Clean cinematic balance हमेशा ज्यादा professional लगता है.
- Subject details बदलना: face, helmet, gloves, boots, या bike details alter होने से original look टूट जाता है.
- Numbers गलत रखना: ride stats exact नहीं होंगे तो screenshot-based realism खत्म हो जाता है.
- UI को float कराना: road integration के बिना composition naturally believable नहीं लगता.
- Over-editing: too much sharpening, glow, या saturation image को artificial बना देता है.
- Poor perspective: road angle और stats placement mismatch होने पर depth weak दिखती है.
Best use cases and ideas for These images
Om Editing Top style biker edits कई जगह बहुत अच्छी तरह काम करते हैं, खासकर तब जब आपको bold, action-oriented, and premium-looking visual चाहिए. Instagram posts और reels covers के लिए यह style attention-grabbing होता है, क्योंकि biker subject और stats overlay together एक strong storytelling feel create करते हैं. यह fitness, travel, adventure, and biking niche pages के लिए भी useful हो सकता है.
Profile pictures के लिए अगर crop carefully किया जाए, तो biker identity sharp और confident दिखती है. Thumbnails में यह style बहुत effective रहता है क्योंकि cinematic road layout और embedded stats viewer का ध्यान instantly खींचते हैं. Portfolios में इसे creative editing showcase के रूप में use किया जा सकता है, जहाँ realism, compositing skill, और perspective handling clear दिखाई देती है.
- Instagram posts: bold biker aesthetic और cinematic road composition के लिए.
- Profile pictures: confident and dynamic personal branding visual के लिए.
- Thumbnails: clickable, high-contrast, and story-driven look के लिए.
- Portfolios: editing skill, realism, and compositing quality showcase करने के लिए.
- Reels covers: quick attention grab करने वाले motion-style visuals के लिए.
This Style के लिए variations you can try
अगर आप same concept को अलग-अलग ways में explore करना चाहते हैं, तो mood और environment बदलकर बहुत interesting results मिल सकते हैं. Om Editing Top style में biker को same रखते हुए background, lighting, season, और color mood adjust करने से हर version अलग personality देता है. इससे content series बनाना भी आसान होता है.
For example, dark night mode में neon reflections और wet road texture cinematic intensity बढ़ा सकते हैं. Golden hour version warm, premium, और adventurous feel देता है. Monsoon theme में reflective asphalt और dramatic clouds composition को more powerful बनाते हैं. Similarly, mountain route, urban street, or highway setting से पूरी visual story बदल सकती है.
- Morning light: soft shadows और fresh outdoor vibe.
- Night cinematic: dark contrast, bright highlights, and reflective road surface.
- Monsoon look: wet asphalt, moody sky, and richer reflections.
- Desert route: warm tones, dusty atmosphere, and strong sunlight.
- Urban setting: modern, edgy, and high-energy social media appeal.
- Cool color palette: blue, steel, and silver tones for a sleek biker identity.
- Warm color palette: orange, amber, and gold for a dramatic cinematic finish.
This Style conclusion
Overall, Om Editing Top style biker edits तब सबसे अच्छा perform करते हैं जब realism, clarity, और cinematic depth साथ में काम करें. Biker subject को exactly preserve करना, ride stats को cleanly integrate करना, और road surface पर believable perspective create करना ही इस edit को खास बनाता है. यही balance इसे ordinary image से premium visual में बदल देता है.
अगर आप bold social media content, thumbnails, or portfolio-ready compositions बनाना चाहते हैं, तो this style approach definitely try करने लायक है. सही reference, सही details, और strong composition के साथ आप ऐसे visuals बना सकते हैं जो instantly eye-catching हों और लंबे समय तक याद रहें.
💬 Comments