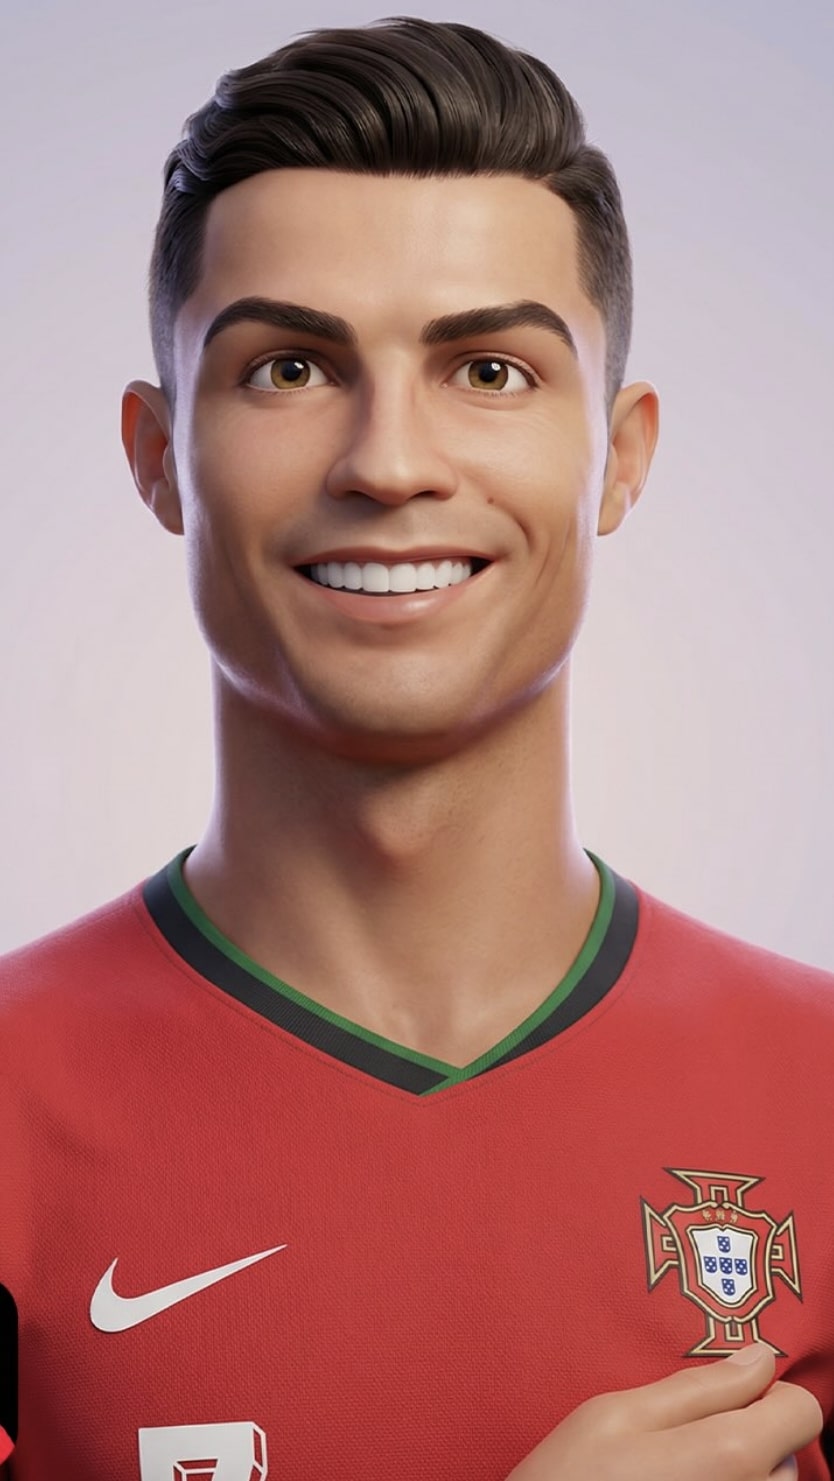
3D Disney-style character
Om Editing Top: 3D Disney-style character ke liye kya hai aur kis ke liye useful hai?
Om Editing Top ek aisa creative editing style hai jo normal photo ko high-quality 3D Disney-style character look me convert karne ke liye use hota hai. Is type ki editing un logon ke liye bahut useful hai jo apni portrait photo ko animated, cinematic aur premium character render jaisa banana chahte hain, bina original identity ko lose kiye.
Read Also: cinematic-style realistic portrait | 2026 New Year
Is style ka main focus hota hai face ko same rakhte hue usse soft, rounded, expressive aur film-like appearance dena. Matlab aapka look cartoonish zaroor lagega, lekin generic nahi hoga. Original facial structure, eye shape, jawline aur overall identity ko preserve karke ek polished 3D Disney-inspired result milta hai jo social media, profile picture, fan art, content creation aur personal branding ke liye kaafi attractive hota hai.
Agar aap beginner hain aur mobile se photo edit karna chahte hain, to Om Editing Top style aapke liye easy-to-use concept hai. Isme aapko complex Photoshop skills ki zarurat nahi padti; bas sahi photo, sahi angle aur sahi prompt-style approach se ek strong animated character effect achieve kiya ja sakta hai.
This Style prompt style se aapko kya visual result milta hai?
Om Editing Top jaisi 3D Disney-style character editing ka output usually smooth, clean aur cinematic hota hai. Skin shading soft hoti hai, edges rounded lagte hain, aur overall image me ek premium animation-film wali feel aati hai. Eyes expressive dikhte hain, lekin unka natural placement aur proportion preserve rehta hai, isliye face recognizable lagta hai.
Is style me lighting bahut important hoti hai. Aksar soft studio lighting, gentle highlights aur subtle shadows use hote hain taaki face depth ke saath render ho. Colors generally warm, balanced aur slightly pastel ya neutral tone me dikhte hain. Background bhi simple rakha jata hai, jaise clean studio backdrop ya soft gradient, taaki focus pure character par rahe.
Composition ke level par bhi yeh style kaafi polished hota hai. Head aur shoulders framing, shallow depth of field, crisp focus aur high-resolution texture render se image professional animated poster jaisi feel deti hai. Yeh look un photos par sabse achha aata hai jahan face clearly visible ho aur image me unnecessary clutter na ho.
- Soft rounded geometry for cartoon-like but realistic appeal
- Expressive eyes with preserved shape and distance
- Smooth cinematic skin shading
- Subtle stylization without face distortion
- Neutral or pastel studio background
- Premium feature-film quality finish
This Style ka use kaise karein: beginner-friendly step-by-step guide
Agar aap first time Om Editing Top style try kar rahe hain, to process ko simple rakhna best hota hai. Sabse pehle ek clear photo choose karein jisme face front ya slightly angled ho. Blurry, dark ya overedited photo se result weak aa sakta hai. Achhi source photo hi strong Disney-style output ki base hoti hai.
Uske baad image ko kisi mobile editing tool ya AI-based editor me upload karein jahan portrait transformation support hota ho. Yahan par style ko 3D animated, cinematic, Disney-inspired ya Pixar-like direction me set kiya jata hai. Agar prompt-based system use ho raha hai, to original face identity preserve karne wali instruction ka effect bahut important hota hai.
Finally output ko inspect karein: kya eyes natural proportion me hain, kya jawline same feel de rahi hai, aur kya background clean hai? Agar image me face thoda distorted lage, to better source photo use karein ya crop adjustment karein. Mobile par kaam karte waqt zoom karke details check karna helpful hota hai.
- Apni best clear portrait photo select karein.
- Photo ko mobile editor ya AI image tool me upload karein.
- Style option me 3D Disney-style, animated portrait ya cinematic character look choose karein.
- Face identity preserve karne wala mode on rakhein agar available ho.
- Background ko neutral, pastel ya studio look par set karein.
- Result generate karke face details, eyes aur skin shading check karein.
- Final image ko high-resolution me save karein.
Kaun si photos This Style me sabse achhi kaam karti hain?
Om Editing Top effect ke liye best photos woh hoti hain jisme face clearly visible ho aur lighting balanced ho. Front-facing portraits ya slightly turned head shots sabse effective hote hain, kyunki AI ya editing style facial proportions ko accurately read kar paata hai. Agar face partially covered ho ya angle bahut extreme ho, to identity preservation difficult ho sakti hai.
Resolution bhi important hai. High-resolution photo me skin detail, eye contour, lip shape aur jawline zyada clearly detect hoti hai, jisse final render sharp aur premium lagta hai. Low quality ya pixelated image se output me softness ke saath detail loss bhi aa sakta hai. Isliye hamesha clean, bright aur focused image use karein.
Clothing aur background bhi result ko affect karte hain. Simple clothing, plain background aur natural daylight ya soft indoor lighting aksar best rehti hai. Busy background, strong shadows, heavy filters ya overexposed light character conversion ko messy bana sakti hai. Agar aap chahte hain ki final image Disney/Pixar-type polished lage, to source photo bhi utni hi clean honi chahiye.
- Front-facing ya slight angle portrait
- High-resolution, sharp focus image
- Soft natural light ya balanced indoor lighting
- Plain background ya uncluttered setting
- Simple clothing with visible face and neck area
- No heavy filters, blur, or extreme shadows
Pro tips for the best results with Om Editing Top
To get the cleanest and most cinematic result from Om Editing Top, start with a clear source image. A sharp front-facing photo with good lighting usually works better than a blurry or heavily filtered one, because the details stay more consistent in the final 3D Disney-style character look. The goal is to keep the original identity while improving the visual style, so the better the input, the better the output.
It also helps to guide the edit with simple, specific style directions. If you want a softer animated finish, mention gentle lighting, smooth skin shading, and expressive eyes. If you want a more premium movie-poster feel, ask for studio lighting, a neutral background, and polished cinematic rendering. Small instructions often make a big difference when you are using Om Editing Top for character transformation.
- Use a high-resolution image so facial details stay sharp.
- Choose a front-facing or slightly angled portrait for better identity retention.
- Keep the background simple if you want a cleaner Disney-style render.
- Request soft studio lighting for a more premium 3D look.
- Ask for natural facial proportions so the character still looks recognizable.
- Test different moods one by one instead of changing everything at once.
Common mistakes to avoid in This Style
One of the biggest mistakes is using a low-quality or heavily cropped image. When the face is unclear, the final result may lose important identity details, which hurts the whole purpose of a 3D Disney-style character edit. Clean source photos usually give more accurate and more attractive results.
Another common issue is overloading the prompt with too many style changes. If you ask for too many effects at once, the output can become inconsistent or lose the smooth animation look. With Om Editing Top, it is better to keep the direction focused: preserve the face, apply the Disney/Pixar-inspired style, and maintain a polished cinematic finish.
- Do not use blurry photos, because facial identity becomes harder to preserve.
- Do not add too many random style keywords, or the output may look messy.
- Do not request extreme beauty changes, because that can distort the original face.
- Do not ignore lighting instructions, since lighting strongly affects 3D realism.
- Do not choose busy backgrounds if you want a clean character-focused image.
It is also smart to avoid changing the expression too aggressively. A natural smile or calm expression usually works best for Disney-style character edits, while extreme expressions can make the face look less balanced. For better consistency, keep the pose, expression, and framing as close to the original as possible.
Best use cases and ideas for This Style
The this style style is perfect for people who want their portrait to feel creative, polished, and social-media ready. One of the most popular uses is for Instagram posts, where a Disney-style 3D character image can stand out immediately in the feed. It is also a strong choice for profile pictures because the animated finish looks eye-catching while still keeping the face recognizable.
Creators can also use this type of image for YouTube thumbnails, reels covers, and short-form content banners. A stylized character image adds personality and makes the design feel more memorable. If you are building a personal brand, portfolio, or content page, this kind of transformation can help create a consistent visual identity across platforms.
- Instagram posts: ideal for aesthetic reels covers, highlight art, and profile feeds.
- Profile pictures: great for a clean, memorable animated avatar.
- YouTube thumbnails: helps the face pop with a premium 3D look.
- Portfolios: useful for creative showcases and character-style branding.
- Reels covers: adds a bold, modern, shareable appearance.
You can also use these images for digital greeting cards, fan-style edits, personal wallpapers, and themed social campaigns. Because the style feels cinematic and friendly, it works well for both casual and professional content. That flexibility is one reason this prompt is so appealing for creators who want something unique.
Variations you can try with This Style
Once you have the basic 3D Disney-style version, you can experiment with different moods to create a wider set of visuals. For example, a warm golden tone can make the character feel cheerful and magical, while cooler pastel colours can give it a softer and more dreamy look. Small changes in colour temperature can completely change the mood without losing the core identity.
You can also try seasonal variations to match festivals, campaigns, or personal themes. A spring-inspired background with fresh pastel tones feels light and bright, while an autumn version with deeper orange and brown shades gives a richer cinematic feel. Winter themes often work well with cooler lighting and clean, soft gradients. These options make this look useful for more than one type of post.
- Mood variations: cheerful, dreamy, elegant, heroic, soft, or premium.
- Colour variations: pastel pink, sky blue, gold, lavender, peach, or warm beige.
- Setting variations: studio background, soft gradient, outdoor glow, or fantasy-inspired space.
- Seasonal variations: spring freshness, summer brightness, autumn warmth, winter cool tones.
- Lighting variations: soft diffused light, dramatic rim light, or gentle cinematic glow.
Another useful idea is to create multiple versions for different platforms. One edit can be made for a profile picture with a tighter crop, while another can be framed wider for a banner or thumbnail. This approach lets you reuse the same character identity in several formats while still keeping each image fresh and platform-friendly.
Conclusion: try This Style for a polished Disney-style character look
If you want a creative image that feels expressive, premium, and easy to use across social platforms, yeh style is a strong choice. It helps turn a regular portrait into a cinematic 3D Disney-style character while keeping the original face identity intact, which is exactly what makes the result feel personal and recognizable.
Whether you are making content for Instagram, a profile picture, a thumbnail, or a portfolio, this style gives you a polished animated finish with lots of room for experimentation. Try different moods, colours, and settings, and use this edit to create a version that matches your own style.
💬 Comments