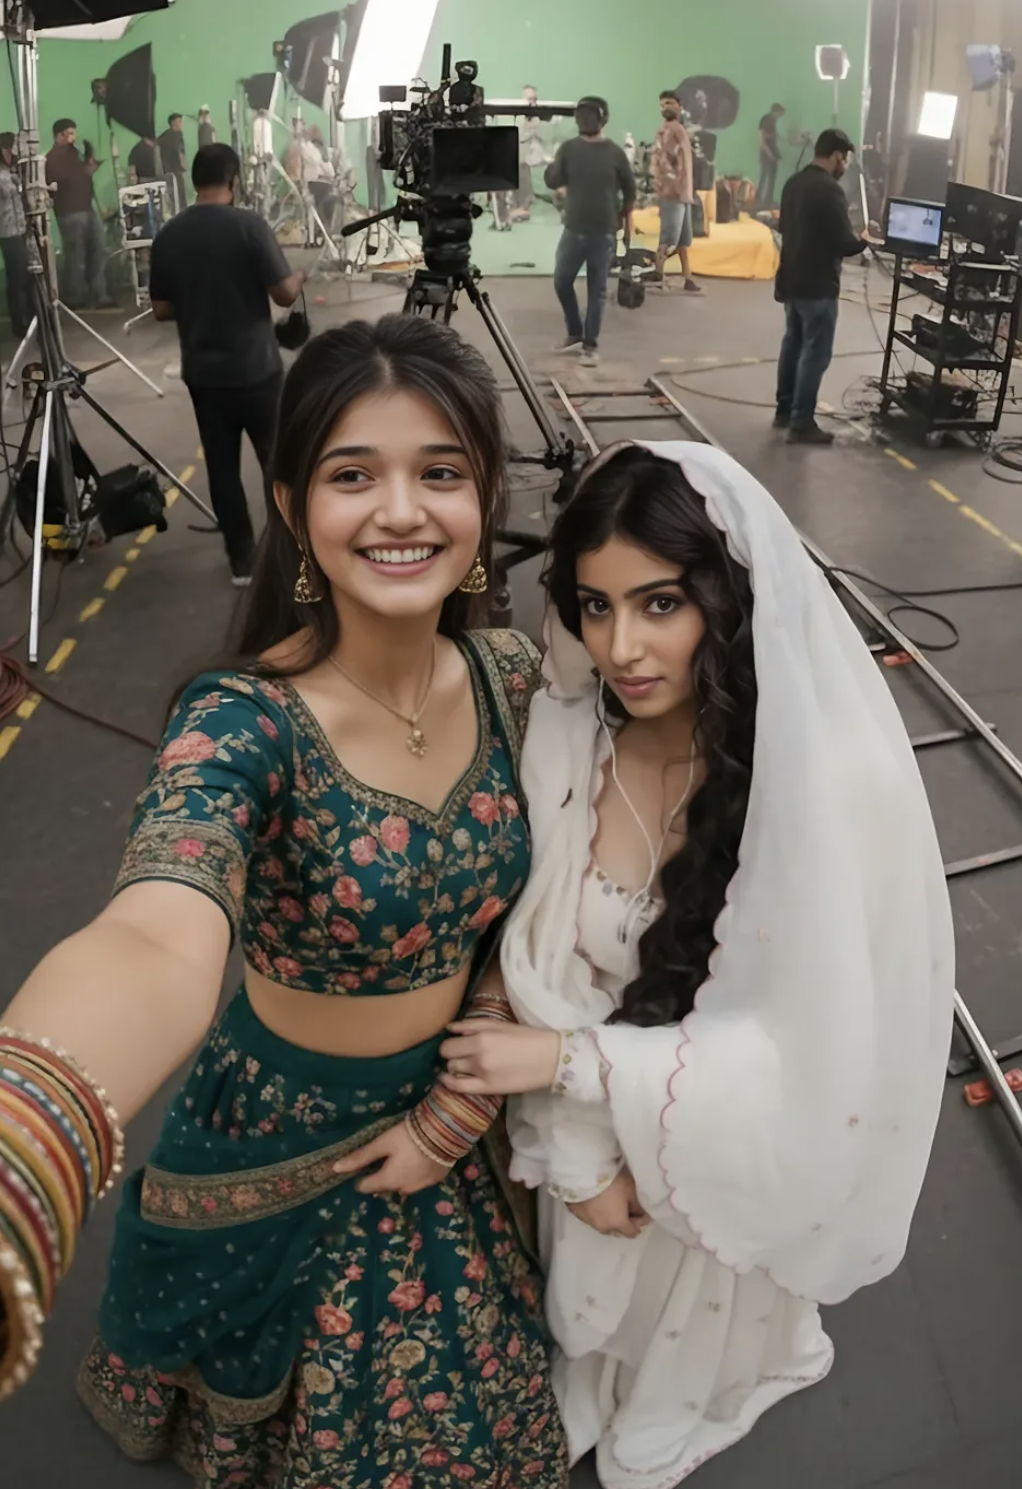
Selfie on set
Selfie on Set: Yeh Style Kya Hai aur Kis Ke Liye Best Hai?
Selfie on set ek cinematic behind-the-scenes look deta hai jo normal selfie se kaafi zyada polished, realistic aur film-like feel banata hai. Is style mein subject ko aisa dikhaya jata hai jaise woh kisi movie set, shooting studio, ya professional production environment mein khud camera hold karke photo le raha ho.
Read Also: cinematic-style realistic portrait | 2026 New Year
Yeh look un logon ke liye perfect hai jo social media par dramatic, trendy, aur premium visual content chahte hain. Agar aap actor, creator, influencer, filmmaker, ya simply apni photos ko unique aur cinematic banana chahte ho, to Om Editing Top style ka yeh prompt aapko ek strong studio vibe aur authentic on-set mood de sakta hai.
Is type ki image ka main goal hota hai natural selfie energy ko film production atmosphere ke saath blend karna. Result mein photo casual bhi lagti hai aur high-end bhi, jaise aap kisi actual shooting day ka part ho.
Om Editing Top Selfie on Set Prompt Kya Deliver Karta Hai?
Is prompt ka sabse strong point hai uska realistic cinematic setup. Image mein usually wide studio space, camera rigs, lighting equipment, rails, monitors, aur production atmosphere dikhai deti hai, jo scene ko genuine movie set jaisa banati hai. Subject ka pose hand-held selfie style mein hota hai, isliye image over-posed nahi lagti, balki spontaneous aur natural feel deti hai.
Lighting generally soft yet professional hoti hai, jisse faces clear dikhte hain aur background ka studio detail bhi visible rehta hai. Colours usually clean, balanced, and cinematic hote hain — neutral tones, soft highlights, aur controlled shadows ke saath. Agar output sahi aata hai, to photo mein depth aur scale dono feel hote hain, matlab ek hi frame mein personality bhi dikhti hai aur production environment bhi.
Composition bhi is style ka important hissa hai. Ultra-wide framing wajah se background zyada visible hota hai, aur selfie angle image ko more immersive bana deta hai. Isse viewer ko lagta hai ki woh actual set ke andar khada hai. Yeh style especially tab useful hota hai jab aap BTS content, creator branding, film-related thumbnails, ya attention-grabbing profile visuals banana chahte ho.
- Cinematic selfie vibe with a real behind-the-scenes feel
- Professional studio lighting and film-set environment
- Wide composition with visible production details
- Natural, handheld selfie angle for authentic look
- Realistic colour balance with soft highlights and depth
Step-by-Step: Mobile Par Is Prompt Ko Kaise Use Karein
Agar aap beginner ho, to is style ko use karna simple hai. Sabse pehle apni reference photo carefully select karo, kyunki yahan face, outfit, hairstyle, aur overall appearance ko as-it-is preserve karna important hota hai. Better reference image ka result better output deta hai, especially jab prompt mein exact identity maintain karni ho.
Phir image generator ya editing tool mein prompt box open karo aur reference images upload karo. Mobile par upload karte waqt file size aur clarity check karna helpful hota hai, taaki face details blur na ho. Iske baad prompt paste ya use karo, aur format ya aspect ratio 9:16 vertical choose karo, kyunki yeh selfie style ke liye best rehta hai.
Generate karne ke baad pehla output hamesha carefully review karo. Agar background too busy lage, face detail weak ho, ya selfie angle natural na ho, to minor adjustments karke dubara try karo. Beginner users ke liye best approach hota hai ki ek time par sirf ek change karein, taaki samajh aaye kaunsi setting output ko improve kar rahi hai.
- Apni best clear reference photo choose karo.
- Second character ya additional image ho to uski bhi sharp image upload karo.
- Tool mein vertical 9:16 format select karo.
- Prompt ko as-it-is use karo aur reference images attach karo.
- Generate output aur face consistency check karo.
- Agar needed ho to lighting, background, ya framing ko refine karke regenerate karo.
Mobile users ke liye ek practical tip: Wi-Fi ya stable internet connection par kaam karo, kyunki multiple image uploads ke time glitches aa sakte hain. Saath hi, image gallery mein se woh files select karo jisme subject clear ho, motion blur na ho, aur face fully visible ho. Yeh small steps final result ko kaafi improve kar dete hain.
Kaunsi Photos Sabse Achhi Kaam Karti Hain?
Is prompt ke liye best photos woh hoti hain jisme subject front-facing ya slightly angled ho, taaki selfie composition naturally fit ho sake. Face clear hona chahiye aur expression relaxed rehna chahiye. Agar aap extreme side pose ya covered face photo use karte ho, to result mein identity consistency weak ho sakti hai.
Resolution bhi important hai. High-resolution, sharp, well-lit image use karne se facial features better preserve hote hain aur final output zyada realistic lagta hai. Background simple ya neutral ho to AI ko subject par focus karne mein help milti hai, lekin prompt ke hisaab se set background alag se generate hona hota hai, isliye original photo ka clutter-free hona advantage deta hai.
Clothing aur lighting ka bhi direct impact hota hai. Aise outfits choose karo jo clearly visible hon aur artificial shadows se hide na ho rahe hon. Natural daylight, soft indoor light, ya evenly lit photos sabse safe choice hoti hain. Agar original image mein face dark hai ya background too noisy hai, to output mein details lose ho sakti hain.
- Clear front-facing ya slight angle selfie-style photo
- High-resolution image with sharp facial details
- Natural, even lighting without harsh shadows
- Simple or uncluttered background in the reference image
- Visible clothing details, especially on shoulders and neckline
- Relaxed expression and stable pose for consistency
Pro tips for the best results with Om Editing Top
Om Editing Top ka best output tab aata hai jab aap reference images ko clean, clear aur consistent rakhte ho. Agar uploaded photo me face, outfit, aur hairstyle already sharp hai, to final edit bhi zyada natural aur realistic dikhega. Selfie on set type image me camera angle, lighting, aur background scale bahut important hota hai, isliye prompt ya setup me clarity honi chahiye.
Ek aur useful tip ye hai ki subject ko background ke saath balance me rakha jaye. Since ye behind-the-scenes style image hai, frame me studio feel aani chahiye, but main focus phir bhi selfie pose par hi rahe. Om Editing Top ke through aap cinematic look ko overdo kiye bina polished aur professional result pa sakte ho.
- Reference image me face aur outfit clearly visible rakho, taaki identity same rahe.
- Hand-held selfie feel ke liye camera angle slightly close aur natural rakho.
- Daytime studio lighting choose karo, taaki image bright aur realistic lage.
- Background me film set elements jaise lights, cameras, rails, aur monitors add karo.
- Characters ko naturally close pose me rakho, forced pose se bachो.
- Wide cinematic environment mention karo, but subject details ko change mat karo.
Common mistakes to avoid in Om Editing Top
Sabse common mistake hoti hai identity consistency ko ignore karna. Agar face shape, hairstyle, ya outfit change ho gaya, to image ka original feel khatam ho jata hai. Om Editing Top ka real purpose tab hi fulfill hota hai jab image edited bhi lage aur original likeness bhi maintain rahe.
Ek aur issue hota hai background ko too busy kar dena. Film studio setup me enough detail honi chahiye, lekin itni bhi nahi ki subject background me lose ho jaye. Isi tarah, excessive filters ya unnatural skin smoothing image ko fake बना sakte hain.
- Face features change karna — isse reference match weak ho jata hai.
- Outfit ko modify karna — original look maintain nahi rahega.
- Overcrowded background use karna — selfie subject par focus kam ho jata hai.
- Harsh lighting add karna — cinematic mood ki jagah flat ya noisy look aa sakta hai.
- Too much blur ya effect lagana — behind-the-scenes realism lose ho jata hai.
Best use cases and ideas for Om Editing Top
Om Editing Top style images ka use kai jagah kiya ja sakta hai, especially jab aapko modern, cinematic aur social-media friendly content banana ho. Ye look Instagram posts, story highlights, profile visuals, aur reels covers ke liye bahut effective hota hai. Selfie on set theme ek saath personal aur professional feel deta hai.
Agar aap content creator, actor, model, ya digital portfolio ke liye visual series bana rahe ho, to ye style kaafi versatile hai. Behind-the-scenes format audience ko engaged rakhta hai because it feels candid, but the studio environment still gives it a premium production vibe.
- Instagram posts: cinematic behind-the-scenes style for engagement.
- Profile pictures: natural selfie look with polished studio background.
- Thumbnails: bold, eye-catching visuals for video or reel covers.
- Portfolios: creators and performers ke liye professional image set.
- Reels covers: clean, scroll-stopping preview frames.
- Fan pages or promo content: realistic on-set vibe ke saath strong visual identity.
Variations you can try with Om Editing Top
Is concept ko experiment karna easy hai, aur isi wajah se Om Editing Top bahut flexible option ban jata hai. Aap same selfie-on-set idea ko different moods, lighting styles, aur seasonal settings me try kar sakte ho. Har variation se image ka feel slightly change hota hai, but core identity same rehti hai.
For example, aap daytime film shoot ke bajay golden-hour studio lighting try kar sakte ho. Ya phir background me warmer tones, cooler tones, ya moody dramatic setup use kar sakte ho. Seasonal variations bhi interesting hote hain, especially agar aap specific campaign ya social media theme ke liye content बना रहे ho.
- Mood variations: cheerful, confident, candid, relaxed, stylish.
- Colour variations: warm studio lights, cool blue tones, neutral cinematic tones.
- Setting variations: indoor soundstage, outdoor shoot area, green screen studio, control room style set.
- Season variations: summer brightness, monsoon softness, winter cool contrast, festive production vibe.
- Framing variations: close selfie crop, wider BTS frame, slight high-angle or eye-level angle.
Aap even subtle changes try kar sakte ho, jaise more energetic expression, softer smile, ya more documentary-style candid capture. In small variations se Om Editing Top output fresh lagta hai aur repeated content bhi repetitive feel nahi hota.
Conclusion: Om Editing Top se selfie on set look try karein
Om Editing Top un logon ke liye perfect hai jo selfie on set type cinematic, realistic aur social-media ready image banana chahte hain. Jab aap reference identity ko same rakhte ho, studio environment ko thoughtfully add karte ho, aur composition ko natural rakhte ho, to result bahut polished aata hai.
Agar aapko behind-the-scenes vibe, professional film set energy, aur selfie-style realism ek saath chahiye, to Om Editing Top ek strong choice hai. Ab aap different moods, colours, aur studio setups ke saath experiment karke apna best version try kar sakte ho.
💬 Comments