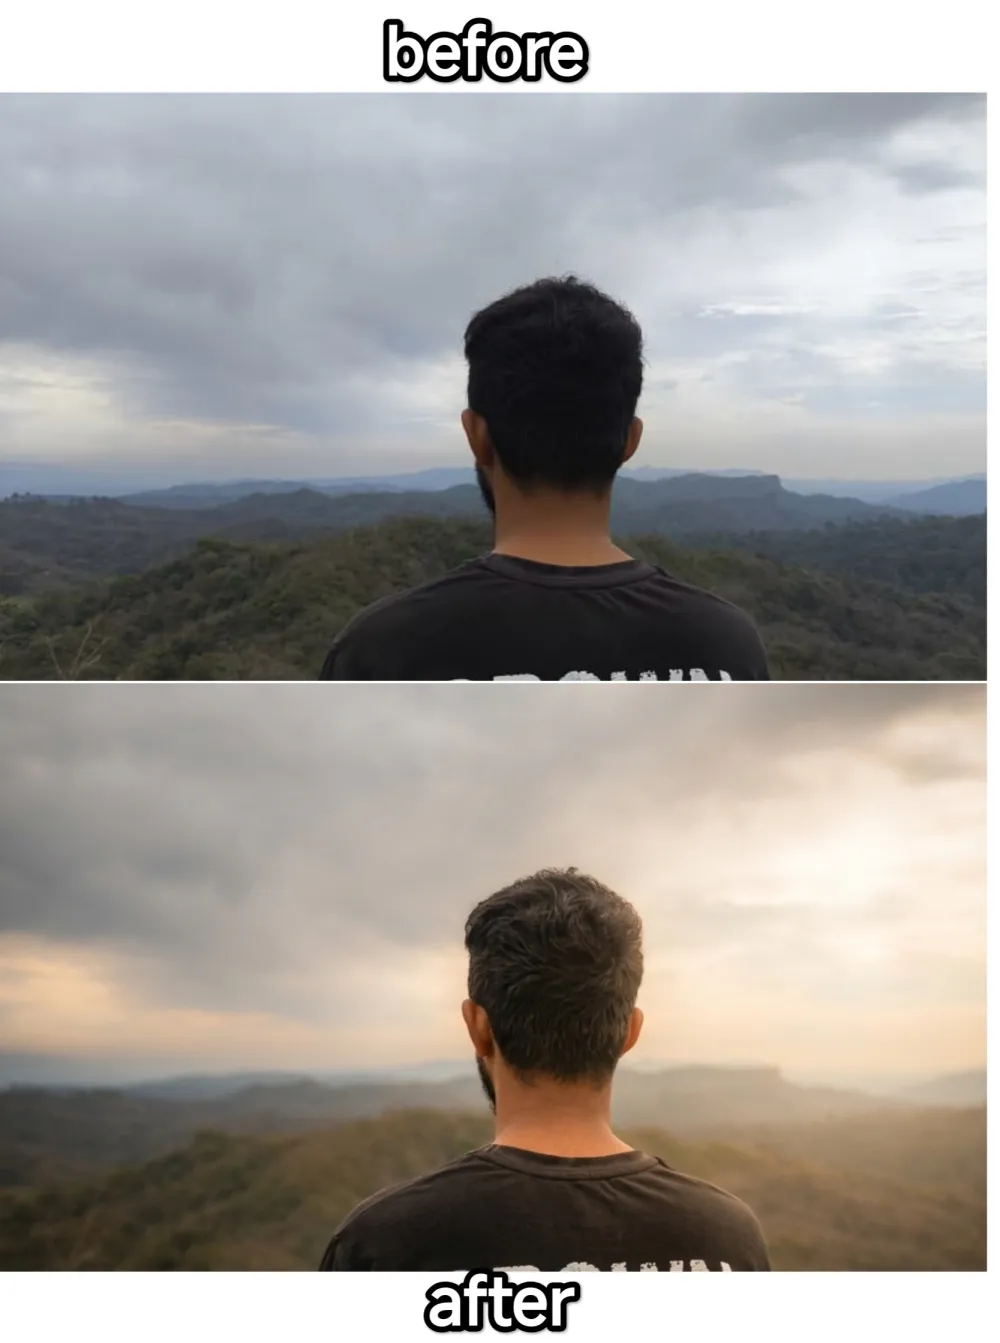
8k enhancing and colour grading
Om Editing Top: 8k enhancing and colour grading ka matlab kya hai?
Om Editing Top style ka 8k enhancing and colour grading un users ke liye hota hai jo normal photo ko premium, cinematic aur ultra-realistic look me transform karna chahte hain. Is type ki editing ka main goal hota hai image ko zyada sharp, zyada clean aur zyada professional banana, bina subject ki original identity ya pose ko bigade.
Read Also: cinematic-style realistic portrait | 2026 New Year
Ye style specially un photos par best kaam karta hai jahan person already frame me ho, lekin image thodi flat, dull ya low-detail lag rahi ho. Photographer jaisa feel dene ke liye isme depth, warm light, background blur aur color balance ko carefully improve kiya jata hai.
Agar aap mobile se editing prompt use karte hain ya AI-based photo enhancement try karte hain, to ye style Instagram, YouTube thumbnail, profile portrait, aur romantic outdoor shots ke liye kaafi useful hota hai. Iska result usually ek polished portrait hota hai jo natural bhi lagta hai aur visually rich bhi.
Is photo style me kya-kya milta hai?
8k enhancing and colour grading ka sabse bada benefit hota hai image ka overall premium look. Subject sharper dikhta hai, skin texture cleaner lagti hai, aur face par realistic detail maintain rehti hai. Background ko soft blur aur bokeh ke through isolate kiya jata hai, jisse focus seedha person par chala jata hai.
Color grading me warm sunset tones, golden highlights, cinematic contrast aur balanced shadows add kiye jate hain. Isse photo me ek emotional aur stylish mood aata hai, jaise professional DSLR se shot li gayi ho. Grass, sky, hills ya water background me ho to unka blur aur glow aur bhi attractive feel deta hai.
Ye look un logon ke liye best hai jo natural portrait ko dramatic but realistic style me convert karna chahte hain. Na to image over-processed lagti hai, na artificial. Sahi use par subject crisp रहता है aur background soft, dreamy aur depth-filled lagta hai.
- Ultra-sharp subject detail
- Creamy background blur aur bokeh effect
- Warm sunset lighting feel
- Natural skin texture with realistic glow
- High-clarity, cinematic color grading
- Professional portrait-style finish
Mobile par Om Editing Top style kaise use karein?
Agar aap beginner hain, to sabse pehle aisi photo choose karein jisme person clearly visible ho aur face blur na ho. Mobile par AI editing ya enhancement tool kholkar image upload karein aur base photo ko as-it-is rakhne ka option choose karein. Is style me face match aur original framing ko preserve karna bahut important hota hai.
Uske baad enhancement settings me sharpness, depth, lighting aur color tone ko gradually improve karein. Ek hi baar me maximum effect lagane ke bajay chhote changes karke preview check karein. Isse photo natural bhi rahegi aur over-edited bhi nahi lagegi.
Beginners ke liye best method ye hai ki pehle image ko enhance karein, phir warm grading apply karein, aur end me background blur ya glow adjust karein. Agar app me portrait enhancement, HDR look, ya cinematic filter available ho to unhe lightly use karein taaki face realistic rahe.
- Apni best portrait photo select karein.
- Photo ko mobile editor ya AI tool me upload karein.
- Base image ko preserve karne wala option choose karein.
- Sharpness aur detail enhancement ko medium se start karein.
- Warm sunset tones aur soft contrast apply karein.
- Background blur aur depth effect ko balance karein.
- Preview dekhkar final export karein.
Kaun si photos is style ke liye sabse achchi hoti hain?
Is type ki editing ke liye wo photos best hoti hain jisme subject thoda separated ho aur background me natural open space ho. Outdoor portraits, water ke paas shots, hill-side photos, ya sunset light wali images is style me kaafi achchi lagti hain. Jab background already soft ho, to enhancement aur bhi premium dikhती hai.
Angle bhi important hai. Front-facing ya slightly side-angle portraits zyada strong result dete hain, kyunki face detail achchi tarah maintain hoti hai. Agar camera angle stable ho aur framing clear ho, to AI enhancement subject ko aur crisp bana pata hai. Low-quality crop ya extreme motion blur wali photos se bachna chahiye.
Clothing simple aur clean ho to final result better aata hai. Solid colors, casual shirts, plain outfits ya subtle fashion wear is style me achche lagte hain, kyunki grading face aur lighting ko highlight kar deti hai. Busy background ya cluttered scene ho to subject ki clarity kam ho sakti hai.
- Clear face wali portrait photo
- Good resolution aur sharp original image
- Natural sunlight ya golden hour lighting
- Simple background: hills, water, sky, open area
- Stable pose aur clean composition
- Plain, non-distracting clothing
- Low blur aur low noise image
Om Editing Top style ko best result ke liye kaise optimize karein?
Agar aap chahte hain ki final image professionally finish lage, to original photo me hi kuch basic cheezein sahi honi chahiye. Face par light evenly pad rahi ho, subject background se alag dikhe, aur image me enough detail ho. Isse enhancing ke baad output zyada realistic aur impactful banta hai.
Editing ke time over-sharpening se bachna chahiye, kyunki usse skin unnatural lag sakti hai. Isi tarah color grading ko bhi bahut heavy na rakhein; warm cinematic tone ka matlab ye nahi ki poori image orange ho jaye. Balance maintain karna hi is style ka real secret hai.
Best approach ye hota hai ki aap image ko first clean enhance karein, phir depth aur lighting adjust karein, aur finally color tone ko polish karein. Is order me kaam karne se face detail bhi safe rehti hai aur background ka cinematic feel bhi strong hota hai.
- Original photo high quality rakhein
- Natural light wali image prefer karein
- Too much sharpening avoid karein
- Warm tones ko subtle rakhein
- Background blur ko subject ke according balance karein
Om Editing Top ke liye Pro Tips for Best Results
Jab aap Om Editing Top style ka use karte ho, to best output sirf “enhance” karne se nahi aata. Isme base image, light, background blur, aur colour grading ka balance bahut important hota hai. Agar original photo clear hai, to final result aur bhi premium, natural aur cinematic lagega.
Ek strong edit ke liye hamesha subject ko centre of focus rakho. Face details, skin texture, aur outfit ke natural tones ko preserve karna chahiye, kyunki यही cheezein image ko realistic banati hain. Background ko soft rakhne se portrait aur zyada polished dikhta hai, especially jab aap sunset glow ya shallow depth of field use karte ho.
- High-quality original photo use karo, taaki enhancement clean aur detailed aaye.
- Subject ka face sharp rakho aur background ko smooth blur do for DSLR look.
- Warm golden tones ka use karo agar cinematic sunset feel chahiye.
- Natural skin texture maintain karo, over-smoothing se bacho.
- Contrast aur clarity ko balanced rakho, taaki image over-edited na lage.
- Frame aur pose ko same rakho, especially profile-style portraits ke liye.
Agar aap Instagram-ready content banana chahte ho, to consistency bhi zaroori hai. Same lighting style, same colour mood, aur same sharpness approach use karne se aapke edits ek premium visual identity create karte hain. Ye especially Om Editing Top prompts ke saath kaafi effective hota hai.
Common Mistakes to Avoid in Om Editing Top Style
Sabse common mistake hoti hai over-editing. Bahut zyada sharpening, heavy saturation, ya artificial glow image ko realistic ke bajay fake bana deta hai. Agar skin texture completely disappear ho jaye ya background unnatural lagne lage, to overall portrait ka quality feel gir jata hai.
Ek aur mistake hai composition ko change karna. Is style ka main advantage wahi hota hai ki subject same rahe aur sirf enhancement ho. Face angle, body position, outfit, ya framing change hone se original identity disturb hoti hai aur result less natural lagta hai.
- Too much blur mat do, warna subject aur background ka balance बिगड़ sakta hai.
- Unnatural colour grading avoid karo, especially overly orange ya overly red tones.
- Face features ko distort mat karo; 100% face match jaisa natural look important hai.
- Extra elements add mat karo agar clean portrait look chahiye.
- Lighting ko inconsistent mat banao, warna shadows aur highlights odd lagte hain.
Long-term use ke liye ek aur baat dhyan rakho: har image ki lighting alag hoti hai. Isi liye same edit style ko blindly copy karne ke bajay photo ke according fine-tune karna better hota hai. Ye approach Om Editing Top results ko aur professional banati hai.
Best Use Cases for Om Editing Top Images
Om Editing Top type enhanced portraits ka use bahut jagah kiya ja sakta hai. Ye images sirf social media ke liye nahi, balki portfolio, thumbnails, cover images, aur personal branding ke liye bhi kaafi effective hoti hain. Clean subject separation aur cinematic tone kisi bhi visual ko instantly premium feel dete hain.
Agar aap content creator ho, to ye style reels covers aur YouTube thumbnails me especially useful hoti hai. Sharp subject aur blurred background viewers ka attention instantly attract karta hai. Profile pictures me bhi ye edit style kaafi strong impression deta hai, kyunki face clear aur polished dikhta hai.
- Instagram posts aur story highlights ke liye
- Profile pictures aur display photos ke liye
- YouTube thumbnails aur reel covers ke liye
- Photography portfolio aur personal branding ke liye
- Poster-style creative edits aur digital showcases ke liye
Portfolios me ye look tab aur zyada strong lagta hai jab aap same subject ke multiple moods show karte ho. Ek hi photo ko different colour grading ke saath present karke aap apni editing range bhi showcase kar sakte ho. Isliye Om Editing Top format creators aur editors dono ke liye practical choice hai.
Variations You Can Try with Om Editing Top
Is style ka best part ye hai ki aap mood aur atmosphere ke hisaab se variations try kar sakte ho. Agar aap warm sunset feel chahte ho, to golden highlights aur soft orange tones use karo. Agar cleaner modern look chahiye, to neutral skin tones aur cool background balance better rahega.
Seasonal changes bhi kaafi interesting results dete hain. Monsoon vibe me soft grey-blue tones aur misty background use kiya ja sakta hai, jabki winter edit me crisp light aur slightly muted colours achhe lagte hain. Similarly, festive edits me brighter highlights aur rich contrast zyada appealing hote hain.
- Mood variations: cinematic, romantic, moody, soft, dramatic
- Colour variations: warm gold, cool blue, earthy brown, pastel tones
- Setting variations: outdoor hills, water background, rooftop sunset, garden blur
- Seasonal variations: summer glow, rainy ambience, winter clarity, autumn warmth
- Style variations: ultra-realistic portrait, dreamy bokeh, high-clarity HDR, minimal premium look
Aap agar experimentation karna chahte ho, to same photo par 2-3 different moods test karo. Isse aapko samajh aayega ki kaunsa colour grade aur lighting combination subject ko sabse zyada suit karta hai. Isi tarah Om Editing Top edits ko aur unique aur reusable banaya ja sakta hai.
Conclusion: Om Editing Top Try Karke Dekho
Om Editing Top style un logon ke liye perfect hai jo apni photos ko cinematic, sharp, aur professional look dena chahte hain. Isme subject same rehta hai, but background blur, warm glow, aur premium colour grading image ko ek fresh high-end finish dete hain.
Agar aap clean portrait enhancement, DSLR-style depth, aur social-media-ready result chahte ho, to is approach ko zaroor try karo. Thoda sa balance aur right variation use karke aap apni ordinary photo ko bhi stunning visual me transform kar sakte ho.
💬 Comments