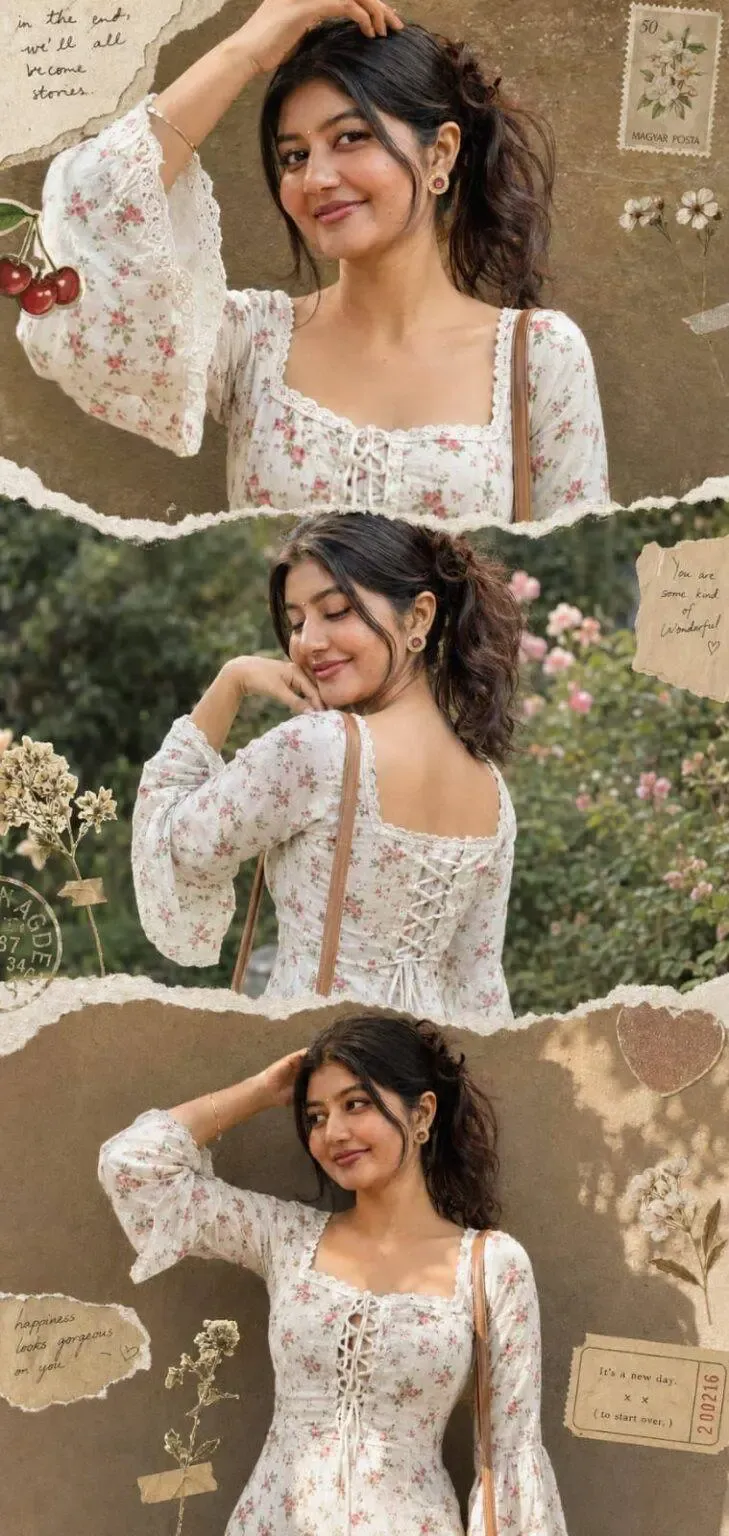
3 layer photo
Om Editing Top: 3 Layer Photo Style Ka Intro
Om Editing Top style ka 3 layer photo look aajkal un logon ke liye kaafi popular hai jo ek hi image mein cinematic, stylish aur highly detailed collage effect chahte hain. Is type ke edit mein same face ko use karke 3 different poses ko ek vertical collage mein arrange kiya jata hai, jisse photo aur bhi premium aur social-media friendly lagti hai.
Read Also: cinematic-style realistic portrait | 2026 New Year
Ye style especially un creators, editors, aur mobile users ke liye useful hai jo apne portrait photos ko trendy scrapbook aesthetic mein convert karna chahte hain. Agar aap Instagram reels cover, WhatsApp DP style edit, fashion portrait, ya ai-generated collage look banana chahte ho, to Om Editing Top jaisa 3 panel photo concept kaafi impressive result de sakta hai.
Is editing style ki sabse badi khasiyat ye hai ki ek hi subject ko teen alag moods aur poses mein present kiya jata hai, lekin overall composition cohesive rehta hai. Matlab photo dekhne mein complex lagti hai, but concept simple hota hai: same face, different poses, aur ek artistic vertical layout.
Ye 3 Layer Photo Style Actually Kya Deta Hai?
Is type ke photo prompt ya editing style se aapko ek ultra-realistic collage output milta hai jisme top, middle, aur bottom panels alag-alag emotion aur angle dikhate hain. Har layer ka apna visual role hota hai, jisse image more dynamic aur story-like feel karti hai.
Usually is style mein warm lighting, soft daylight, textured background, aur vintage scrapbook details ka mix hota hai. Is combination se photo natural bhi lagti hai aur edited bhi. Cherry stickers, flower elements, torn paper edges, handwritten notes, ya stamp-like textures image ko creative aur trendy banate hain.
Agar aap carefully dekho, to ye style sirf portrait collage nahi hota — ye ek mini visual story hoti hai. Top panel mein close-up confidence, middle mein soft candid mood, aur bottom mein stylish mid-shot expression photo ko more engaging bana dete hain.
- Lighting: warm sunlight, soft daylight, ya gentle indoor glow
- Mood: confident, elegant, candid, and slightly dreamy
- Colours: natural skin tones, warm beige, floral accents, muted vintage palette
- Composition: 3-panel vertical layout with balanced spacing
- Finish: ultra-realistic, scrapbook-inspired, lightly grainy texture
This Style Use Kaise Karein: Step-by-Step Guide
Agar aap beginner ho aur mobile par ye style try karna chahte ho, to sabse pehle apni best face photo select karo. Photo clear honi chahiye, face properly visible hona chahiye, aur lighting natural honi chahiye. Blur ya heavy shadow wali image se result weak aa sakta hai.
Uske baad collage ya prompt-based editing tool mein apni image upload karo. Yahan important baat ye hai ki same face consistency bani rahe, kyunki 3 layer photo style ka main base hi identical subject hota hai. Isliye jo photo upload karo, woh front-facing ya slightly angled aur high quality honi chahiye.
Beginner users ke liye sabse easy method ye hota hai ki pehle photo ko crop aur enhance karo, phir vertical collage format choose karo. Agar aap AI editing app use kar rahe ho, to instruction short, clear, aur structured hona chahiye. Mobile screen par kaam karte waqt image preview ko baar-baar check karna bhi useful hota hai.
- Apni clear aur high-resolution face photo choose karo.
- Photo ko crop karke face aur upper body ko properly frame karo.
- Collage ya vertical 3-panel layout select karo.
- Same subject ko all panels mein maintain karne ka option enable karo.
- Lighting style ko warm ya natural set karo.
- Background ko textured, outdoor, ya softly blurred rakho.
- Fashion details ko consistent rakho, jaise kurti, jewelry, ya handbag.
- Final preview check karke export ya download kar lo.
Kaunsi Photos Is Style Ke Liye Sabse Best Rehti Hain?
Om Editing Top 3 layer photo ke liye wahi photos best hoti hain jisme subject ka face sharp ho, expression natural ho, aur background zyada cluttered na ho. Agar image already overexposed ya too dark hai, to collage ka realism kam ho sakta hai. Isliye balanced exposure sabse important hota hai.
Angle ke liye slightly side pose, front pose, aur mild over-the-shoulder style images best rehti hain. Kyunki 3 panel collage mein har section ko alag visual mood dena hota hai, to source photos mein variety hona helpful hota hai. Ek hi type ka pose use karne se final result repetitive lag sakta hai.
Clothing bhi is style mein big role play karti hai. White floral kurti, soft fabric, subtle makeup, aur minimal jewelry jaise elements collage ko elegant aur realistic बनाते hain. Background simple ho to subject aur outfit dono clearly stand out karte hain.
- Resolution: high-resolution photo use karo, preferably clear portrait quality
- Angle: side pose, back pose, aur front-facing variation achha rehta hai
- Lighting: natural daylight ya warm soft light best hai
- Background: textured wall, outdoor garden, ya lightly blurred backdrop
- Clothing: ethnic wear, floral outfit, or elegant casual dress zyada suit karti hai
- Hair: open, slightly voluminous hair collage ko stylish banata hai
- Accessories: minimal gold jewelry aur small handbag image ko polished look dete hain
Pro Tips for the Best Om Editing Top Results
अगर आप Om Editing Top style में really clean और eye-catching output चाहते हैं, तो सिर्फ prompt डालना enough नहीं होता। Best results के लिए face consistency, outfit details, pose clarity, और lighting direction को carefully guide करना पड़ता है। जब हर panel में same identity और same styling maintain रहती है, तब collage much more natural और premium लगता है.
एक और important point है background balance. Since 3-layer photo में हर panel अलग mood दिखाता है, इसलिए colors और texture को harmonize रखना चाहिए। Warm sunlight, soft daylight, and textured vintage looks को combine करना तभी अच्छा लगता है जब subject का look cohesive रहे। यही चीज़ आपकी 3 layer photo editing को ordinary collage से professional aesthetic edit में बदल देती है.
- Same face reference को हर panel में consistent रखें, ताकि collage realistic लगे।
- Outfit details को clearly define करें, especially sleeve style, neckline, and jewelry.
- Lighting को panel-wise separate करें, लेकिन overall tone एक जैसा रखें।
- Background में too many elements add न करें, वरना subject dull हो सकता है।
- Vintage textures, torn edges, and stickers का use subtle रखें ताकि collage balanced रहे।
- Pose variations को natural रखें, over-posed look से image less believable लगती है।
अगर आप Instagram-style edits बना रहे हैं, तो thumbnail clarity भी बहुत जरूरी है। Middle panel में expression soft और readable हो, जबकि top और bottom panels में pose variation साफ दिखे। इस तरह आपका Om Editing Top collage scroll-stopping बनता है और small screen पर भी attractive दिखता है.
Common Mistakes to Avoid in This Style
सबसे common mistake है panels के बीच face mismatch. अगर तीनों हिस्सों में face shape, hairstyle, या expression बहुत अलग हो जाए, तो collage टूटता हुआ लगता है। इसी तरह outfit का color, fabric texture, या jewelry placement बदलने से भी final edit inconsistent दिख सकता है।
दूसरी गलती है lighting mismatch को ignore करना. एक panel में harsh light और दूसरे में soft daylight होने पर image disconnected लगती है। this style जैसे layered edit में consistency बहुत important है, लेकिन हर panel में subtle variation होना चाहिए ताकि collage boring न लगे.
- Face variation: Same face use न करने से identity टूट जाती है और realistic effect कम हो जाता है।
- Overloaded background: Too many objects होने से focus subject से हट जाता है।
- Mismatch outfit details: Neckline, sleeve, or blouse shape अलग होने पर overall design off लगता है।
- Too much grain or filter: Excessive effects subject details hide कर सकते हैं।
- Poor pose planning: Random poses collage को unbalanced बना देती हैं।
- Sticker overuse: Cute elements अच्छे लगते हैं, लेकिन ज्यादा हों तो photo messy दिख सकती है।
अगर आपका goal polished social media content बनाना है, तो हर layer में visual hierarchy सोचकर काम करें। Main subject सबसे पहले नजर आए, फिर outfit details, और उसके बाद scrapbook-style elements दिखें। यही approach this prompt edits को clean, premium, और share-worthy बनाती है.
Best Use Cases and Creative Ideas for 3 Layer Photo Edits
this look style images कई जगह use की जा सकती हैं, खासकर वहां जहाँ aesthetic presentation matter करती है। Instagram posts, profile pictures, and story highlights के लिए यह style बहुत appealing लगता है क्योंकि इसमें personality, fashion, and artistic mood एक साथ आ जाते हैं।
Creator accounts, fashion pages, and personal branding profiles पर ये edits खासतौर पर अच्छी perform करती हैं। अगर आप reels cover बना रहे हैं, तो three-panel collage attention grab करता है और viewer को instantly curiosity देता है। Portfolio presentation में भी यह style useful है, क्योंकि इससे model look और styling variety दोनों showcase हो जाते हैं.
- Instagram posts: Artistic feed aesthetic और themed carousels के लिए perfect.
- Profile pictures: Close-up face panels use करके memorable avatar feel दिया जा सकता है.
- Thumbnails: Reels या shorts covers में bold layered composition काफी attractive दिखती है.
- Portfolios: Fashion, posing, and styling variety को organized तरीके से present किया जा सकता है.
- Reels covers: Scrapbook-inspired collage viewers का ध्यान instantly पकड़ सकती है.
अगर आप personal aesthetic build कर रहे हैं, तो इसे seasonal themes में भी use कर सकते हैं। Garden look, warm sunlight, vintage textures, or soft neutral backgrounds से हर post में नया mood बनाया जा सकता है। इस तरह 3 layer photo सिर्फ एक image नहीं रहती, बल्कि a repeatable content format बन जाती है.
Variations You Can Try with This Style
इस style की सबसे अच्छी बात यह है कि आप mood, color palette, और setting बदलकर कई अलग versions बना सकते हैं। एक ही base concept के साथ warm, cool, vintage, romantic, or minimal looks create किए जा सकते हैं। यही flexibility yeh style को long-term content ideas के लिए useful बनाती है.
आप seasonal variation भी try कर सकते हैं, जैसे spring garden tones, monsoon softness, autumn earthy shades, या winter-muted backgrounds। Outfit styling में छोटे changes, जैसे jewelry tone, handbag color, or sleeve detail, पूरी image की vibe बदल सकते हैं। इससे आपकी edits repetitive नहीं लगतीं और हर version fresh feel देता है.
- Different moods: Soft smile, confident pose, dreamy gaze, or editorial expression.
- Colour palettes: Warm beige, pastel pink, olive green, vintage sepia, or muted blue tones.
- Settings: Garden, studio texture, old wall, floral backdrop, or cozy outdoor light.
- Seasons: Spring florals, rainy-day softness, golden autumn tones, or winter calm styling.
- Textures: Scrapbook paper, grainy film look, torn edges, and matte finish for variety.
अगर आप experiment करना चाहते हैं, तो panel-by-panel storytelling भी try करें। Top panel में confident close-up, middle में serene back pose, और bottom में expressive front pose रखने से image ज्यादा dynamic लगती है। इस तरह आपका this edit collage not only aesthetic बनता है, बल्कि visually interesting भी रहता है.
Conclusion: Try This Style for a Stylish 3 Layer Look
अगर आप creative, elegant, और social-media-ready collage बनाना चाहते हैं, तो this style एक बहुत strong choice है। सही face consistency, thoughtful lighting, balanced colors, और tasteful scrapbook details के साथ आपकी 3 layer photo editing instantly more polished और engaging दिख सकती है.
अब आप अलग moods, seasons, और poses के साथ experiment करके अपने own signature version बना सकते हैं। चाहे Instagram feed हो, reels cover हो, या personal portfolio, this prompt style images हमेशा attention-grabbing और stylish लगती हैं. Try it with a clean concept, and let the layered look do the rest.
💬 Comments