happy smile
Om Editing Top के साथ Happy Smile Prompt का मतलब क्या है?
Om Editing Top जैसी AI editing styles में happy smile वाला prompt एक simple लेकिन बहुत useful concept है। इस तरह का prompt खासकर उन लोगों के लिए बनाया जाता है जो एक ही character को अलग-अलग emotions, poses और outfits के साथ देखना चाहते हैं, लेकिन character की पहचान consistent रहे। अगर आप mobile पर AI image generation, avatar design, या social media content creation करते हैं, तो यह style आपके लिए बहुत काम की हो सकती है।
Read Also: cinematic-style realistic portrait | 2026 New Year
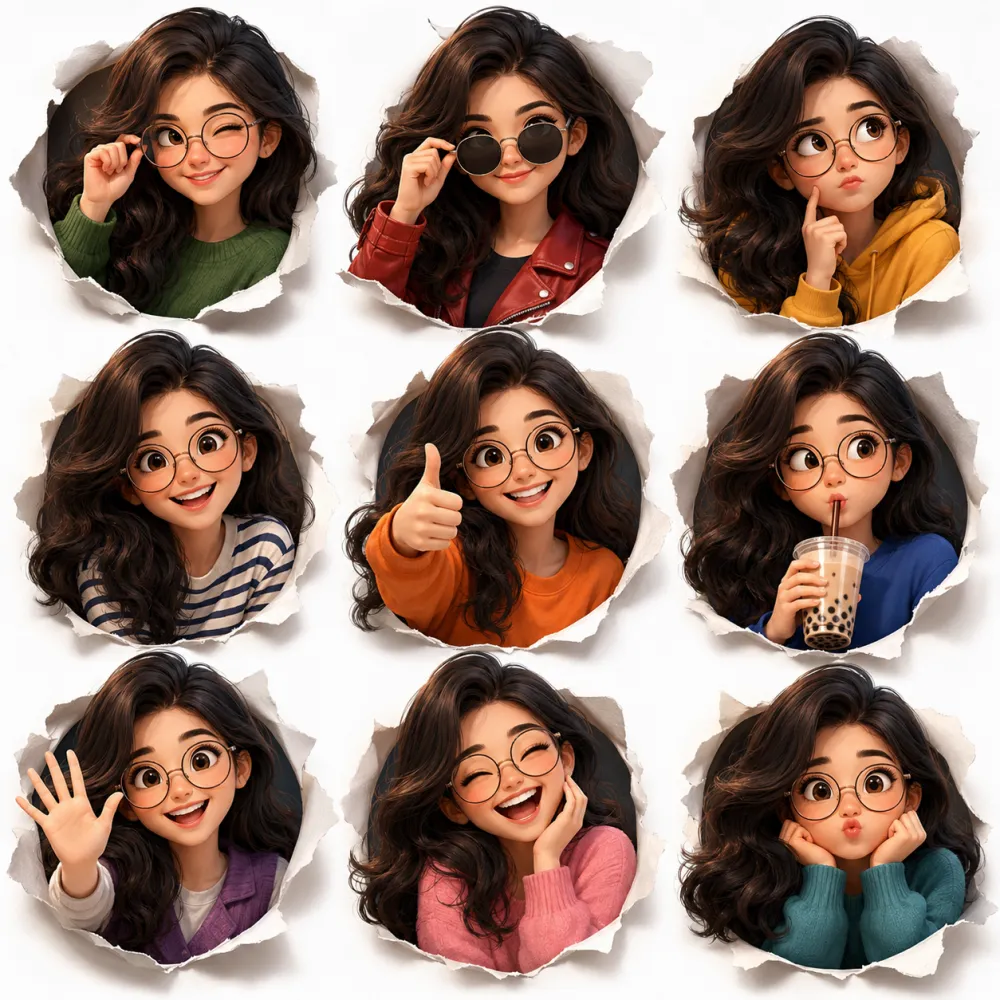
यह prompt आम तौर पर एक cute, stylized, 3D cartoon look देता है जिसमें face expressions साफ दिखते हैं और overall composition organized होती है। इसका use beginners, content creators, Instagram editors, YouTube thumbnail designers, and AI art lovers कर सकते हैं। “happy smile” जैसा emotion खासतौर पर friendly, positive, और engaging visual बनाने के लिए useful होता है, क्योंकि इससे image instantly approachable लगती है।
अगर आपका goal एक ऐसा character बनाना है जो अलग-अलग moods में भी same लगे, तो Om Editing Top style का यह prompt बहुत helpful है। इसमें expression sheet type layout, cute avatar look, and vibrant presentation मिलती है, जिससे output सिर्फ pretty नहीं बल्कि practical भी बनता है—especially जब आपको same character को multiple poses में showcase करना हो।
यह Photo Style आपको Exactly क्या देता है?
इस style की सबसे बड़ी खासियत इसकी visual consistency है। मतलब character का face, hair, glasses, और overall design हर frame में same रहता है, लेकिन expressions बदलते हैं। यही चीज़ इसे avatar sheet, character reference, or social media design के लिए perfect बनाती है। “Happy smile” pose उस sheet का one of the most attractive expressions बन जाता है क्योंकि यह warm, cheerful, and easy to connect वाला feel देता है।
Lighting आमतौर पर soft cinematic होती है, जिससे character ज्यादा polished और premium दिखाई देता है। Background clean white रखा जाता है, ताकि focus पूरी तरह character पर रहे। Colors vibrant होते हैं, लेकिन cluttered नहीं—यानी हर outfit और expression अलग दिखता है, फिर भी image neat रहती है। Composition grid-based होती है, इसलिए यह design studio output जैसा organized लगता है।
इस style में realism और cartoon aesthetics का balance भी important है। चेहरा realistic details के साथ stylized दिखता है, जिससे output juvenile नहीं बल्कि modern 3D animation जैसा लगता है। अगर आप thumbnail, profile reference, sticker pack, या AI-generated character set बना रहे हैं, तो यह look visually strong और reusable रहता है।
- Soft cinematic lighting for smooth, premium finish
- Clean white background for distraction-free presentation
- Vibrant yet balanced colors for each outfit
- 3D Pixar-style cute realism for expressive character design
- Grid layout that works well for reference sheets and showcases
Mobile Par Happy Smile Prompt Kaise Use Karein: Step-by-Step Guide
अगर आप beginner हैं, तो इस तरह के prompt को use करना मुश्किल नहीं है। बस आपको सही app, सही input, और सही image reference समझना होगा। सबसे पहले अपने phone में कोई AI image generator, editing app, या prompt-based art tool खोलें जो text prompt accept करता हो। फिर image generation section में जाएँ और prompt paste या type करें।
अगर आप reference image use कर रहे हैं, तो उसे upload करने के बाद prompt को clearly define करना जरूरी है। उदाहरण के लिए character ka face, expression, outfit, background, और style details properly mention होने चाहिए। इससे tool को समझने में आसानी होती है कि आपको एक cheerful happy smile वाला stylized avatar चाहिए, न कि random cartoon image।
नीचे simple mobile workflow दिया गया है, जिसे कोई भी follow कर सकता है:
- अपनी AI art app या editing tool खोलें.
- New project या image generation option चुनें.
- Reference image हो तो upload करें, वरना blank prompt mode use करें.
- Prompt में character style, expression, outfit, और background details add करें.
- Resolution या aspect ratio सही set करें, खासकर अगर grid sheet बनानी हो.
- Generate button दबाएँ और output देखें.
- अगर face, smile, या glasses सही नहीं लगे, तो prompt को थोड़ा refine करें.
- Best version save करें और जरूरत हो तो gallery में edit करें.
Beginner users के लिए सबसे important tip यह है कि एक ही prompt को बार-बार थोड़ा बदलकर test करें। कभी outfit change करें, कभी lighting tweak करें, और कभी expression focus बढ़ाएँ। इससे आपको समझ आएगा कि कौन-से words output को ज्यादा accurate बनाते हैं।
कौन-सी Photos इस Style के लिए सबसे अच्छी रहती हैं?
अगर आप source photo या reference face use कर रहे हैं, तो photo की quality बहुत matter करती है। सबसे अच्छे results तब आते हैं जब face साफ दिखे, angle बहुत extreme न हो, और lighting even हो। इस style में character sheet जैसा look चाहिए होता है, इसलिए blurry, dark, or heavily filtered photos avoid करना बेहतर है।
Angle की बात करें तो front-facing या slightly turned face सबसे अच्छा काम करता है। इससे glasses, smile, and hair details easily readable रहते हैं। High resolution image use करें ताकि AI model या editing tool facial structure को सही समझ सके। Background simple होना चाहिए—plain wall, soft indoor background, या minimal setting ideal रहती है।
Clothing भी important है, खासकर अगर आप consistent character design चाहते हैं। Solid colors, casual tops, sweaters, hoodies, or simple layered outfits ज्यादा अच्छे दिखते हैं क्योंकि ये face expression से attention नहीं हटाते। Bright patterns, very busy prints, या very dark clothes कभी-कभी details hide कर देते हैं।
- Angle: front-facing या slight angle best रहता है
- Resolution: high-resolution photo use करें
- Lighting: soft natural light या indoor even light बेहतर है
- Background: plain, clean, or minimal background choose करें
- Clothing: simple sweaters, tees, hoodies, या solid colors use करें
- Face visibility: glasses, smile, और hair clearly visible होने चाहिए
अगर आप “happy smile” expression को strong बनाना चाहते हैं, तो reference image में eyes and mouth clearly visible होने चाहिए। Half-covered face, harsh shadow, or motion blur output को weak कर सकता है। साफ photo के साथ prompt ज्यादा natural, cute, and polished result देता है—जो Om Editing Top style की core strength है।
Om Editing Top: Pro Tips for the Best Results
अगर आप this style style में सबसे clean और attractive output चाहते हैं, तो सबसे पहले character consistency पर ध्यान दें। Same face structure, same hair shape, और same glasses style रखने से 3D avatar sheet ज्यादा professional लगता है और हर pose में character पहचान बना रहती है।
Lighting भी बहुत बड़ा role निभाता है। Soft cinematic light, balanced shadows, और clean background आपकी edited image को sharp और premium look देते हैं। अगर colors बहुत harsh होंगे, तो expressions उतने natural नहीं लगेंगे; इसलिए vibrant होने के साथ-साथ harmony भी बनाए रखें।
Best result के लिए कुछ practical tips follow करें:
- Face proportions को हर pose में consistent रखें, ताकि avatar अलग-अलग character न लगे।
- Outfits में variety रखें, लेकिन color palette को coordinated रखें।
- Expressions को clear और readable बनाएं, खासकर wink, happy smile, laughing, और cool look जैसे poses में।
- White या light background use करें ताकि focus सीधे character पर रहे।
- High-detail finishing रखें, लेकिन overediting से बचें, वरना image artificial लग सकती है।
- Grid layout को neat रखें ताकि social media या portfolio use के लिए image ज्यादा organized दिखे।
This Style: Common Mistakes to Avoid
बहुत लोग editing में detail जोड़ते-जोड़ते image को cluttered बना देते हैं। जब background, clothes, and facial effects सब बहुत heavy हो जाते हैं, तो cute stylized look खो जाता है। इस type की avatar sheet में simplicity और polish दोनों जरूरी हैं।
एक और common mistake है expressions को too exaggerated बनाना। अगर हर face pose बहुत extreme होगा, तो consistency टूट जाएगी और sheet less usable लगेगी। वहीं कुछ लोग outfits में बहुत random colors डाल देते हैं, जिससे overall composition unbalanced हो जाती है।
- Inconsistent face shape: अलग-अलग poses में चेहरा बदलने से character identity कमजोर होती है।
- Too much background detail: clean avatar sheet का focus character होना चाहिए, background नहीं।
- Clashing colors: बहुत loud colors मिलकर image को messy बना सकते हैं।
- Weak expression variety: अगर सभी poses similar लगेंगे, तो sheet कम engaging होगी।
- Unbalanced lighting: harsh shadows या overexposure से details lose हो जाती हैं।
- Poor spacing in grid: poses close या uneven हों, तो design cramped दिखता है।
इन गलतियों से बचकर आप अपने this prompt results को ज्यादा polished, eye-catching, और reusable बना सकते हैं। खासकर when the image is meant for posts, thumbnails, or digital branding, clean execution बहुत matter करती है।
Best Use Cases for These Images
इस तरह की cute avatar sheet का use बहुत versatile होता है। अगर आपका goal Instagram content, profile branding, या character-based visuals बनाना है, तो this look style images तुरंत attention grab करती हैं। Multiple expressions होने की वजह से एक ही design को कई जगह इस्तेमाल किया जा सकता है।
Creators इसे reels covers, story highlights, digital portfolios, या even fan pages के लिए use करते हैं। 3×3 grid format खास तौर पर उन लोगों के लिए useful है जो एक single image में कई moods दिखाना चाहते हैं, बिना बार-बार नया design बनाए।
- Instagram posts: cute and trendy feed visuals के लिए perfect.
- Profile pictures: friendly, expressive, और memorable avatar identity के लिए.
- Thumbnails: eye-catching expressions click-through बढ़ाने में मदद करते हैं.
- Portfolios: character design skills दिखाने के लिए useful.
- Reels covers: content series को consistent look देने के लिए.
- Brand pages: mascot-style representation के रूप में भी use किया जा सकता है.
अगर आप personal branding कर रहे हैं, तो ऐसे images आपके online presence को more approachable बनाते हैं। Cute smile, friendly wave, and laughing expressions viewers के साथ emotional connection बनाते हैं, जो digital content में काफी valuable होता है।
This Style Variations You Can Try
अगर आप same concept को different style में experiment करना चाहते हैं, तो mood और color variation सबसे आसान तरीका है। yeh style look को playful, cozy, bold, या soft aesthetic में बदला जा सकता है, बस outfit tones और lighting को थोड़ा adjust करके।
Season-based variations भी बहुत अच्छे लगते हैं। Winter vibe के लिए sweaters और cool tones, summer look के लिए bright shirts और sunny warmth, या festive feel के लिए more vibrant accents use किए जा सकते हैं। इससे आपकी avatar sheet same theme पर रहते हुए भी नया feel देती है।
- Mood variations: cheerful, dreamy, confident, soft, or playful expressions try करें.
- Color variations: pastel palette, bold neon, warm earth tones, or clean monochrome accents.
- Setting variations: white background, light gradient, studio look, or minimal textured backdrop.
- Seasonal variations: summer casual, winter cozy, spring fresh, or festive bright style.
- Outfit variations: streetwear, school-casual, cozy homewear, or trendy layered looks.
आप glasses, hair shine, pose energy, और accessory styling में भी changes try कर सकते हैं ताकि character fresh लगे, लेकिन core identity same बनी रहे। यही balance this edit content को repeatable और creative दोनों बनाता है।
This Style: Final Thoughts
अगर आप cute, expressive, और well-organized avatar sheet बनाना चाहते हैं, तो this style एक strong and flexible style choice है। इसमें personality, color balance, और visual clarity तीनों का अच्छा mix मिलता है, जो इसे social content और creative projects के लिए highly useful बनाता है।
अब आप pro tips, common mistakes, use cases, और variations को ध्यान में रखकर अपनी own version try कर सकते हैं। सही editing के साथ आपका design ज्यादा polished, engaging, और memorable दिखेगा।
this prompt को एक बार experiment करके देखें, और expressions, outfits, तथा colors के साथ खेलकर अपना perfect cute avatar result तैयार करें।
💬 Comments